Chinese Beef Noodle Soup (Instant Pot cooking)


Beef noodle in soup

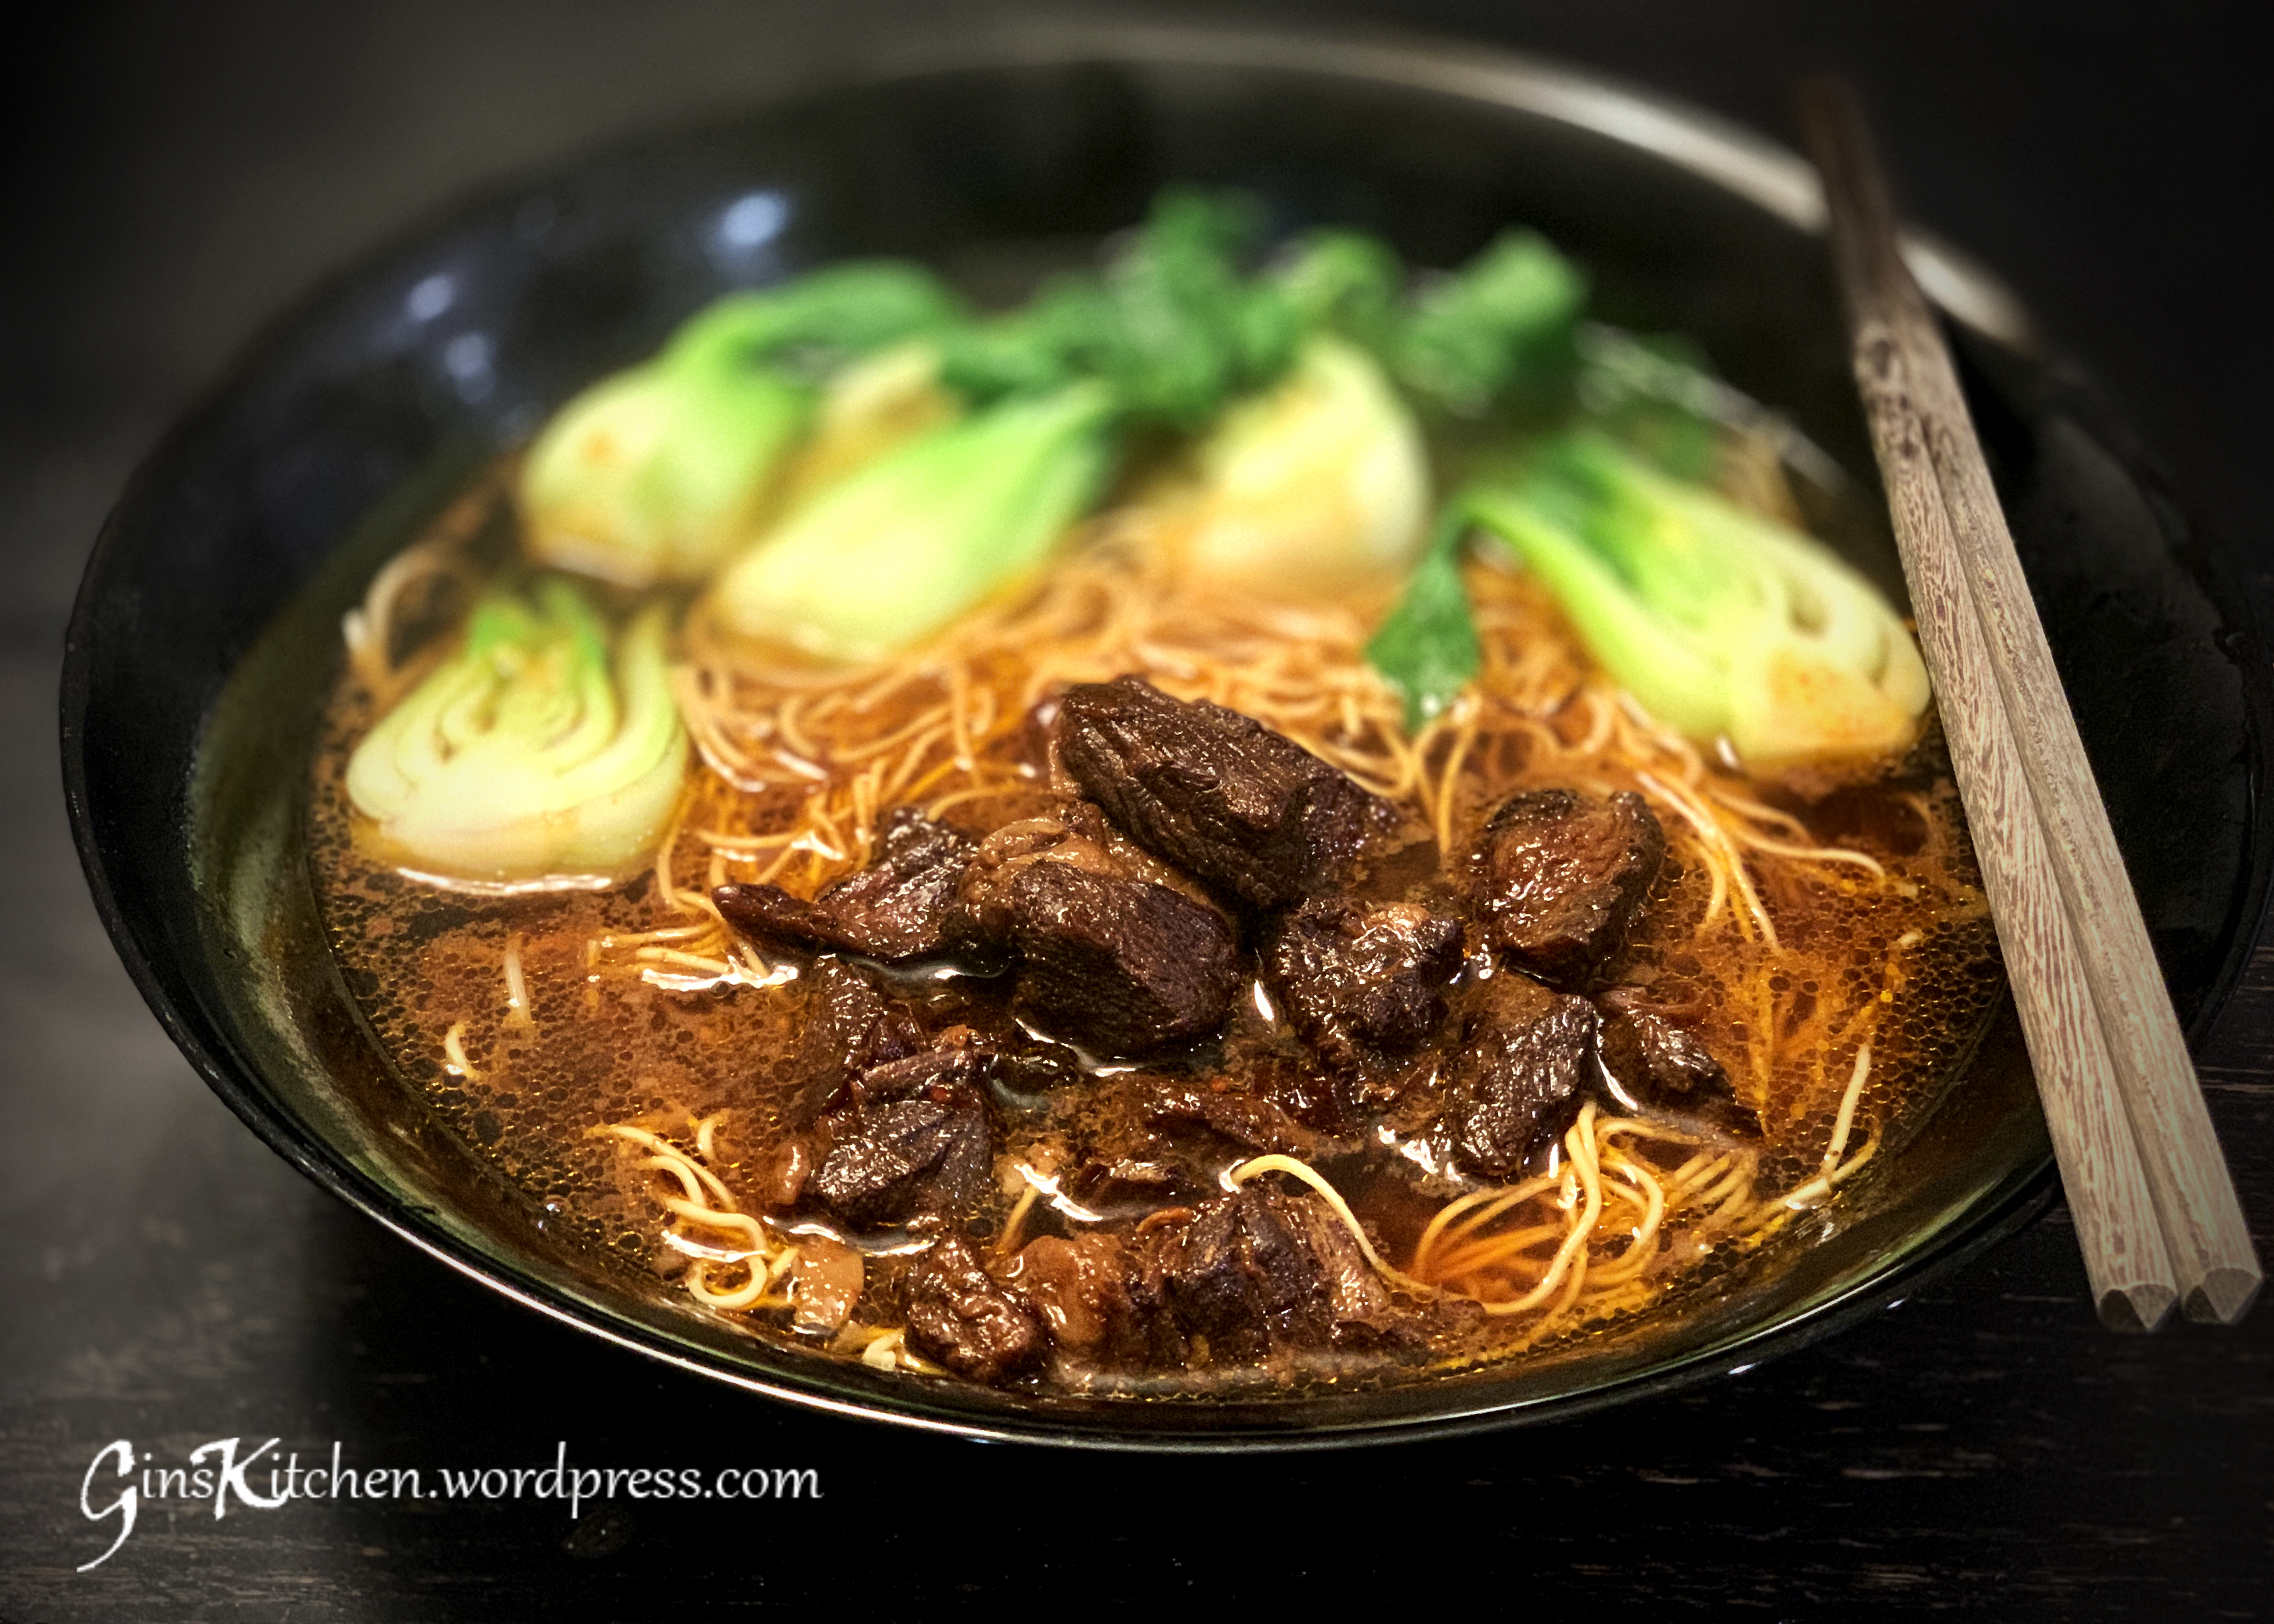
It has been raining for a few days already.  When the weather is cold and wet, a bowl of hot beef noodle soup sounds very comforting.  Noodles are very popular in China, as there are many ways of cooking noodles.  They can be served with sauce or in soup, as well as pan fried or deep fried until crispy.  My favorite way of cooking noodles is to make it in soup.

Beef stew usually takes at least 2 hours to simmer on the stove top, until tender.  However, if you use a pressure cooker, the cooking time can easily be reduced in half.  I’m using my favorite Instant Pot for this dish. Once everything is in the pressure cooker, I can sit back and relax.

Ingredients for Beef Stew (8 servings):

4 poundsBeef stew meat
6 stalksGreen onion
8 slicesFresh ginger
2 wholeAnise star
10Garlic cloves
1White onion
3Tomatoes
5 leavesBay leaf
2Red chili (either fresh or dried)
3 TbspBrown sugar
¾ CupLight soy sauce
¾ CupDark soy sauce
1 ½ CupRice cooking wine
1 ½ CupWater
2 TbspGround Bean Paste (磨鼓醬)
1-2 TbspChili Bean paste (depending on how spicy you want)

Ingredients for noodle soup (4 servings):

8 BundleShrimp noodles/Rice noodles
8 CupsChicken broth
2 CupsBok Choy
1 tspSalt

Directions for making Beef Stew:

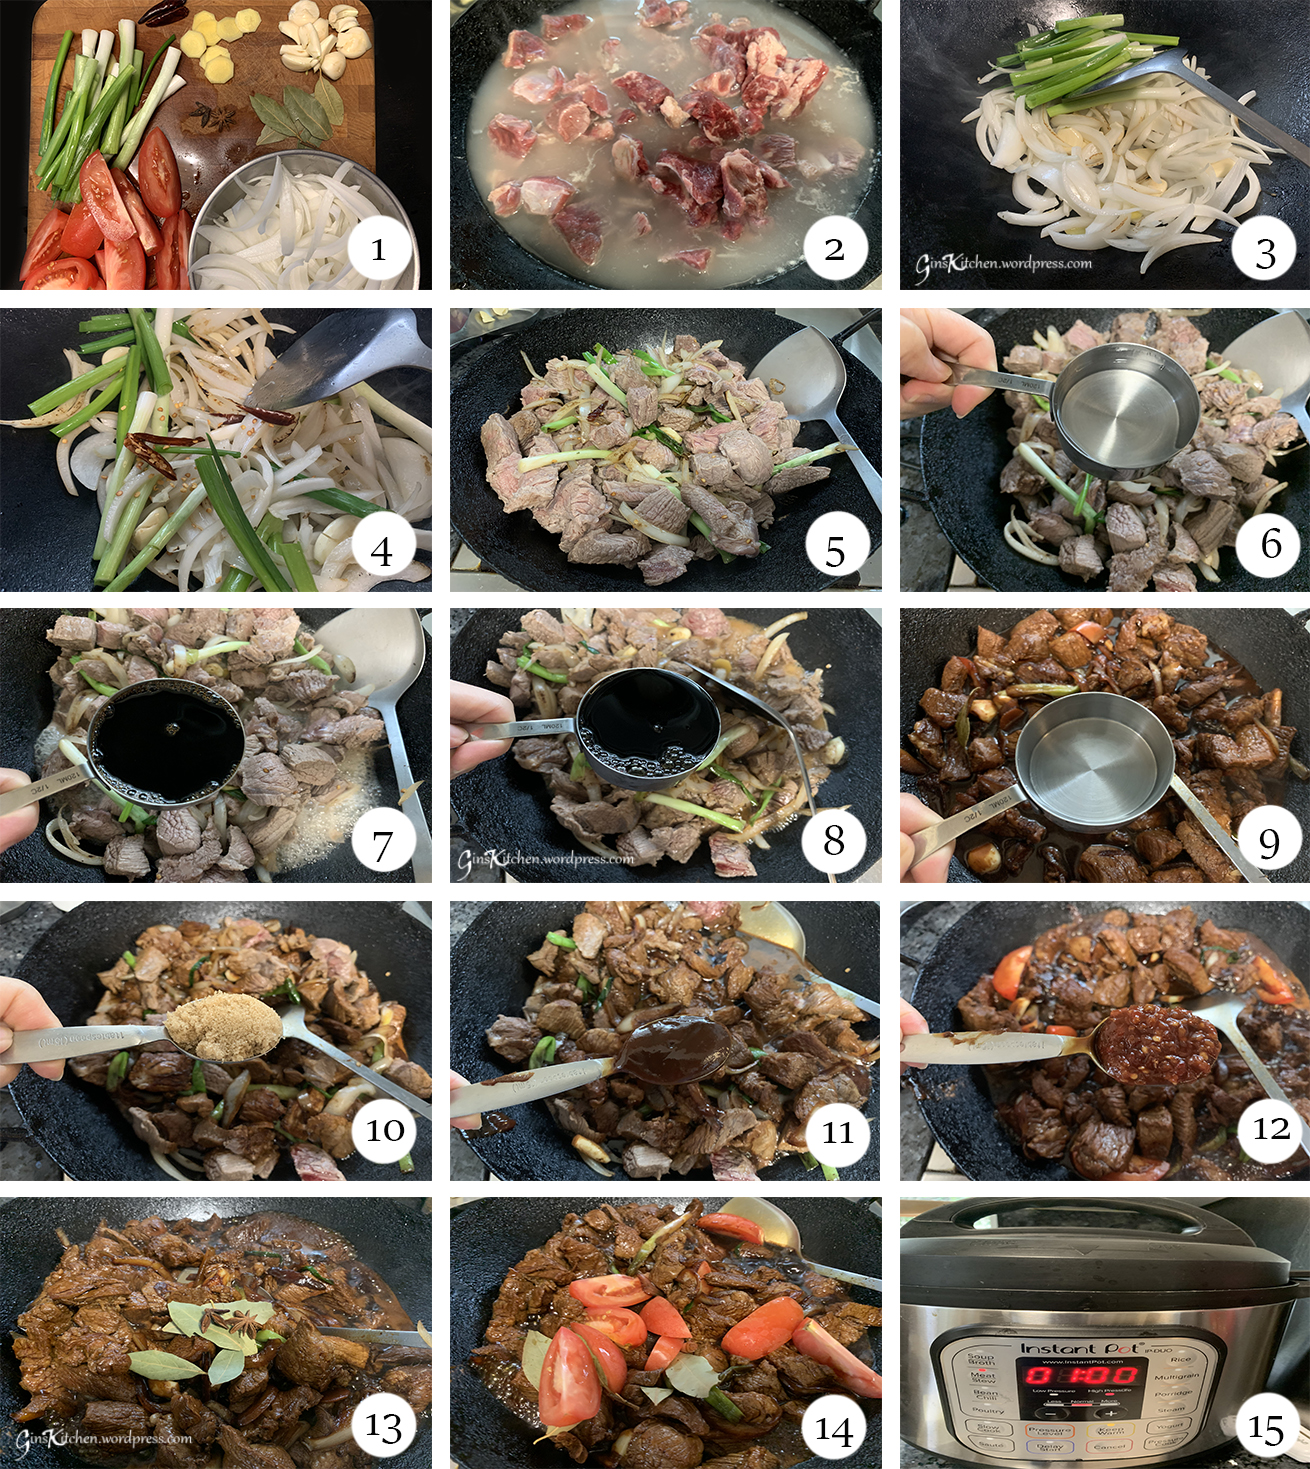
  1. Slice the onion, peel the garlic, halve the red chilies, halve the green onions, slice the ginger root, rinse the star anise and bay leaves.  Set aside (Picture 1)
  2. Bring a large pot of water to a boil, put 4 slices of ginger in the water.  Add beef into the pot and cook for 5 minutes.  Discard the water and rinse beef under running tap water.  Set aside.  (Picture 2)
  3. Add a little oil to the wok, fry onion, garlic, green onion, remaining ginger and red chili. (Pictures 3 & 4)
  4. When onion is a little brown, add in beef and stir for 2 minutes. (Picture 5)
  5. Pour in cooking wine, light soy sauce, dark soy sauce and water. (Pictures 6-9)
  6. Add brown sugar, ground bean paste, chili bean paste, bay leaves and star anise.  (Pictures 10-13)
  7. Add in tomatoes and stir well. (Picture 14)
  8. After the sauce is boiled, transfer everything to the Instant Pot (Pressure Cooker).  Select “Meat Stew” and set timer for 1 hour.  Turn knob to the “sealing” position.  (Picture 15)
  9. When finished cooking, do a quick pressure release before you open the lid.
Beef noodle soup

Directions for making noodles in soup:

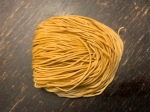
Noodles may be cooked from either their fresh or dry forms.  Below is a picture of the dried shrimp noodle.

IMG_7937
  1. Bring a large pot of water to a boil and cook the noodles according to the package instructions.  Remove noodles from the pot and rinse it under cold water.
  2. Add 8 cups of chicken broth to a pot and bring to a boil.  Add a teaspoon of salt for taste.  The broth can be a little light as we are going to add in a few spoons of the sauce from the beef stew.
  3. When the broth is boiling, add bok choy and cook for 1 minute.
  4. Put noodles and broth in a large bowl, lay bok choy on top and add some beef and its sauce to your bowl of noodles.  Garnish with cilantro or green onions.

Char Siu 义燒 (Chinese BBQ Pork)


Char Siu

I don’t remember which magazine had this recipe, but it was a recipe from the writer’s grandma so it immediately caught my eye!   We all know grandmas’ cooking is always full of delicious recipes created with ‘secret’ ingredients.

It is very important to choose a good piece of meat. For making Char Siu, the best piece is pork butt.  Choose a piece that has more marbling than others as lean pieces will be very dry and won’t be as flavorful as well.  If you still want to keep it healthy and lean, I’d recommend using pork neck since the texture is more tender yet lean (the pictures below in the collage show pork neck).

Ingredients:

2 poundsPork Butt
4 TbspGranulated sugar
2 TbspLight soy sauce
2 TbspDark soy sauce
2 TbspHoisin sauce
2 TbspRice cooking wine
2 TbspGround bean paste
2 tspSesame oil
1/4 tspGround white pepper
2 TbspHoney

Directions:

  1. Quarter pork butt lengthwise.  If you use pork neck, you don’t need to cut it.  In a small bowl, combine sugar, soy sauce, hoisin sauce, rice wine, ground bean paste, sesame oil, pepper, and stir to combine (save the honey for later).  Pour mixture over pork, making sure it is well coated.  Cover the container with plastic wrap and refrigerate overnight, turn pork at least once.  (picture 1)
  2. When ready to roast, let pork come to room temperature and let it sit for at least 30 minutes. Preheat broiler, place a rack in a roasting pan or use a broiling pan.  Add enough hot water so that it reaches a depth of ¼ inch in the pan.  Brush the broiling pan with oil so meat won’t stick to the pan.  (Picture 2 and 3)
  3. Place pork on rack, discard marinade.  Carefully place pan under broiler (pork should be about 4 inches from broiler element), and broil until meat is just beginning to char slightly, about 15 minutes.  Brush with honey and broil for 2 more minutes (Pictures 4 and 5)
  4. Turn pork and repeat Item 3 above.
Cha Siu collage

Let the meat rest for 5 minutes and cut into slices.

IMG_E1614

Served with rice and your favorite side dishes, or you can make noodles in soup.

BBQ Pork with noodles

Egg Waffle / Bubble Waffle / Egg Puff / Gai Daan Jai (雞蛋仔)


Egg Waffles - 3

Since I mentioned in my Boot Jai Go post that one of the most popular Hong Kong street vendor’s snacks is egg waffle, I must introduce and record a recipe on my blog.  According to Wikipedia, egg waffles were ranked No.1 in a 100 most popular Hong Kong street snack listing.  There are many English names (bubble waffle, egg puff, eggettes, just to name a few), but its Cantonese name is Gai Daan Jai (meaning little eggs).  One story says the enterprising post-war generation created the egg-shaped mould to make up for an eggless batter as eggs became a luxury in China.  Grocery stores would take the cracked eggs and sell the perfect eggs to customers.  Throwing away the cracked eggs would be a waste of money, so they turned the eggs into batter and sold them as waffles.  After making the egg waffles with the semi-spherical cell pans (pan base is deeper and the cover is shallower), they look like small eggs.  I guess this is how it got its name “little eggs”.

Ingredients:  (makes 5)

210gAll purpose flour
10gBaking powder
15gCustard powder
42gTapioca starch
3Eggs
210gGranulated Sugar
42gLow fat milk
210mlVery cold water
42gVegetable oil
3 drops (slightly less than ¼ tsp)Vanilla extract

Directions:

  1. Measure all ingredients, set aside.  (picture 1)
  2. Pour all ingredients into a blender (except vegetable oil and vanilla extract), blend until well mixed.  (picture 2)
  3. Add in vanilla extract and oil and blend until combined.  (pictures 3 and 4)
  4. Strain the batter through a sieve.  (picture 5)
  5. Warm up each side of the mould and brush a thin layer of oil on each side. (picture 6)
  6. Pour the egg batter onto the mould with a ladle and close the mould.  Hold the handles firm to keep two sides tight.   I turned the fire to medium high.  (picture 7)
  7. After 1-2 minutes, flip the pan and cook for 1-2 minutes.  You can slightly open the pan to check if the the waffle is slight brown.  (picture 8)
  8. Remove the egg waffle from the mould with a fork and place it on a cooling rack.  (picture 9)
Egg Waffles Steps

It should be served hot or warm (cold is not as good). The waffles are crispy on the outside, soft and chewy on the inside.Egg Waffles - 2

This egg waffle mould/pan makes waffles over the stove.  For first time use, clean the pan thoroughly. The first 2 waffles should be discarded.  There are some fancy electricity-powered makers that make perfect egg waffles and you don’t need to pay too much attention to the cooking process or need any skill.   However, one owner of the waffle shop said “If the skill isn’t there, it doesn’t matter how good your ingredients are.”  IMG_9924

Note:  Some recipes say the batter should be refrigerated for at least an hour in order to make a perfect egg waffle.  To skip this step, I substituted room temperature water with icy-cold water.  The result is the same.

Yummy!Egg Waffles - 4

Rose Shaped Steamed Buns/Mantou (玫瑰花饅頭)


Rose Shaped Mantous

My friend, Janet who loves to cook and bake, was nice to share her buns with me last week.  It was a lovely purple color as it was made with purple yam.  When food is turned into an art piece, it makes the food more appealing.  Since it tasted and looked so good, I decided to make some, but with carrot juice to get a bright orange color.

I posted a recipe for making the milk mantou 4 years ago, and I used that recipe for the white petals.  Both milk mantou and carrot juice mantou recipes are listed below (for a total of 24 pieces).

Ingredients for orange petals:

500gAll purpose flour
300mlCarrot juice
35gSugar
5gYeast
1/4 tspSalt
1 TbspVegetable oil

Ingredients for white petals:

500gAll purpose flour
300mlFat free milk
35gSugar
5gYeast
1 TbspVegetable oil

Directions:

You will need 3-4 carrots to get 300ml of carrot juice depending on the size of the carrots.

Carrot juice
  1.  Prepare all ingredients, one set for the orange petals and one set for the white petals.  Combine all ingredients for the orange petals in a mixing bowl, attach the dough hook and mix the ingredients with low speed.  Knead the dough until smooth (about 10 minutes).  Let the dough rest for 10 minutes.  Repeat this step for the ingredients for the white petals (pictures 1, 2 and 3).
  2. During the 10-minute resting period, make sure to cover the container with plastic wrap.  (picture 4)
  3. Take the dough out, punch down with your hands to deflate, and cut into half.  Cover the second half with plastic wrap to keep it soft.  Roll out the dough and roll it tightly to form a log.  (picture 5)
  4. Cut the log into pieces and each piece should weigh about 20g.  Cover pieces with plastic wrap. (picture 6)
  5. Repeat steps 3 and 4 for the orange petals.  (picture 7)
  6. Roll each piece thinly like gyoza wrappers.  (picture 8)
  7. You will need 3 pieces of the orange dough and 3 pieces of the white dough, alternate the colors. (picture 9)
  8. Roll the dough up (roll from the right hand side) to form a small thick log.  (picture 10)
  9. Cut the rolled up dough in half from the center.  When you turn the dough up, you will see the pretty rose shape and shape the petals with your fingers.  (picture 11)
  10. Pour some cold water in the bottom of the steamer.   Place rose shaped buns in the steamer lined with parchment paper, cover and let the buns rise for 20 minutes.   Make sure to space out the buns (picture 12)
  11. After the final rise, boil water and steam the buns for 15 minutes until they are cooked and puffed.
steps
Mantou 1

Note:

  • Don’t skip the final rise, otherwise the bun outer layer won’t be fluffy.
  • Don’t uncover the pot right away after steaming, leave the buns covered in the pot for another 15 mins.  This is to prevent the buns from shrinking.

Mini Red Bean Pudding Cake (砵仔糕 Boot Jai Go / Put Chai Ko)


boot-chai-go

Boot Jai Go aka Put Chai Ko is a popular snack sold by street vendors in Hong Kong.  Traditionally, these pudding cakes were steamed in earthen bowls, which in Chinese means “Boot Jai”.  This is how it got its name “Boot Jai” pudding.  These pudding cakes are made from white or brown sugar, rice flour and wheat starch.  Sometimes red bean is also added.  I still remember during my childhood in Hong Kong, the hawker removed the pudding cake from a porcelain bowl by inserting two bamboo sticks and we just held the skewers while eating them.  Besides the Egg waffles, Boot Jai Go is one of Hong Kong’s must try street vendor’s snacks.

Today, I made these pudding cakes using mini muffin trays.  I made two types, one with brown sugar and one with white sugar and coconut cream.  I also made some without red bean as my daughter likes them plain.

Brown Sugar Boot Jai Go:

Ingredients:

60gWheat Flour 澄麵
90gRice Flour 粘米粉
110gDark Brown Sugar 黑蔗糖
2 cupWater 水
1 cupCooked red beans 熟紅豆
ingredients

Directions:

  1. Pour 1/2 cup of red bean and 1-1/2 cup of water into the pressure cooker, and set the pressure cooking time to 25 minutes (sugar can be added depending on your preference).  Discard water once red bean is cooked and set aside;
  2. Combine wheat starch and rice flour in a big bowl, add 1 cup of cold water to the flour mixture and mix well, make sure the batter has no lumps (picture 1);
  3. In a small pot, combine 1 cup of water and 110g of dark brown sugar, bring to a boil until sugar is dissolved (picture 2);
  4. Quickly pour the hot sugar water into the batter, mix thoroughly (picture 3);
  5. Scope out the batter to a mini muffin tray with a ladle (while transferring the batter, keep mixing the batter as the starch tend to sink to the bottom) (picture 4);
  6. In a big steamer/wok, bring water to a boil.  Transfer the muffin tray to the steamer and steam over high heat for 3 minutes.  Then add red bean to the middle of each pudding and continue steaming for 7 minutes.  If you want to make the plain pudding with red beans, just steam it for 10 minutes straight (picture 5).
puding-cake

Coconut Boot Jai Go:

  1. Replace brown sugar with white sugar, also 110g (picture A);
  2. Instead of 1 cup of boiling water, combine 1/2 cup of water and 1/2 cup of coconut cream (pictures B & C);
  3. Pour sugar, water and coconut cream into a pot, bring to a boil (picture D);
  4. Repeat steps 4-6 above.
coconut-rice-cake

Note:

  • It’s normal that the cake droops in the middle after steaming.
  • You will need to steam this for 30 minutes or so if you use a porcelain bowl depending the size of the bowl.  Red bean can be added to the batter just prior to steaming.
dsc_6560

Sous Vide Soy Sauce Chicken


soy-sauce-chicken

Sous vide cooking is new to me, a lot of my friends have already owned a Sous Vide Precision Cooker for a couple of years.  I heard many good things about it but never thought about buying one until after the Thanksgiving holiday when there was a big sale.  I purchased mine (Anova brand) and used it the very first time yesterday.  Basically sous vide cooking is putting food in a bag and cooking it in a water bath.  This technique is about bringing food up to a precisely controlled temperature to deliver super-juicy, flavor-packed results throughout the entire piece of meat.  I personally don’t like the idea of cooking food in a plastic bag, but if I use those vacuum sealer bags that are BPA free, I think that is acceptable.  Below is my first recipe – A Chinese soy sauce chicken –  the meat was cooked just right, very tender and juicy.  Please note this soy sauce chicken doesn’t need the searing step after the water bath.

Ingredients:

13-4 pound free range brown chicken 黃毛雞
3 slicesFresh ginger
3Star anise
3Bay leaves
2 stalksGreen onions
6 clovesGarlic
7 TbspBrown sugar
300mlLight soy sauce
300mlWater
2 TbspMei Kuei Lu Chiew (Cooking wine) 玫瑰露酒

Directions for making the sauce:

  1. Measure all ingredients and set aside (picture 1).
  2. Add a tablespoon of cooking oil to the frying pan, stir in ginger, garlic and green onion and cook for a minute. (pictures 2)
  3. Add a tablespoon of Mei Kuei Lu Chiew (cooking wine) and then add in 300 ml water. (pictures 3-4)
  4. Add in sugar, anise and bay leaves. (pictures 5 and 6)
  5. When the liquid is boiling, add a tablespoon of Mei Kuei Lu Chiew (cooking wine) and soy sauce. (pictures 7 and 8)
  6. Turn off fire after the sauce is slightly bubbling, transfer the sauce into a bowl and let it cool. (picture 9)
sauce

Directions for sous vide cooking:

  1. Bring a pot of water to a boil and put the whole chicken in for 30 seconds to 1 minute.  This step will firm the chicken skin and allow the sauce to coat the chicken evenly.  (picture a)
  2. Fill a pot of water, clip the Anova Sous Vide Precision Cooker to the side of the pot, download the app and connect Anova to your phone.  Use the phone to set the temperature that you want the food to finish at. For this chicken, I set it to 155.5 for 6 hours.
  3. While the cooker is heating up the water, put chicken in a bag and pour sauce into the bag.  Toss the chicken to make sure sauce gets on all sides.  (pictures c and d)
  4. When water has reached the desired temperature, seal the bag using the water immersion technique (drop the bag into water slowly and air will come out, use binder clips to secure the bag).  Place the bag in the water bath and let it cook for 6 hours.  (pictures e and f)
  5. When the timer goes off, remove the bag from the water bath.  Take out the chicken and let it cool.  You can save the sauce and use it next time, just re-boil and freeze in the freezer.
anova

Let the chicken rest for 10 minutes before cutting.  Serve with white steamed rice.

hal_5642

Traditional Mooncakes 廣式月餅


Mooncakes.jpg

I made these traditional mooncakes two years ago with a 63g mooncake mold.  I’m posting this again with the ingredients for a 75g mold.  Please plan ahead of time as (i) the paste needs to be made and refrigerated (or you can buy the paste from a store), and (ii) the skin normally needs to rest for 2 days after baking to get the best texture,  called “回油” in Chinese.  If you have a sweet tooth, you may want to increase the sugar amount as my recipe is a healthier version – less sugar and less oil.

moon-cakes

Ingredients for Lotus Paste (yield: 17 pieces – 23g each paste ball):

400gLotus seeds
240gSugar
200mlGrape seed oil/Olive oil
2 TbspsHoney
2 TbspsCondense milk
1/4 tspSalt

Directions for making the lotus paste are in my previous mooncake recipe here.

Ingredients for making the dough:  (yield: 17 mooncakes – 52g each dough ball) 

200gAll purpose flour
140gGolden Syrup (recipe courtesy of Christine Ho – here)
1 tspAlkaline water
50g/mlGrape seed oil
  
Fillings: 
900gLotus Paste
9Salted Egg Yolks
1 TbspRose-flavored cooking wine (玫瑰露酒)
1Egg (for egg wash)

Directions: (The dough/filling ratio is 3:7)

  1. Mix salted egg yolks with wine. Wipe dry the yolks with kitchen paper after a few minutes.  Cut each into two halves. Set aside.  (Note: if you don’t want to use cooking wine, you can use salt water to rinse the egg yolks to remove the excess egg whites).
  2. Place golden syrup in a bowl.  Add in alkaline water, stir to combine. Add in oil and mix well.
  3. Add flour into the syrup mixture and combine well. Gently knead the dough till smooth (takes 1~2 mins). Shape it into a round ball and wrap with cling wrap. Leave it in the fridge to rest for at least 2 hours or overnight.
  4. Before making mooncakes, bring the dough to room temperature for 30 mins. Divide dough into 17 equal portions, each weighs 23g.  Roll each portion into a ball shape.  Divide lotus paste into 17 equal portions as well, each weighs 52g, the salted egg yolks are roughly 5g each half.  (Pictures 1-3)
  5. Take a lotus paste ball and poke a hole in the middle with your finger. Place egg yolk inside. (Picture 4).
  6. Flatten each dough into a small disc with a rolling pin. The dough is sticky, I suggest putting a piece of cling wrap on top and roll it out.  (Picture 5)
  7. Wrap the dough around the filling and shape it into a ball. (Picture 6)
  8. Lightly dust the stuffed dough with some flour and lightly dust the mold.  Place the stuffed dough into the mooncake mold.  Tip:  When wrapping the filling, the dough is thicker on the closing end, the thicker side of the dough should go into the mold first as you will get the pattern pressed on this side.  (Picture 7)
  9. Press the handle, then remove the mooncake from the mold.  Dust off any excess flour with a brush.  (Pictures 8-9)
  10. Line the baking sheet with parchment paper and place mooncakes on top.
  11. Preheat oven to 350F. Prepare the egg wash by whisking the egg, sift through a fine sieve.
  12. Lightly spray some water on the mooncakes. (Note: this step prevents the mooncakes from cracking during baking.)   (Picture 10)
  13. Position the rack in the upper third of the oven and bake for 10 mins. Remove from oven and leave to cool for 15mins (Note:  this step helps stabilizing the pattern on top).
  14. After 15 minutes, brush the top with very little egg wash (Note: too much egg wash, the pattern will disappear after baking). Return to oven and change the oven temperature to 325F and continue to bake for another 25-30 mins. (Picture 11)
  15. After baking, the skin doesn’t have the shiny look (picture 12).  Leave mooncakes to cool completely and store in air tight containers. Wait for 2 days before serving, the skin will become soft and shiny, called “回油” in Chinese.
mooncake-steps

This is the clear pattern before baking.

moon-cake-print

I ordered this customized mooncake mold in Hong Kong.  The disk can be removed for easy cleaning.  I personally do not like anything bigger than 75g or smaller than 63g.  However, you may like the 100g as it’s easier to work with.

hkg_4703

I also bought these containers and bags in Hong Kong.  They look nice and neat when giving them as a gift.hkg_4789

Pandan Snow Skin Mooncakes


Snow mooncakes

Last year around this time, I made the traditional mooncakes.  If you never heard of the Mid-Autumn Festival (aka Moon Festival), a brief introduction is on that page.

I spent a month in Hong Kong this summer and ordered a customized mooncake mold which engraved with my blog’s name “Gin’s Kitchen”.  So I’m very excited to use it for the very first time today.

As you can see from my posts, I am a big fan of Christine Ho.  I like a lot of her recipes, including this Pandan Snow Skin Mooncake recipe.  Happy Moon Festival!!

Ingredients: (makes 10 mooncakes with a 75g mold)

55gGlutinous rice flour
45gRice flour
25gWheat starch
60gCaster sugar
190mlNon-fat milk
30mlCondensed milk
25mlVegetable oil
40mlPandan juice
3 dropsPandan paste
2 TbspCooked glutinous rice flour (for coating
Mung bean filingPls see Christine’s recipe here

Directions:

(I’m using a 75g mold and the ratio for filling and dough is 2:3)

  1. To make the pandan juice, steam the frozen pandan leaves for about 10 minutes in a steamer, then cut leaves into small pieces and blend with a food processer.  (picture 1)
  2. Use a cheesecloth to squeeze out the pandan juice.  (picture 2)
  3. Combine all types of flour and sugar in a mixing bowl. Set aside.
  4. In a separate bowl, mix milk, condensed milk, pandan juice and oil together and pour into the flour mixture. Mix until there is no lump. Pass through a fine sieve to have the finest texture. (picture 3)
  5. Steam the batter in a steamer over medium-high heat for about 20 minutes. Remove from the steamer and let it cool. Lightly knead dough by hand and until smooth. (picture 4)
  6. Cut dough into 10 portions, about 45g each.  Mung bean filling should be 35g each, roll each into a round shape.  (pictures 5 and 6)
  7. Wrap each filling ball with a dough and shape it into a ball.  (picture 7)
  8. Lightly dust the mooncake ball and dust the mooncake mould with cooked glutinous rice flour, shake off excess four from the mold. Place the mooncake ball in the mold and press to print the pattern. Repeat this step for the rest of the dough and fillings.  (pictures 8 and 9)
  9. Refrigerate overnight.
Snow Mooncakes

The flour help remove the mooncake from the mold easily.  You don’t need to worry about the excess flour (see picture below) as you can use a clean brush to brush it off.

mooncake
Mooncake
Moon Cake Mold

Pineapple Bun (Bo Lo Bao 菠蘿包)


Pineapple Buns

For years I had no idea why this bun was named “Pineapple Bun” 菠蘿包 as it contains no pineapple.  Instead, the name comes from its appearance where the sugary/buttery crust resembles a pineapple.  The traditional crust of the bun is made of lard, but this recipe (original recipe from Christine Ho) substitutes lard with butter for a slightly healthier version.  Everyone knows what is a Bo Lo Bao in Hong Kong.  It is very popular, and commonly found in bakeries, just like muffins and bagels in the States.  We eat it for breakfast (plain), lunch (with meat filling) or dessert (with custard or shredded coconut filling).  The plain one is still one of my favorite bakery items! If you ever get a chance to visit Hong Kong, pineapple buns are a must try item so make sure you grab one at the bakery.

Ingredients for Bread:

350 gm
70 gm
4 gm
56 gm
10 gm
6 gm
120 gm
125 ml
30 gm
Bread flour (高筋粉)
Caster sugar (幼砂糖)
Salt (鹽)
Whisked egg  (全蛋汁)
Milk powder  (奶粉)
Instant dry yeast  (即發乾酵母)
Tangzhong  (湯種) (recipe here)
Milk  (牛奶)
Unsalted Butter, softened  (無鹽牛油)

Ingredients for Topping:

188 gm
83 gm
60 gm
11 gm

1½ Tbsp
1½ tsp
¼ tsp
Cake flour  (低筋粉)
Caster sugar    (幼砂糖)
Butter, softened    (無鹽牛油)
Milk powder    (奶粉)
Egg yolk  (蛋黃)
Evaporated milk    (淡奶)
Condensed milk    (煉奶)
Edible ammonia powder  (食用臭粉) – Optional (see notes)

Directions:

To make topping:

  1. Cream softened butter with an electric mixer over medium speed until smooth. Add sugar and continue to beat until fluffy.
  2. Add milk powder, egg yolk, evaporated milk, condensed milk, baking powder, combine well.  Sift in flour and ammonia powder (optional) and incorporate well. The mixture is quite moist and sticky. Use a piece of cling wrap to roll into several small logs. Chill for 30 to 40 minutes. When it becomes harder, it’s ready to use and shape it.

*  Keep the extra egg yolk and egg white for egg wash.

To make buns:

  1. Place all ingredients inside the pan in the breadmaker, the wet ingredients first, then followed by the dry ingredients: tangzhong (recipe here), milk, whisked egg, sugar, salt, milk powder and flour.  Fill the yeast dispenser with dry yeast (usually it is on the top of the breadmaker).
  2. Select the “dough” mode (refer to the manual of your breadmaker to select the dough program).  When all ingredients are combined, add butter.  The kneading process in the breadmaker is usually about 30 minutes, and the proofing time is about an hour (depending on the machine).
  3. When the first round of proofing is finished, transfer the dough to a clean floured surface and deflate the dough (Picture 1).
  4. Divide into 12 equal portions and roll each portion into a ball (Picture 2).  Place dough on a parchment-lined baking sheet.  Let them complete the 2nd round of proofing until nearly doubled (if weather is too cold, you can proof at 90◦F in an oven with a pot of boiling water for 30 to 50 minutes.  The water will keep the humidity at certain level).
  5. When the dough portions are doubled in size, preheat oven to 410°F.  Remove topping paste from fridge, cut into 12 equal portions and roll in balls.  Roll each portion into a flat disc (Picture 3).
  6. Place the topping paste on top of dough.  Repeat this step with the remainder (Picture 4).
  7. Brush the top with whisked egg yolk and bake in a preheated oven for 5 minutes (Pictures 5 and 6).  Reduce the temperature to 350°F and bake for another 10 minutes.

Pineapple buns

Notes:

  • If you don’t have condensed milk, increase the total sugar amount to 140g.
  • Ammonia powder can be substituted with 1/2 tsp baking powder, 1/2 tsp baking soda.
  • Ammonia powder is quite hard to work with and not easy to find.  If use too little, you’d be disappointed with the patterns appear on the topping (no crackling patterns).  If use too much, your buns will smell weird.  So, this ingredient can be omitted.  Instead, you can use a sharp knife to make criss crosses, like a checkboard across the top of the topping.
  • If you do not have a breadmaker, you can knead the dough with your hands.  Make a well in the center of the flour, whisk and combine all wet ingredients, then add into the well of the dry ingredients. When all ingredients are combined, knead in the softened butter.  The dough is quite sticky and messy at this stage.  Keep kneading until the dough is smooth, not sticky and elastic. Shape dough into a ball.  Place in a greased bowl and cover with a wet towel or cling wrap. Let it proof till it’s doubled in size, about 40 minutes.

Bo Lo Bao

Chinese Tamales (Zongzi 咸肉粽)


Chinese Tamales

One of the famous festivals in China is Dragon Boat festival (端午節).  This festival commemorates the patriotic poet Qu Yuan (屈原) who died on the fifth day of the fifth month in the Chinese lunar calendar.  Like other Chinese festivals, there is also a legend behind it.  You can read the long story online and learn why Dragon boat racing and eating Zongzi have become the central customs of the festival.

This year, the festival falls on June 12 and I can see a lot of Chinese people at the market getting ingredients to make Zongzi.  Zongzi (also called Zong) has different shapes and various fillings and the main ingredients are sticky rice,  green beans, fresh meat and salted duck egg yolk.  People also added red beans, dried shrimp, peanuts, chestnuts, Chinese sausages, shiitake mushrooms etc.   I have made these Zongzi for many years (only once a year though) and I’m sharing my mom’s secret recipe today.  Every year she makes a lot and gives them to friends, relatives and neighbours.  Her Zongzi were fabulous and never disappointed anyone!

Ingredients (makes 20 Zongzi):

5 lbsSticky rice (Glutinous rice) (糯米)
2 bags (14 oz each)Peeled split mung bean (去皮開邊綠豆)
10Salted Duck Egg Yolks (halved) (咸蛋黃)
2 lbsPork belly
11 ozPeanuts
7 ozMiniature dried shrimp
1 bag (14 oz)Bamboo leaves
3 1/2 TbspSalt
6 TbspVegetable oil
20Long strings

Marinate for Meat:

1 tspSalt
2-3Red fermented beancurd (南乳)
1 TbspLight soy sauce
1 TbspWater
4 TbspFive spice powder (五香粉)

Directions:

  1. Cut pork belly into approx. 1.5” cubes and marinate with 1 teaspoon of salt for 20 minutes.  In a small bowl, mash the red fermented beancurd and add light soy sauce and water, mix well.
  2. Heat the wok with 1 tablespoon of oil and stir in the beancurd mixture, add pork belly and stir fry until the meat gets a nice coat of the sauce  – about 5 minutes (the meat is not completely cooked).  When the meat is cool, cover and refrigerate overnight.
  3. After the meat is marinated overnight, take it out from the fridge, roughly rinse off the beancurd mixture and pad dry.  Sprinkle about 4 tablespoons of five spice powder and mix well.  The pork pieces should have a nice coat of powder, add more if necessary.  Set aside.
  4. Soak rice in water for 4 hours, drain.
  5. Add 3 ½ tablespoons of salt and 6 tablespoons of oil to the rice, mix well (taste the rice, add more salt if necessary).  Set aside.
  6. Soak Green mung beans in water for 2 hours, drain and set aside.
  7. Wash dried shrimp, pad dry and set aside.
  8. Boil a pot of hot water and put the bamboo leaves in, soak for 20 minutes.  Wash each one with a brush.
  9. Wrap ingredients with bamboo leaves (see instructions below).  Boil Zongzi for 4 hours.

These are all the ingredients you will need:

Zongzi ingredients

If leaves are very dirty, you may want to use a clean brush to brush each leaf.  After washing and boiling the bamboo leaves, choose two large ones, make a small cross with the leaves.   Bend and twist the leaves in the center to make a funnel shape (see pictures below).

How to wrap Zongzi

Fill the funnel shape with a few tablespoons of sticky rice, top with a sprinkling of mung beans.  Add meat, egg yolk, peanuts, dried shrimp, etc.  Now the ingredients are heavy enough to hold the funnel shape, add one leaf to each side and top with more sticky rice, mung beans, peanuts and dried shrimp (the meat and the egg yolk should be in the middle part of the Zongzi).   The mound should be generous but not overflowing.  Carefully fold the sides in over the mixture (folding both sides first), then fold the bottom over.  (see pictures below)

How to wrap Zongzi

Now you fold the top leaf flap downwards to make a package.  Take a long string and wrap the Zongzi firmly.

Zongzi

Place Zongzi in a large pot and fill the pot with water (water should cover all Zongzi), cover and bring it to a boil.  Reduce heat and cook for four hours.  You will need to check the water level, add water as necessary.

Note:

  • The pork belly should have some fat, do not trim the fat.  The meat will be too dry if it’s all lean.
  • I left one ingredient out “magenta leaves” (紅絲線 aka 紅藍) which is Chinese herb.  I just couldn’t find it in the States, probably sold in Asia only.
Related articles

Turnip Cake (Law Bak Gow) 蘿蔔糕


ftb_4957

Turnip cake is my husband’s favorite dim sum dish which can be found in Chinese dim sum restaurants throughout the year.  Turnip cake is traditionally made during the Chinese New Year since turnip is a homophone for “good fortune”, so people would make 10 plus containers and give them to friends and relatives.

The difference between homemade one and restaurant one is the amount of filling.  Even you find an authentic Chinese dim sum restaurant, you still won’t be satisfied with the filling (quite stingy).  This recipe requires a lot of chopping, but you will appreciate every effort you put on making this.

Ingredients for filling:

550gGrated turnip
3.5 cupTurnip juice
220gRice flour
250gCornstarch
2 linksChinese preserved sausage (chopped)
80gChinese preserved bacon (chopped)
20gDried shrimp
15gDried scallops (soaked and chopped) (save the liquid)
5-6 piecesShittake mushrooms (chopped)
2 stalksGreen onion (Chopped)

Marinate for filling:

1 tspLight soy sauce
1 tspLight brown sugar
1 TbspRice cooking wine

Seasoning for grated turnip:

1 TbspChicken powder
1/2 tspSalt
1 TbspLight brown sugar
1/2 tspWhite pepper (optional)
1 cupChicken broth
1/2 cupliquid from soaking the dried scallops
turnip cake ingredients

Directions:

  • In a large bowl, shred turnip with a grater or you can use a food processor.  Separate turnip liquid and grated turnip.  You should have about 2 to 2.5 cups of turnip liquid, then add water to reach 3½ cups.  Save about 550g of grated turnip for later use.
  • Soak shiitake mushrooms until softened.  Squeeze the mushrooms to drain all water.  Chop and set aside.
  • Soak dried scallops until softened, reserve the water for later use, chop and set aside.
  • Rinse all ingredients, chop Chinese sausage, bacon, dried shrimp and green onion, set aside.
How to cook turnip cake
  • In a large mixing bowl, combine the rice flour, cornstarch and turnip liquid, stir with a spatula until well blended.
  • Combine chopped sausage, bacon, dried shrimp, mushrooms and scallops in a large bowl and marinate with soy sauce, sugar and cooking wine.  Add 1 tablespoon of oil to a frying pan, stir fry for 2 minutes.  Set aside.
  • Add two tablespoons of oil and a clove of garlic to a large skillet, when garlic turns slightly brown, discard garlic and pour grated turnip into the skillet, stir fry for 2 minutes and add in chicken broth, liquid saved from soaking dried scallops, chicken powder, salt, sugar and pepper, mix well.  Cover and cook for 5 minutes over medium low heat.
  • After 5 minutes, return meat mixture to the skillet, stir fry until everything is combined.  Gradually add liquid mixture and chopped green onion to the pan and mix well (turn fire down to medium low).
  • Transfer the batter to two 8-inch pie pans.  Steam the batter for 40 minutes over medium high heat.
ftb_4949

  • The most common way to eat this turnip cake is to slice to 3/4″ thick pieces and pan fry until both sides are golden brown.  Served with hot sauce.

Chicken Lettuce Wraps


Chicken Lettuce Wraps

When it comes to Chinese cooking, we spend quite a lot of time in preparation (to cut, dice, mince, julienne, chop, etc.).  As a working mom, lettuce wraps is only a weekend dish as I don’t have enough time to cook it after work.  People may find this recipe complicated but it’s worth your time and once you get a handle on it, it is pretty easy.  There are a lot of 30 minute meal recipes, but sometimes we just need to slow down and enjoy cooking and eating.

Marinate for Chicken:

2 pounds
1 tsp
1 Tbsp
2 tsp
1 tsp
Chicken breasts (ground)
Cornstarch
Light soy sauce
Rice cooking wine
Salt

Ingredients:

8
5 Tbsp
1 Tbsp
1 Tbsp
2 stalks
2-3
10
1 package
1 head
Dried shiitake mushrooms (soaked and diced)
Oil
Fresh ginger (minced)
Garlic (minced)
Green onions (cut into small pieces)
Small dried chilies (Optional)
Fresh water chestnuts (minced)
Chinese vermicelli
Iceberg Lettuce

Cooking Sauce:

3 Tbsp
3 Tbsp
3 Tbsp
6 Tbsp
6 Tbsp
3 tsp
3 tsp
6 tsp
Hoisin sauce
Light soy sauce
Rice cooking wine
Oyster sauce
Water
Sesame oil
Light brown sugar
Cornstarch

Directions:

  1. To deep fry the vermicelli, pour 1 cup of oil into a saucepan over medium low heat.  Make sure the oil is hot enough by dropping one noodle into the oil. If the noodle immediately puffs and turns white, the oil is ready.  Fry the noodles in batches, make sure you won’t crowd the pan. Remove the noodles as they puff, and drain them on paper towels.
  2. Cover mushrooms with boiling water, let stand 30 minutes then drain.  Discard woody stems and dice mushrooms, set aside.
  3. Mix all ingredients for cooking sauce in a bowl and set aside.
  4. In a medium bowl, marinate chicken with cooking wine, soy sauce, salt, pepper and cornstarch.  Let it sit for 15 minutes.
  5. Add 3 Tbsp oil to a saucepan/wok over high heat, stir fry chicken until cooked.  Set aside.
  6. Add 2 Tbsp oil to a clean saucepan/wok, add ginger, garlic and chilies.  When garlic is slightly brown, stir in water chestnuts and mushrooms (about 2 minutes).  Return chicken to pan, add 1/3 of the cooking sauce and keep stirring.  The chicken should have a nice coat of sauce, if you see any white part (without a coat of sauce), add more sauce in.
  7. Turn off the fire and sprinkle green onions on top.
  8. Spoon chicken mixture into lettuce leaf and top with cooked vermicelli.
  9. The remaining sauce can be saved and served on the side with the lettuce wraps.  I normally like to bring the sauce to a boil or you can just serve it without cooking.

Note:  To save time, you can buy ground chicken at the market.  I like to rinse the meat before cooking and ground it myself with a food processor.

Mantou (Chinese Steamed Buns) 饅頭


Mantou (Chinese Steamed Buns)

Mantou are originating from Northern China.  These buns are soft and fluffy in texture, pretty plain in taste, not sure if everyone will like it but I’m a big fan.  I like to eat them fresh straight after steaming (plain) or deep fry them.  You can also give it a little sweet flavor by dipping in condensed milk.

Ingredients:

5g
300 ml
500g
35g
1 tbsp
Instant dried yeast
Milk (or water)
All purpose flour
Caster sugar
Vegetable oil

Directions:

  1. In a small bowl, dissolve dried yeast in warm water.
  2. Combine all ingredients in a mixing bowl, attach the dough hook and mix the ingredients with low speed.  Knead the dough until it’s smooth, around 10 minutes.  Let the dough rest for 10 minutes.
  3. Dust a clean work surface lightly with flour, roll out the dough to a 25” x 6” rectangle.  Fold it into thirds and roll it out again to approx. 17” x 10” rectangle.  Brush the surface with water.
  4. Roll the dough tightly from the longer edge to form a log.  Cut the log into half and cut out 4 even pieces from each log.
  5. Prepare 8 square pieces of parchment paper, slightly larger than the bun.  Put parchment paper under each bun.
  6. Place buns in a large steamer (most steamers have multi layers), pour some cold water in the bottom of the steamer, cover and let the buns rise for 20 minutes.
  7. After the final rise, steam the buns for 20 minutes until they are cooked and puffed.
  8. If not eaten immediately, they can be stored in the freezer for up to 3 months.  Reheat them in a steamer for 5 minutes after removing them from the freezer.

Chiu Chow Fun Gor (Teochew Dumplings) 潮州粉果


Chiu Chow Fun Gor

These Chiu Chow-style steamed dumplings are very pupular at Chinese dim sum restaurants.  My grandma made the best Fun Gor, I regret I did not ask for her secret recipe when she was alive.  However, I was able to gather pieces from relatives, friends and online.  It was a fun process to experiment with ingredients until the recipe was just right.

Ingredients for Filling (餡材料):
40g  Lean pork (瘦豬肉)
4   Prawns (大蝦)
3   Dried radish (甜菜脯)
4   Jicama/water chestnut(沙葛 /馬蹄)
3   Dried Shiitake Mushrooms, soaked until soft (冬菇)
30 Dried shrimps (蝦米)
2   Slices carrots (紅蘿蔔)
1    Stalk celery (茜芹)
16  Roasted peanuts (炒熟花生)
16  Ground roasted peanuts (炒熟花生磨碎粉)
16  Cilantro (香芫荽葉)
little White pepper (少許白胡椒粉)
1/4 cup chicken broth

Marinade for pork (醃肉料):
1 Tbsp Soy sauce (生抽)
1  tsp Brown sugar (糖)
1  tsp Corn starch (粟粉)
1/4 tsp Oyster sauce

Seasoning (調味品):
1   tsp Oyster sauce (蠔油)
½  cup Chicken broth (雞湯)
¾  Corn starch (粟粉)

Ingredients for wrapper (16 pieces) (皮料: 16 個)
150 g  Wheat starch (澄麵粉)
50 g  Tapioca/potato starch (菱粉)
250 ml  Boiling water (滾水)
1/3 tsp  Salt (鹽)
2 tsp  Oil (油)

Directions:

  1. Dice all ingredients, set aside.
  2. Add 2 tablespoons of oil to a pan and fry the dried shrimps, set aside.
  3. Boil some water and cook the prawns (about 2 mins), cut each prawn into 3-4 pieces, set aside.
  4. Add 1 tablespoon of oil and heat the pan/wok with a glove of garlic, pan fry jicama, mushrooms, carrots and celery, set aside.
  5. Marinade the meat and pan fry until it is cooked, add all ingredients listed in 4.  Add in ¼ cup of chicken broth and simmer for 3-5 mins with low fire.  Stir in the seasoning mixture to thicken the filling.  Set aside to cool down.  Stir in ground roasted peanuts and mix well.
  6. Add a pinch of salt into wheat starch.  Boil 250ml of water and pour into the wheat starch, mix quickly.  Add Tapioca starch a little by little while kneading the dough.  Add a little oil and keep kneading.
  7. Cut the dough into 16 pieces, cover with a cloth to keep warm while wrapping the dumplings.  Take out one piece of dough at a time, use a rolling pin to roll the dough into a flat circle, or you can use a plate to press it down to form a circle (a tortilla press would have been ideal for this).
  8. Scope a spoon full of filling and add some roasted peanuts, prawn and cilantro into the wrapper.  Fold the wrapper in half and seal the edges.
  9. Spray cooking oil on the steamer and steam dumplings for 7 minutes.  When cooked, the skin will turn transparent like crystal.

Note:  Tapioca starch gives it more elasticity.  If you want a chewer skin, you can change the recipe to have equal amount of wheat starch and tapioca starch.