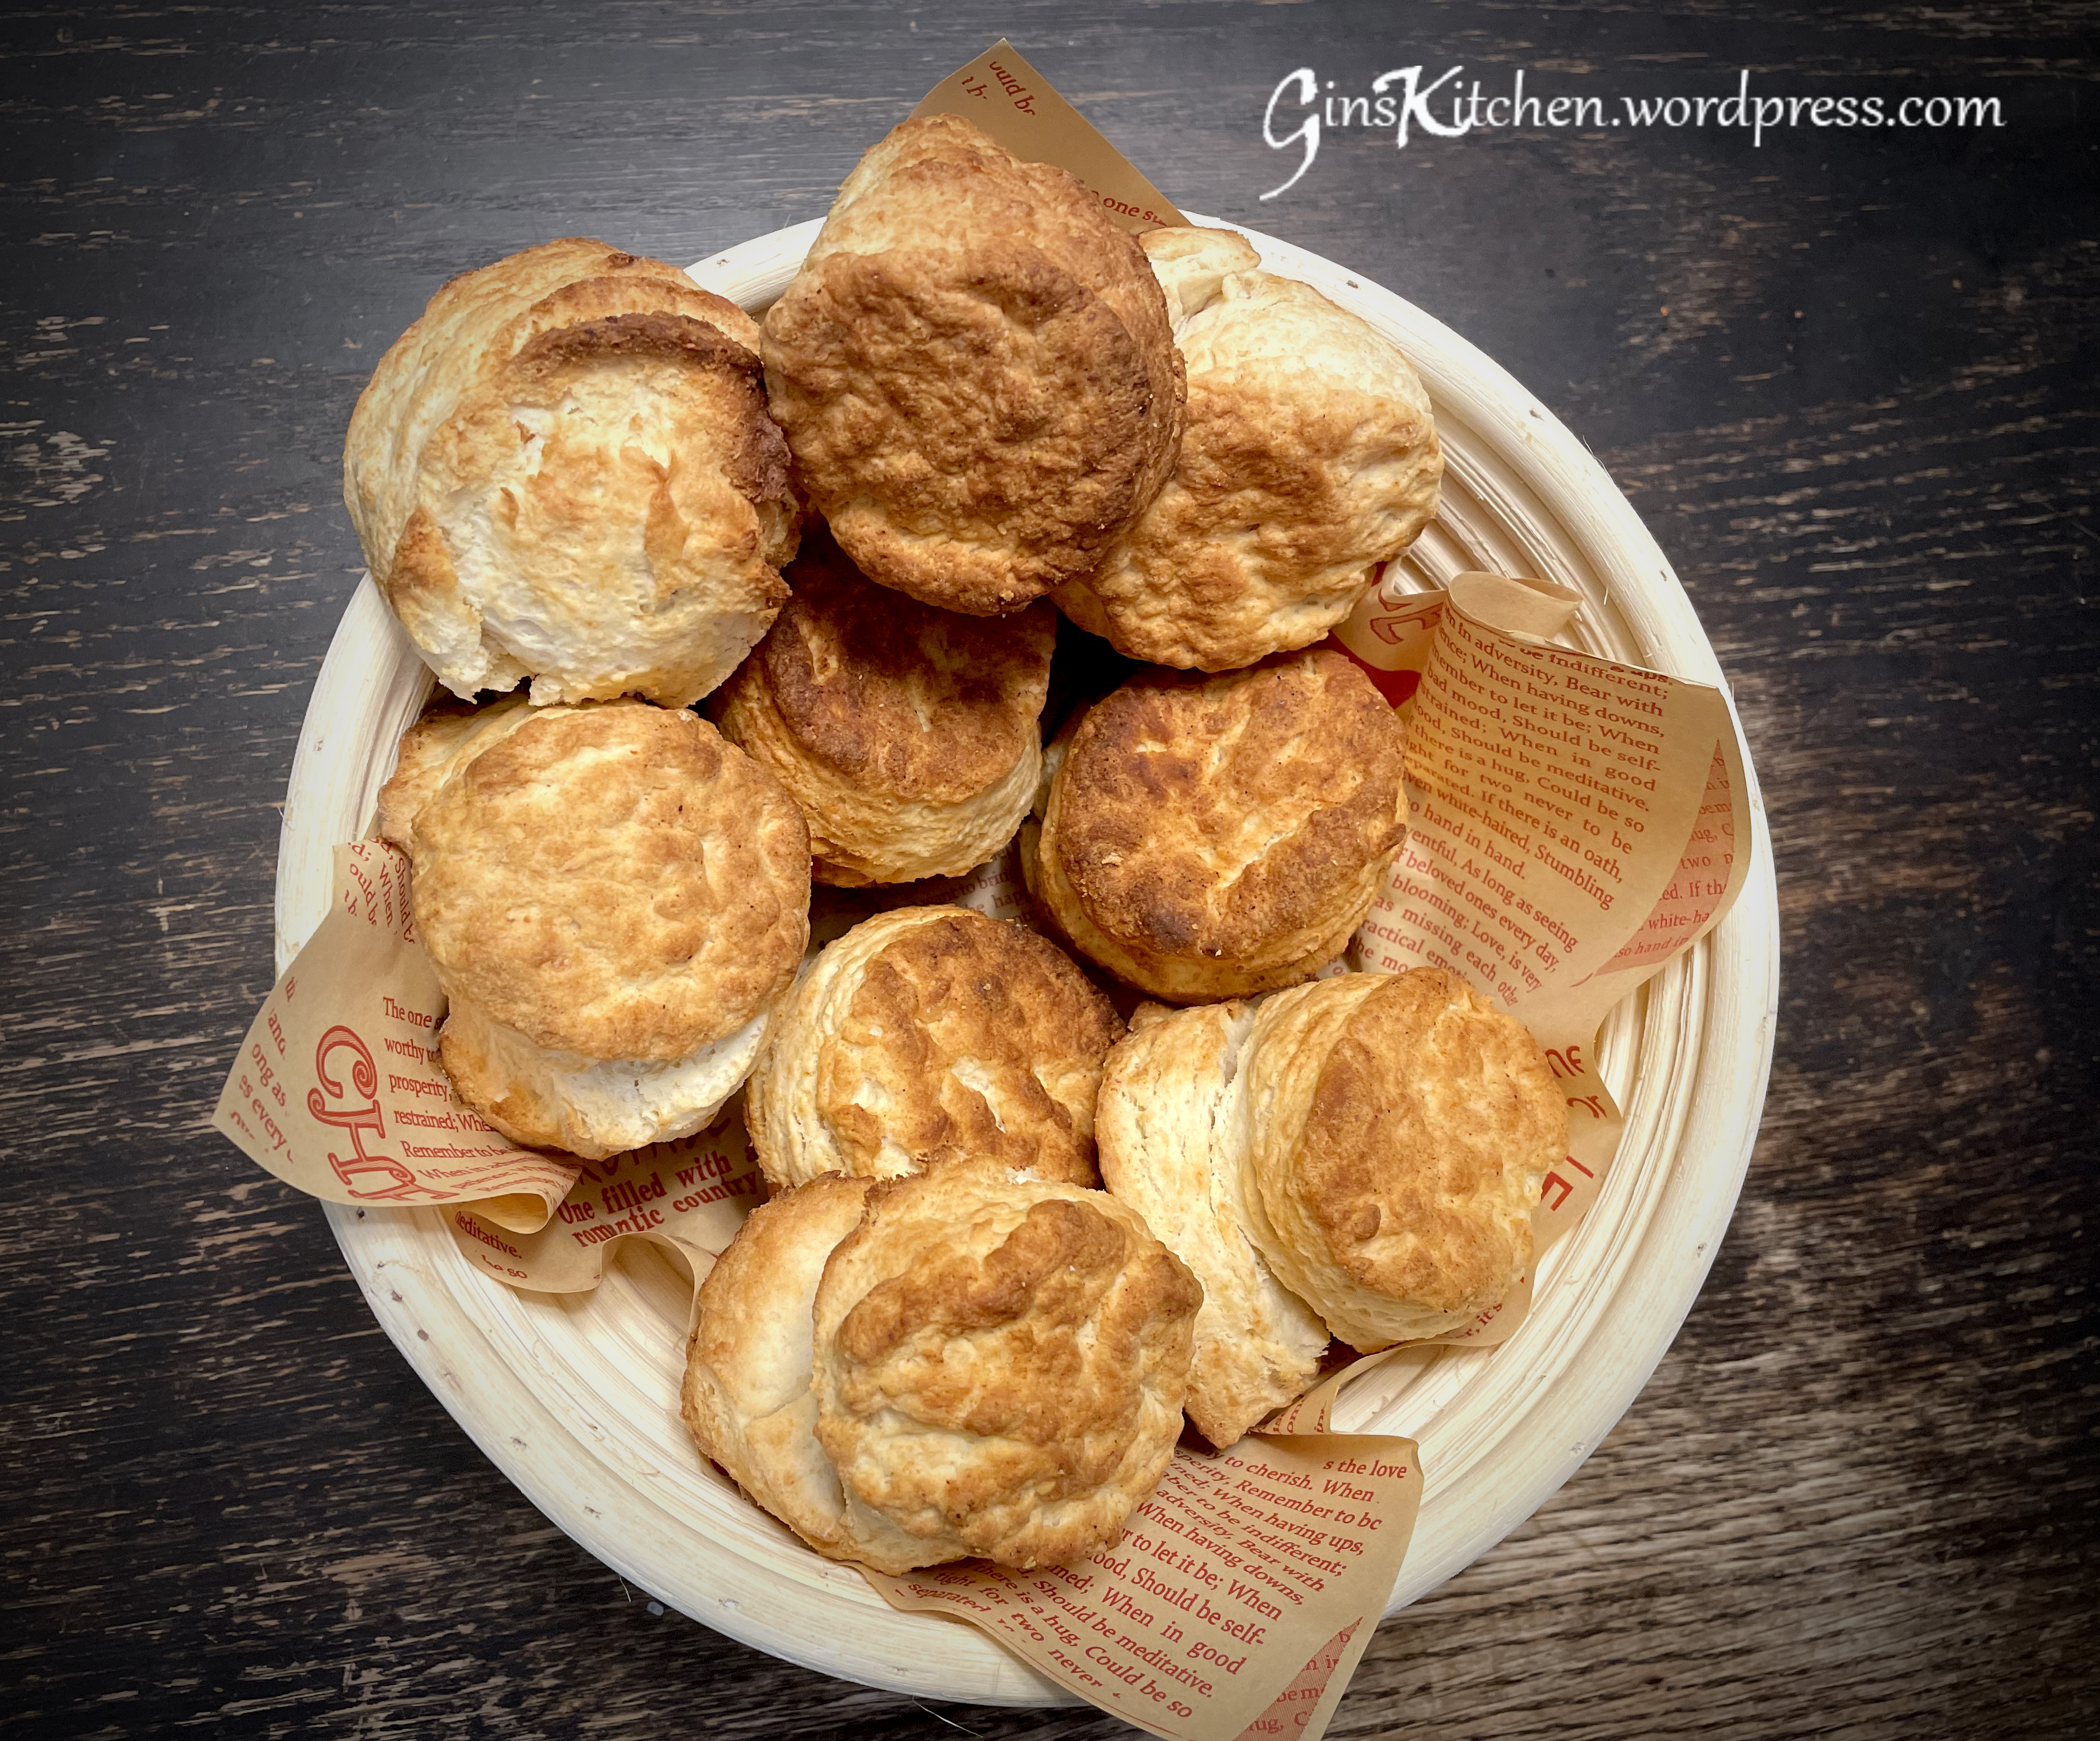
These buttery, flaky biscuits are the perfect side dish for holidays—they go well with turkey, prime rib, or any seafood main course. You will love these biscuits as there are lots of layers, the tops are nicely golden brown, and the bottoms are crispy. Not only they are good for holidays meals, but also for breakfast along with scrambled eggs, bacon, and sausage. Most importantly, they are so simple to make and great for beginners as well. So, stop eating those biscuits out of a can and try making them from scratch.
Ingredients:
370g (2 1/2 cup)
All purpose flour
2 Tbsp
Baking powder
1 Tbsp
Granulated sugar
1 Cup
Buttermilk (very cold)
1 stick
Butter (chilled and grated)
1 tsp
Kosher Salt
Method:
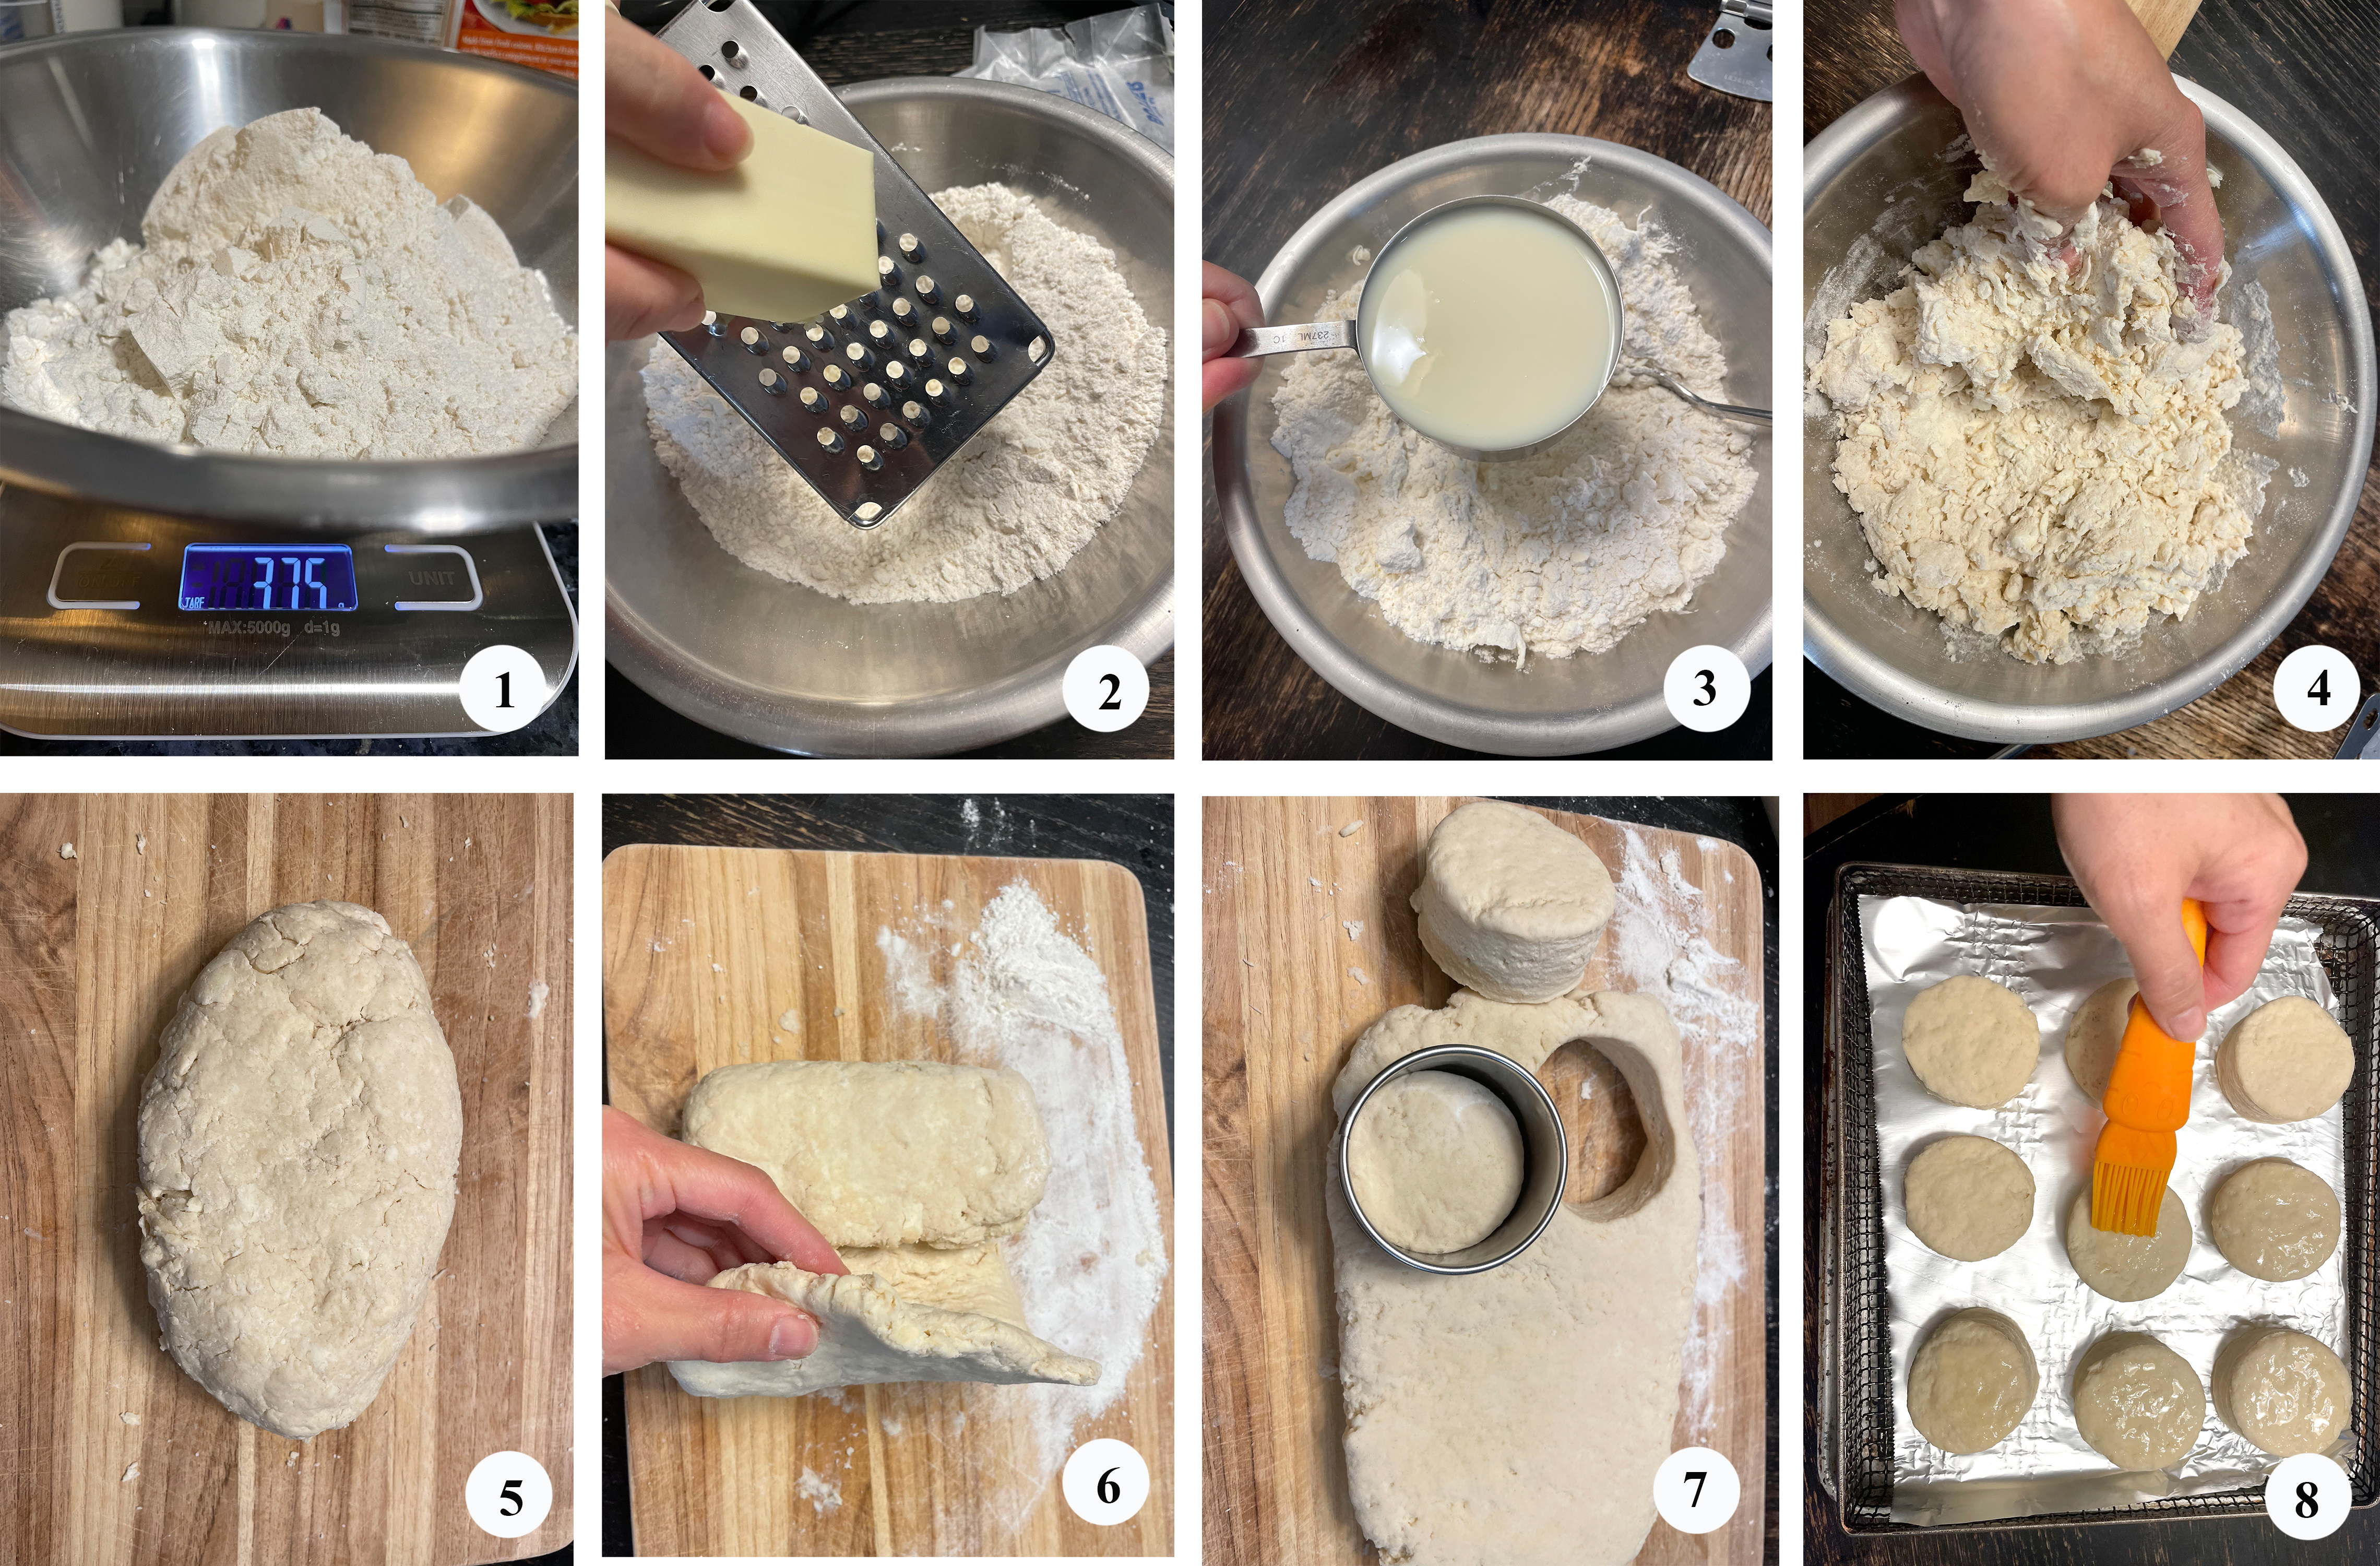
In a large mixing bowl, combine flour, baking powder, salt and sugar. (Picture 1)
Use a grater to grate butter over the flour mixture and quickly toss with your hands. (Picture 2)
Pour in buttermilk and stir until just combined. (Pictures 3 & 4)
Transfer the dough to a clean work surface / chopping board. (Picture 5)
Shape the dough into a rectangle, about 1″ thick, fold the dough into thirds. (Picture 6)
Use a rolling pin, slightly roll it back into a 1″ thick rectangle (do not roll hard to flatten it), repeating the folding process (step 5 above) 2 more times.
Now that the dough is back to a 1″ thick rectangle after folding 3 times, use a small round cookie cutter (about 2″ in diameter) to press down and cut out the biscuits. (Picture 7)
Line air fryer basket with parchment paper, place biscuits 1/2″ apart, brush tops with melted butter. (Picture 7)
Cook at 400F until tops are lightly golden (about 10-12 minutes).
Serve warm.
** If you bake these in the oven, preheat the oven to 425F while mixings the dough. Bake for about 20 minutes until tops are lightly golden.
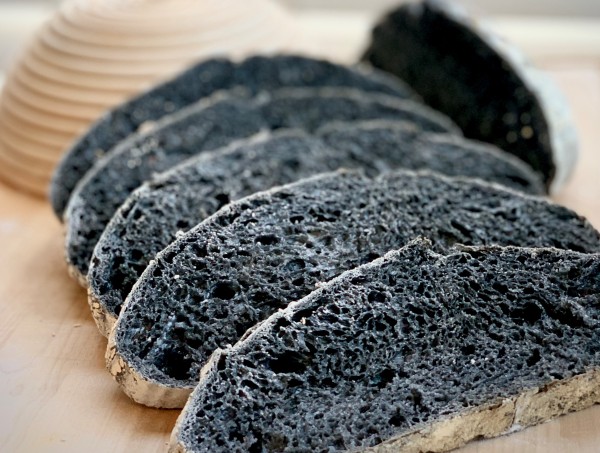
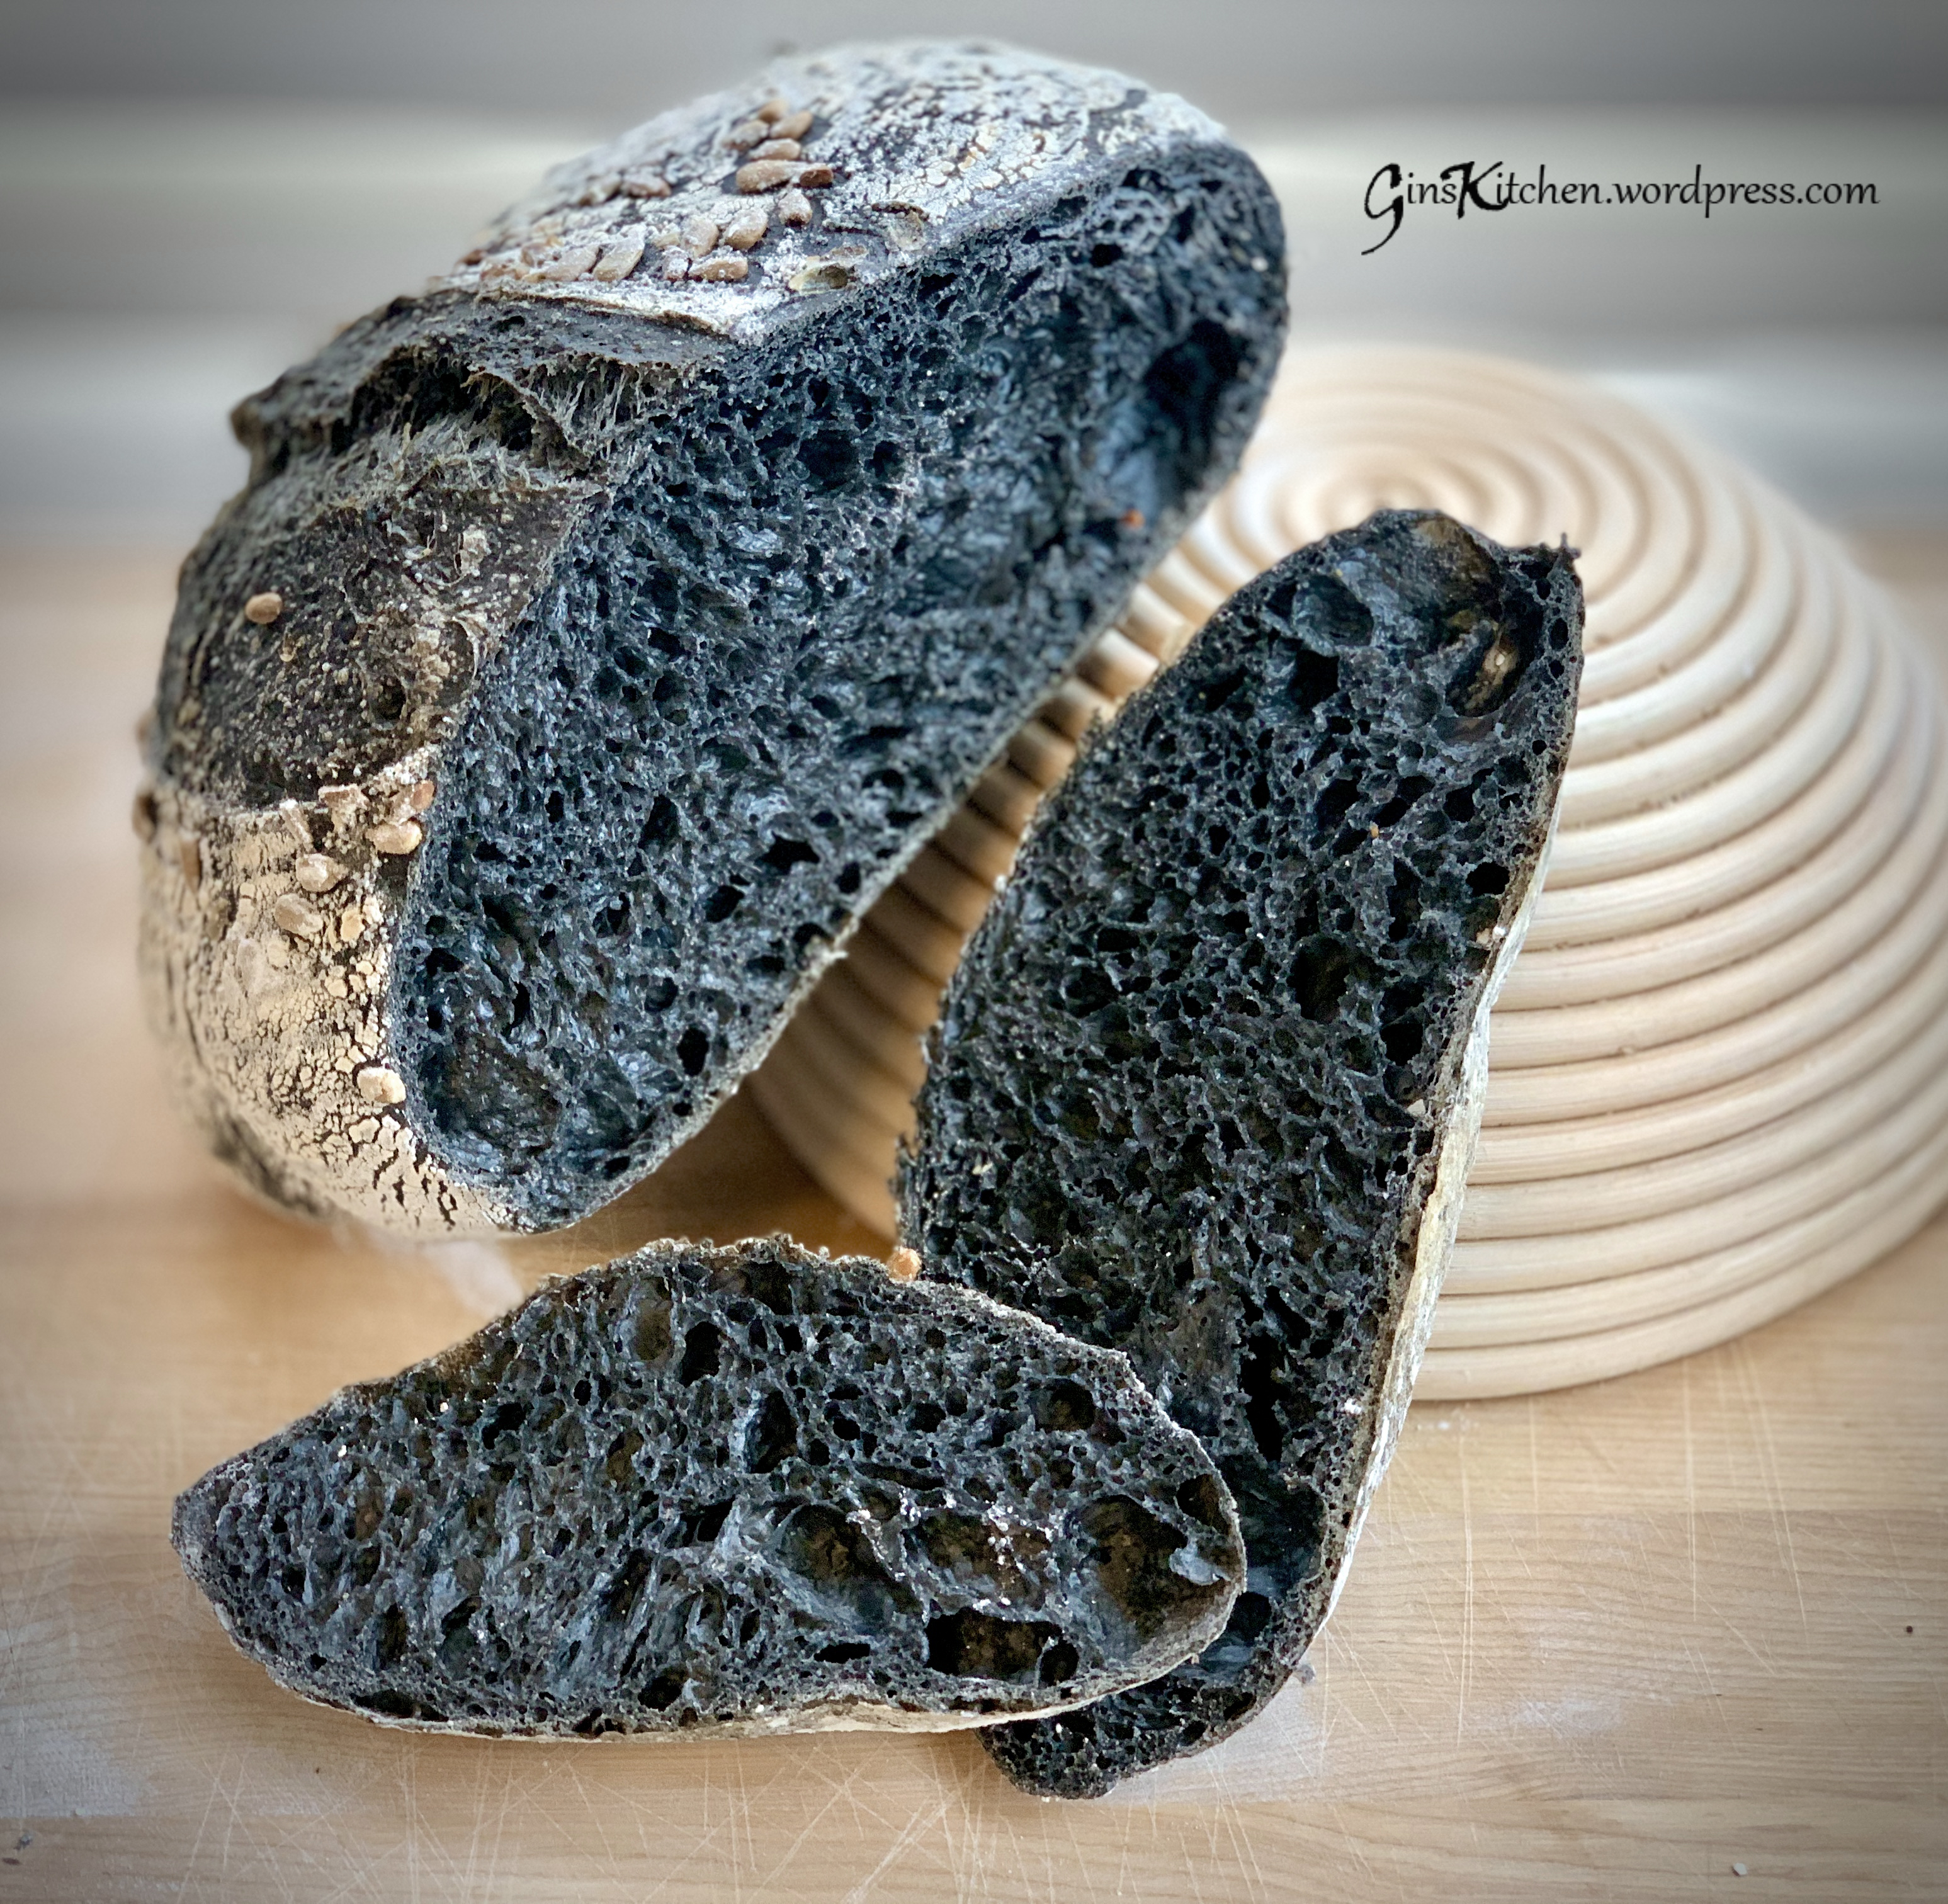
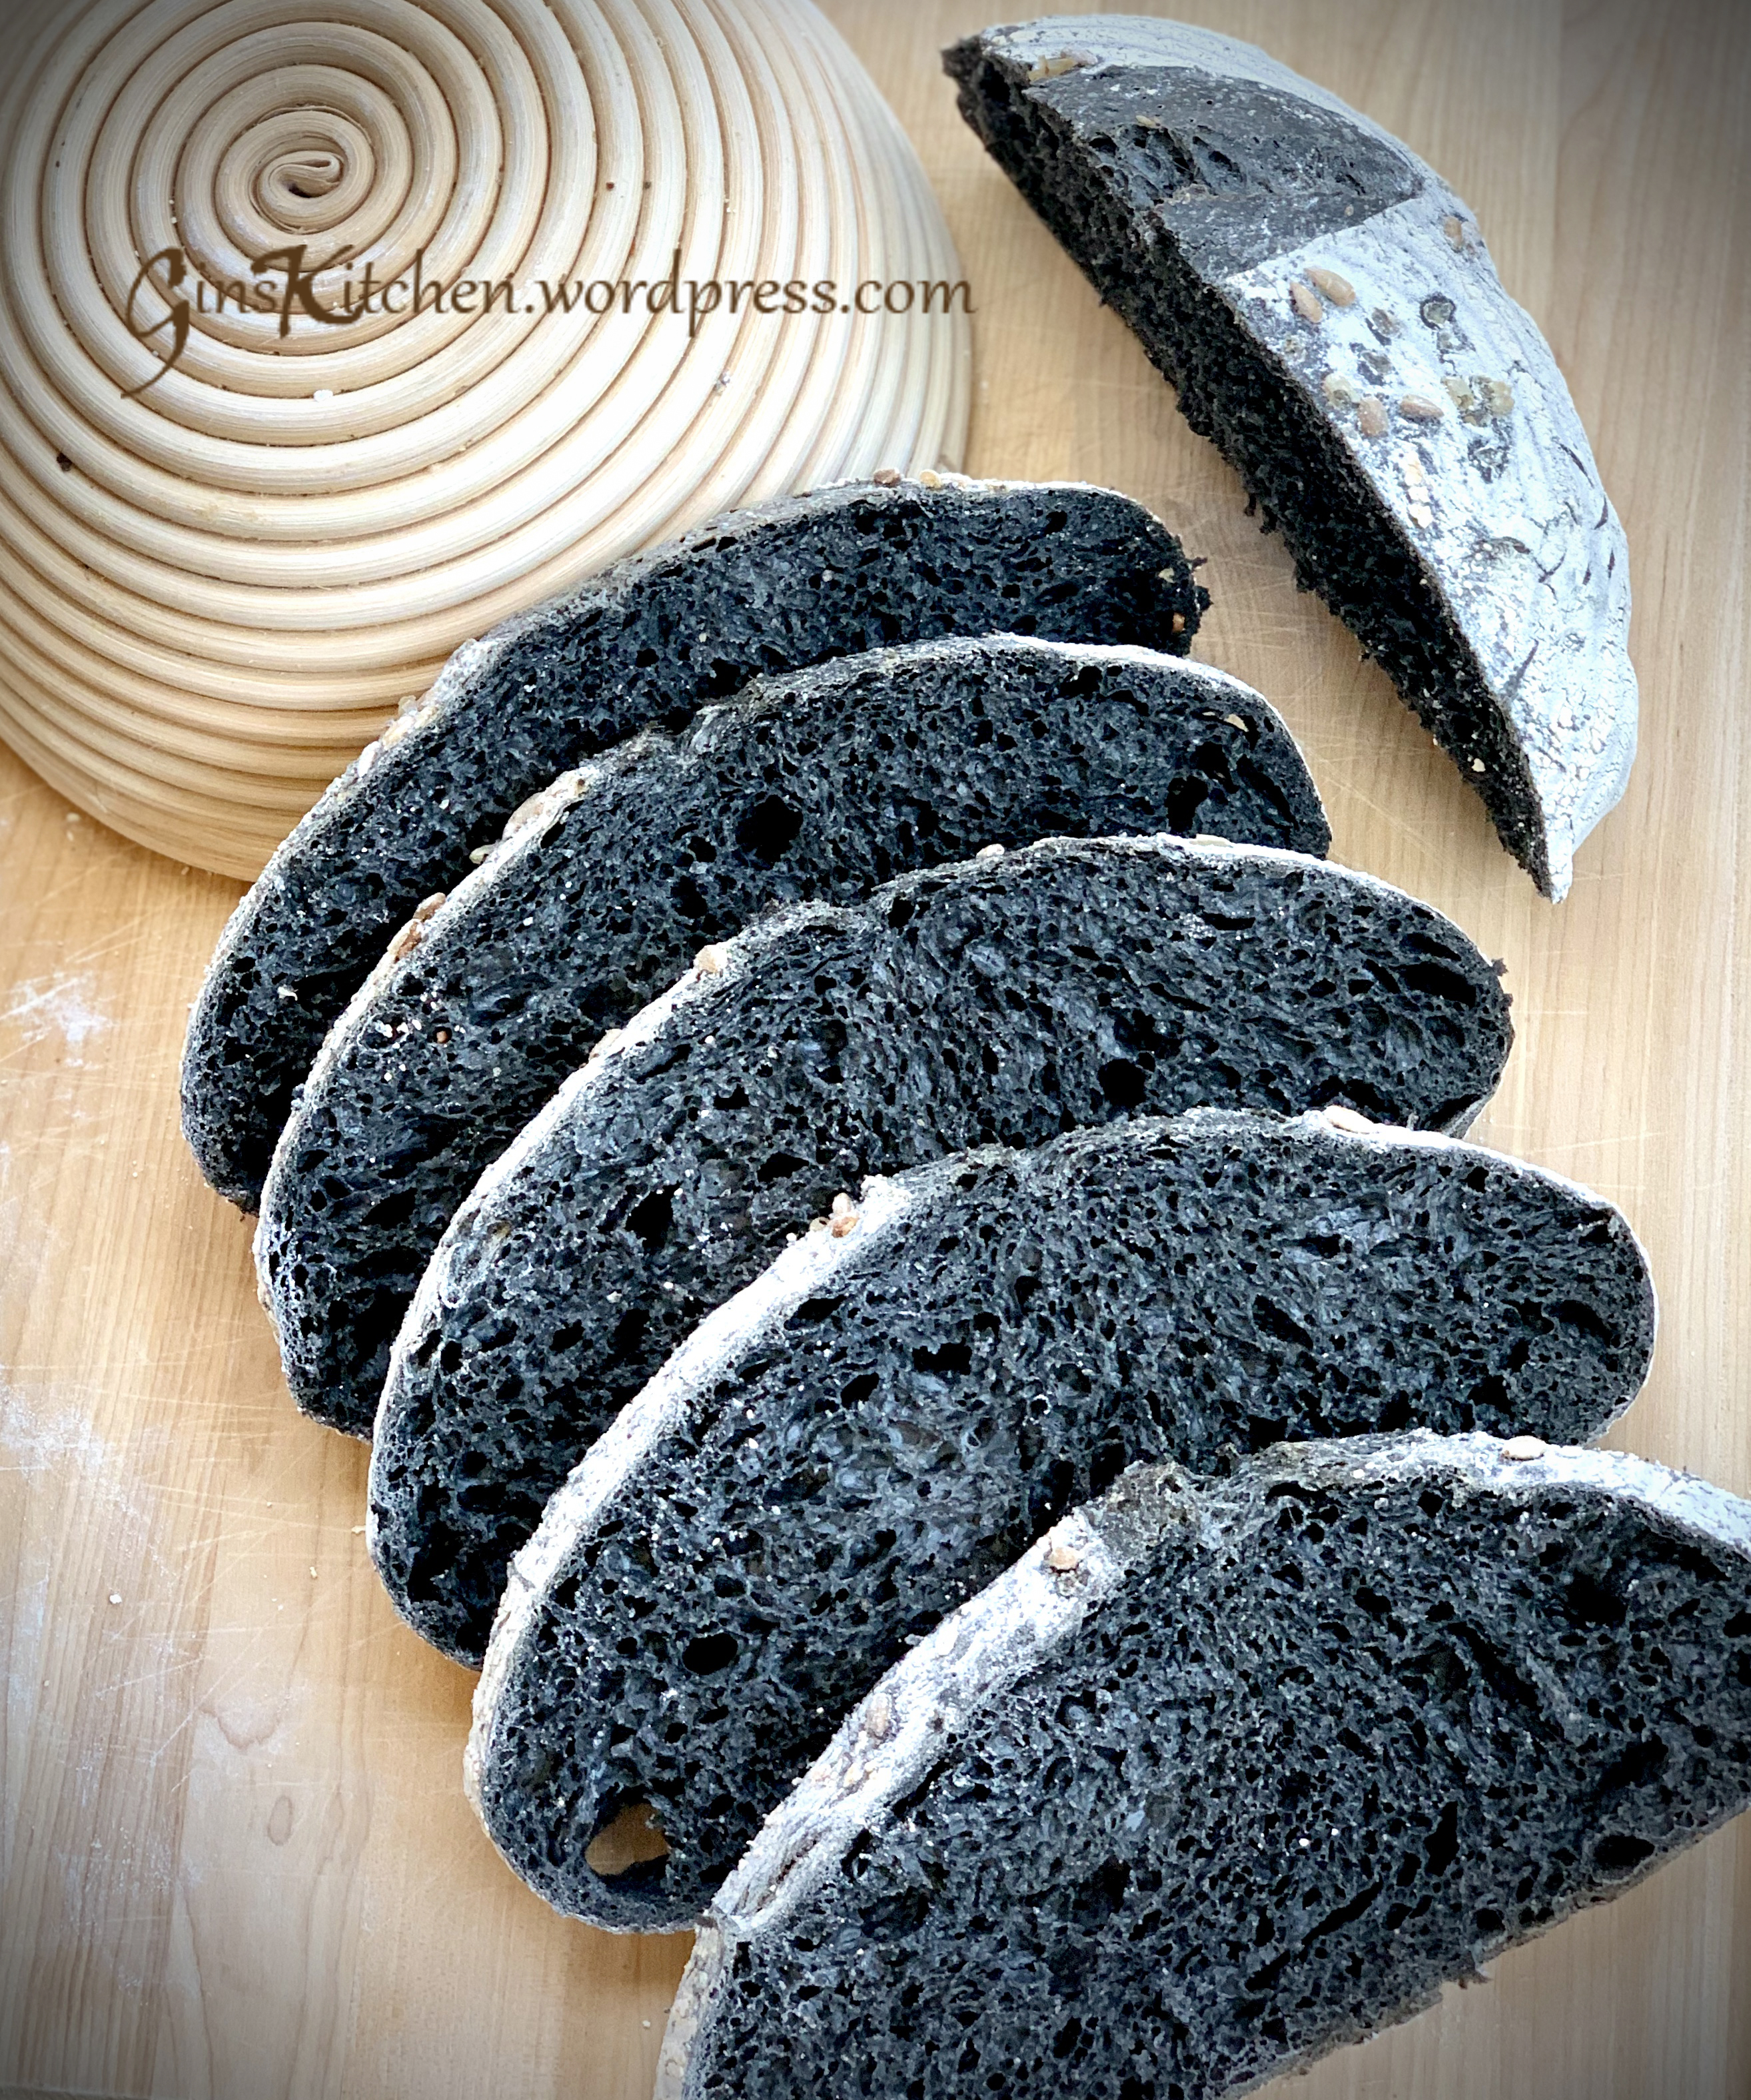
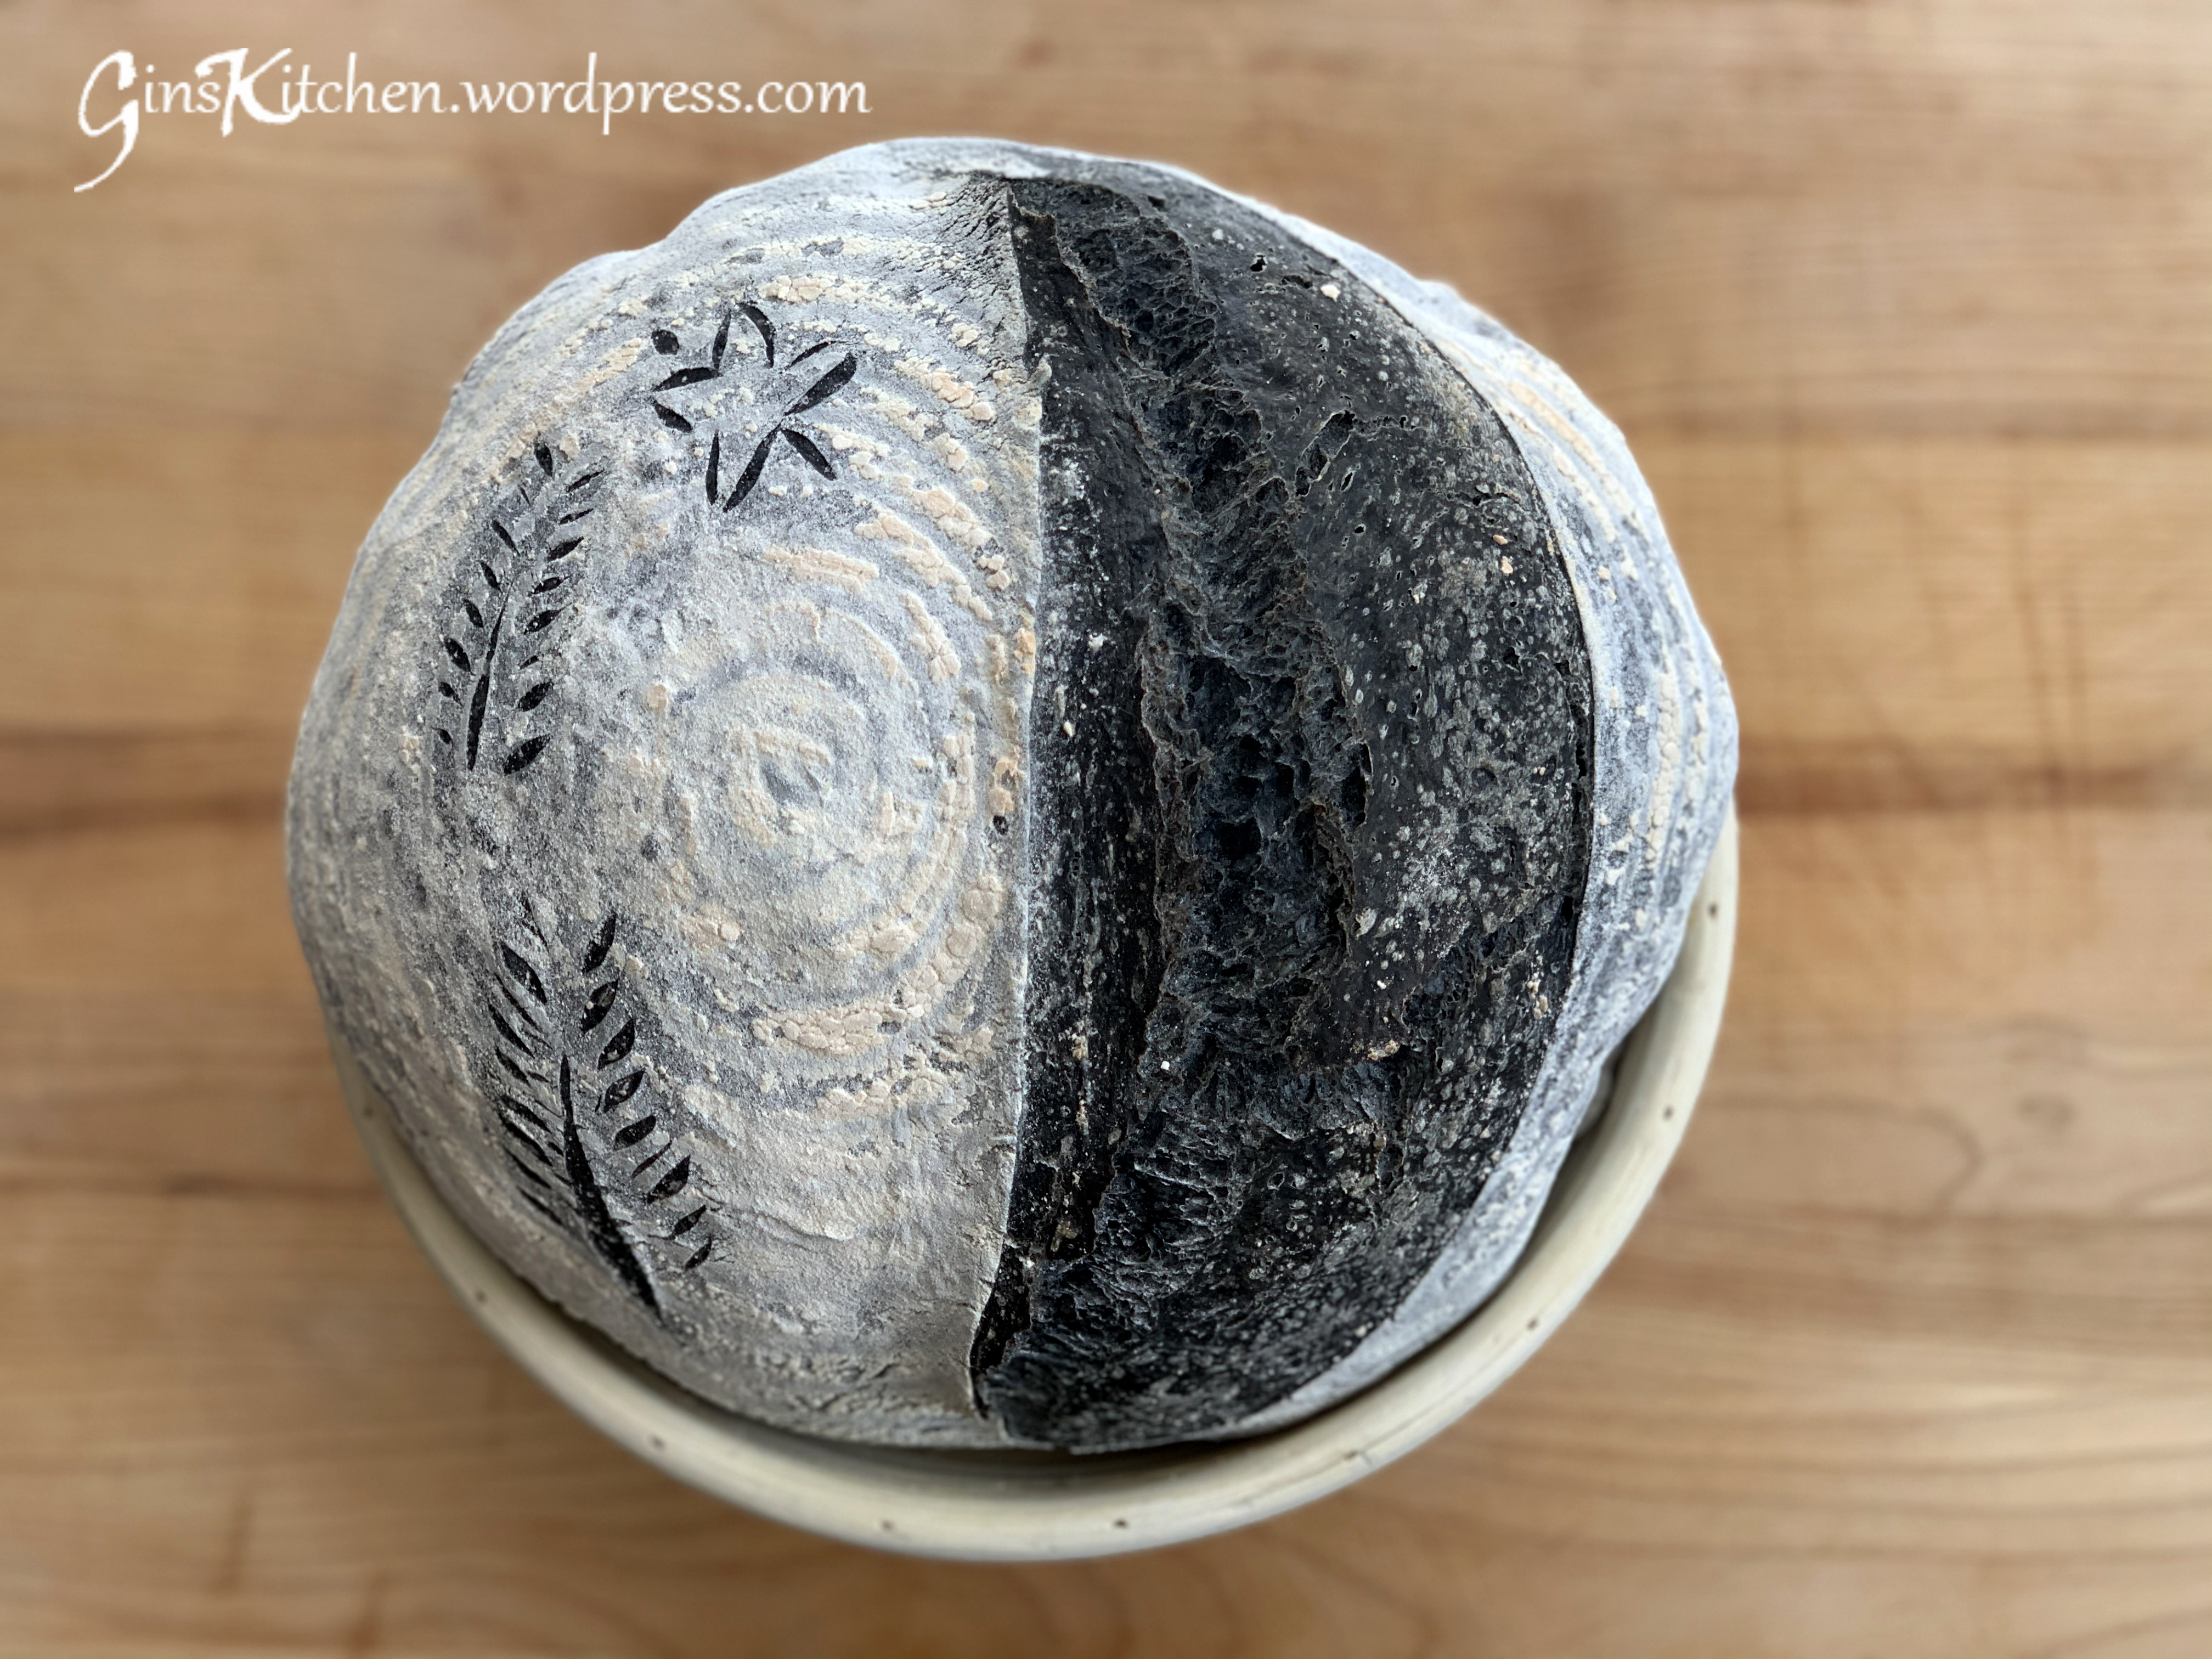
It’s 105°F in Southern California today, the outdoor air is so suffocating and unbearable. This, however, gave me a chance to stay indoors and pick up where I left off on my blog – It’s been a long time since I last saved a recipe here. This charcoal sourdough is one of my kids’ favorites among all other flavors. It’s not because of its taste (charcoal doesn’t bring much taste to the bread at all), but its texture – it’s soft and chewy, perfect to dip in vinegar and olive oil or to spread butter on.
Ingredients (Hydration is about 72%)
Step 1 – Prep for the dough:
400g
Bread Flour
30g
Dark Rye Flour
20g
Spelt Flour
1g
Activated Charcoal Powder
2 Tbsp
Cocoa Powder (optional)
320g
Water
1 tsp
poppy seeds (add in later)
Step 2 – Mix and rest for 30 mins:
10g
Salt
90g
Starter
Directions:
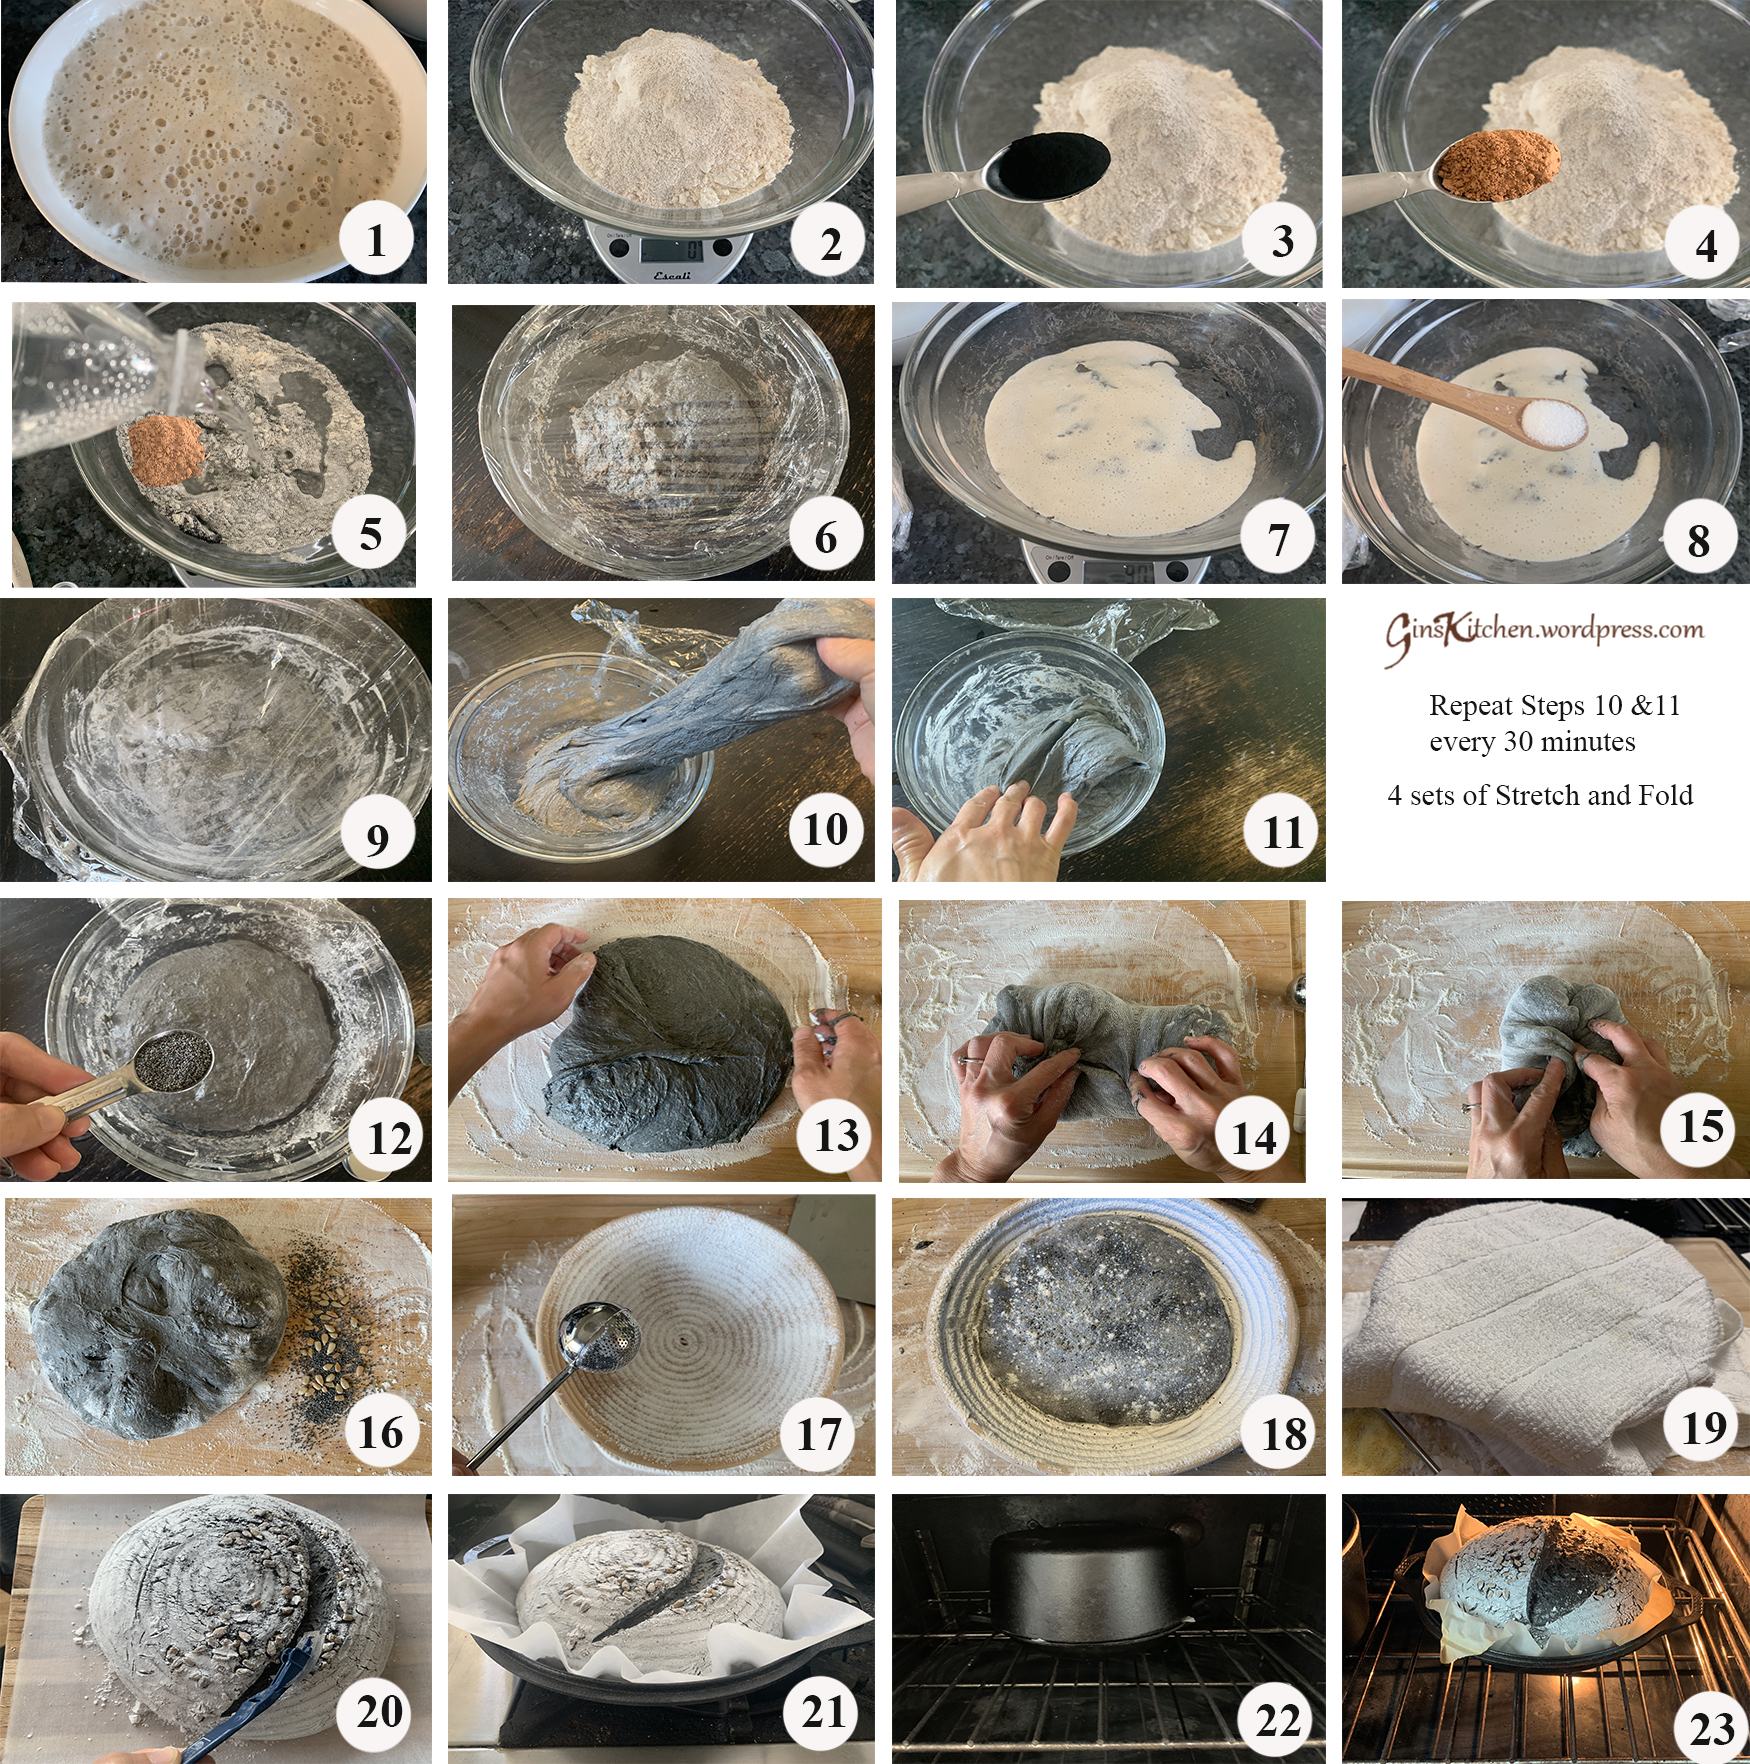
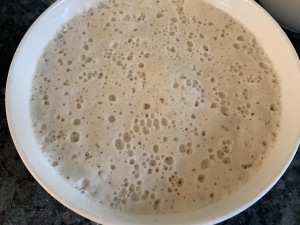
Feed your starter with equal amount of water, flour and starter until it is active and ready to use (you may want to start feeding the starter a few days ahead of time if the starter is stored in the fridge). When starter is ready to use, there will be a lot of bubbles – see picture 1).
In a mixing bowl, combine all flour, charcoal powder, cocoa powder and water. Cover with a towel or plastic wrap and let it rest in room temperature for 1 hour. (Pictures 2-6)
After 1 hour, add 90g of starter and 10g of salt. Use your hand to pinch and fold the dough over and over to get it nice and mixed. The dough is more wet and sloppy than it was during the first mix. Cover the dough and set the timer for 30 minutes. (Pictures 7-9)
Now we are going to stretch and fold the dough – Lift one side of the dough straight up until you meet resistance and fold it across the center. Turn the bowl 90 degree and perform the stretch-and-folds (the dough is probably very relaxed in the beginning). Once you have finished all the way around the bowl back to where you started, you have completed one set. Cover the dough with plastic wrap and set the timer for 30 minutes. (Pictures 10 & 11)
Repeat Step 4 above three more times. Add in poppy seeds during the last round of stretch and fold. (Picture 12)
After the last set of Stretch-And-Fold, lightly fold the dough a couple of times, cover the dough and let it rest for 1-2 hours instead of 30 mins.
Dust the banneton basket with rice flour. Dust your work surface with flour and fold the dough a couple of times and shape the dough to a ball, carefully transfer the dough to the basket. Cover with a towel and put it in the refrigerator for 5-10 hours/overnight. (Pictures 17-19)
Baking the bread:
During the dough’s last 45 minutes of final proof, preheat the oven and the cast iron pan at 500F (preheating the pan for at least 45 minutes).
Remove the basket from the fridge. Put a piece of parchment paper on top of the banneton basket and put a chopping board on top of the parchment paper. Now hold the basket and chopping board tight and flip over the banneton basket.
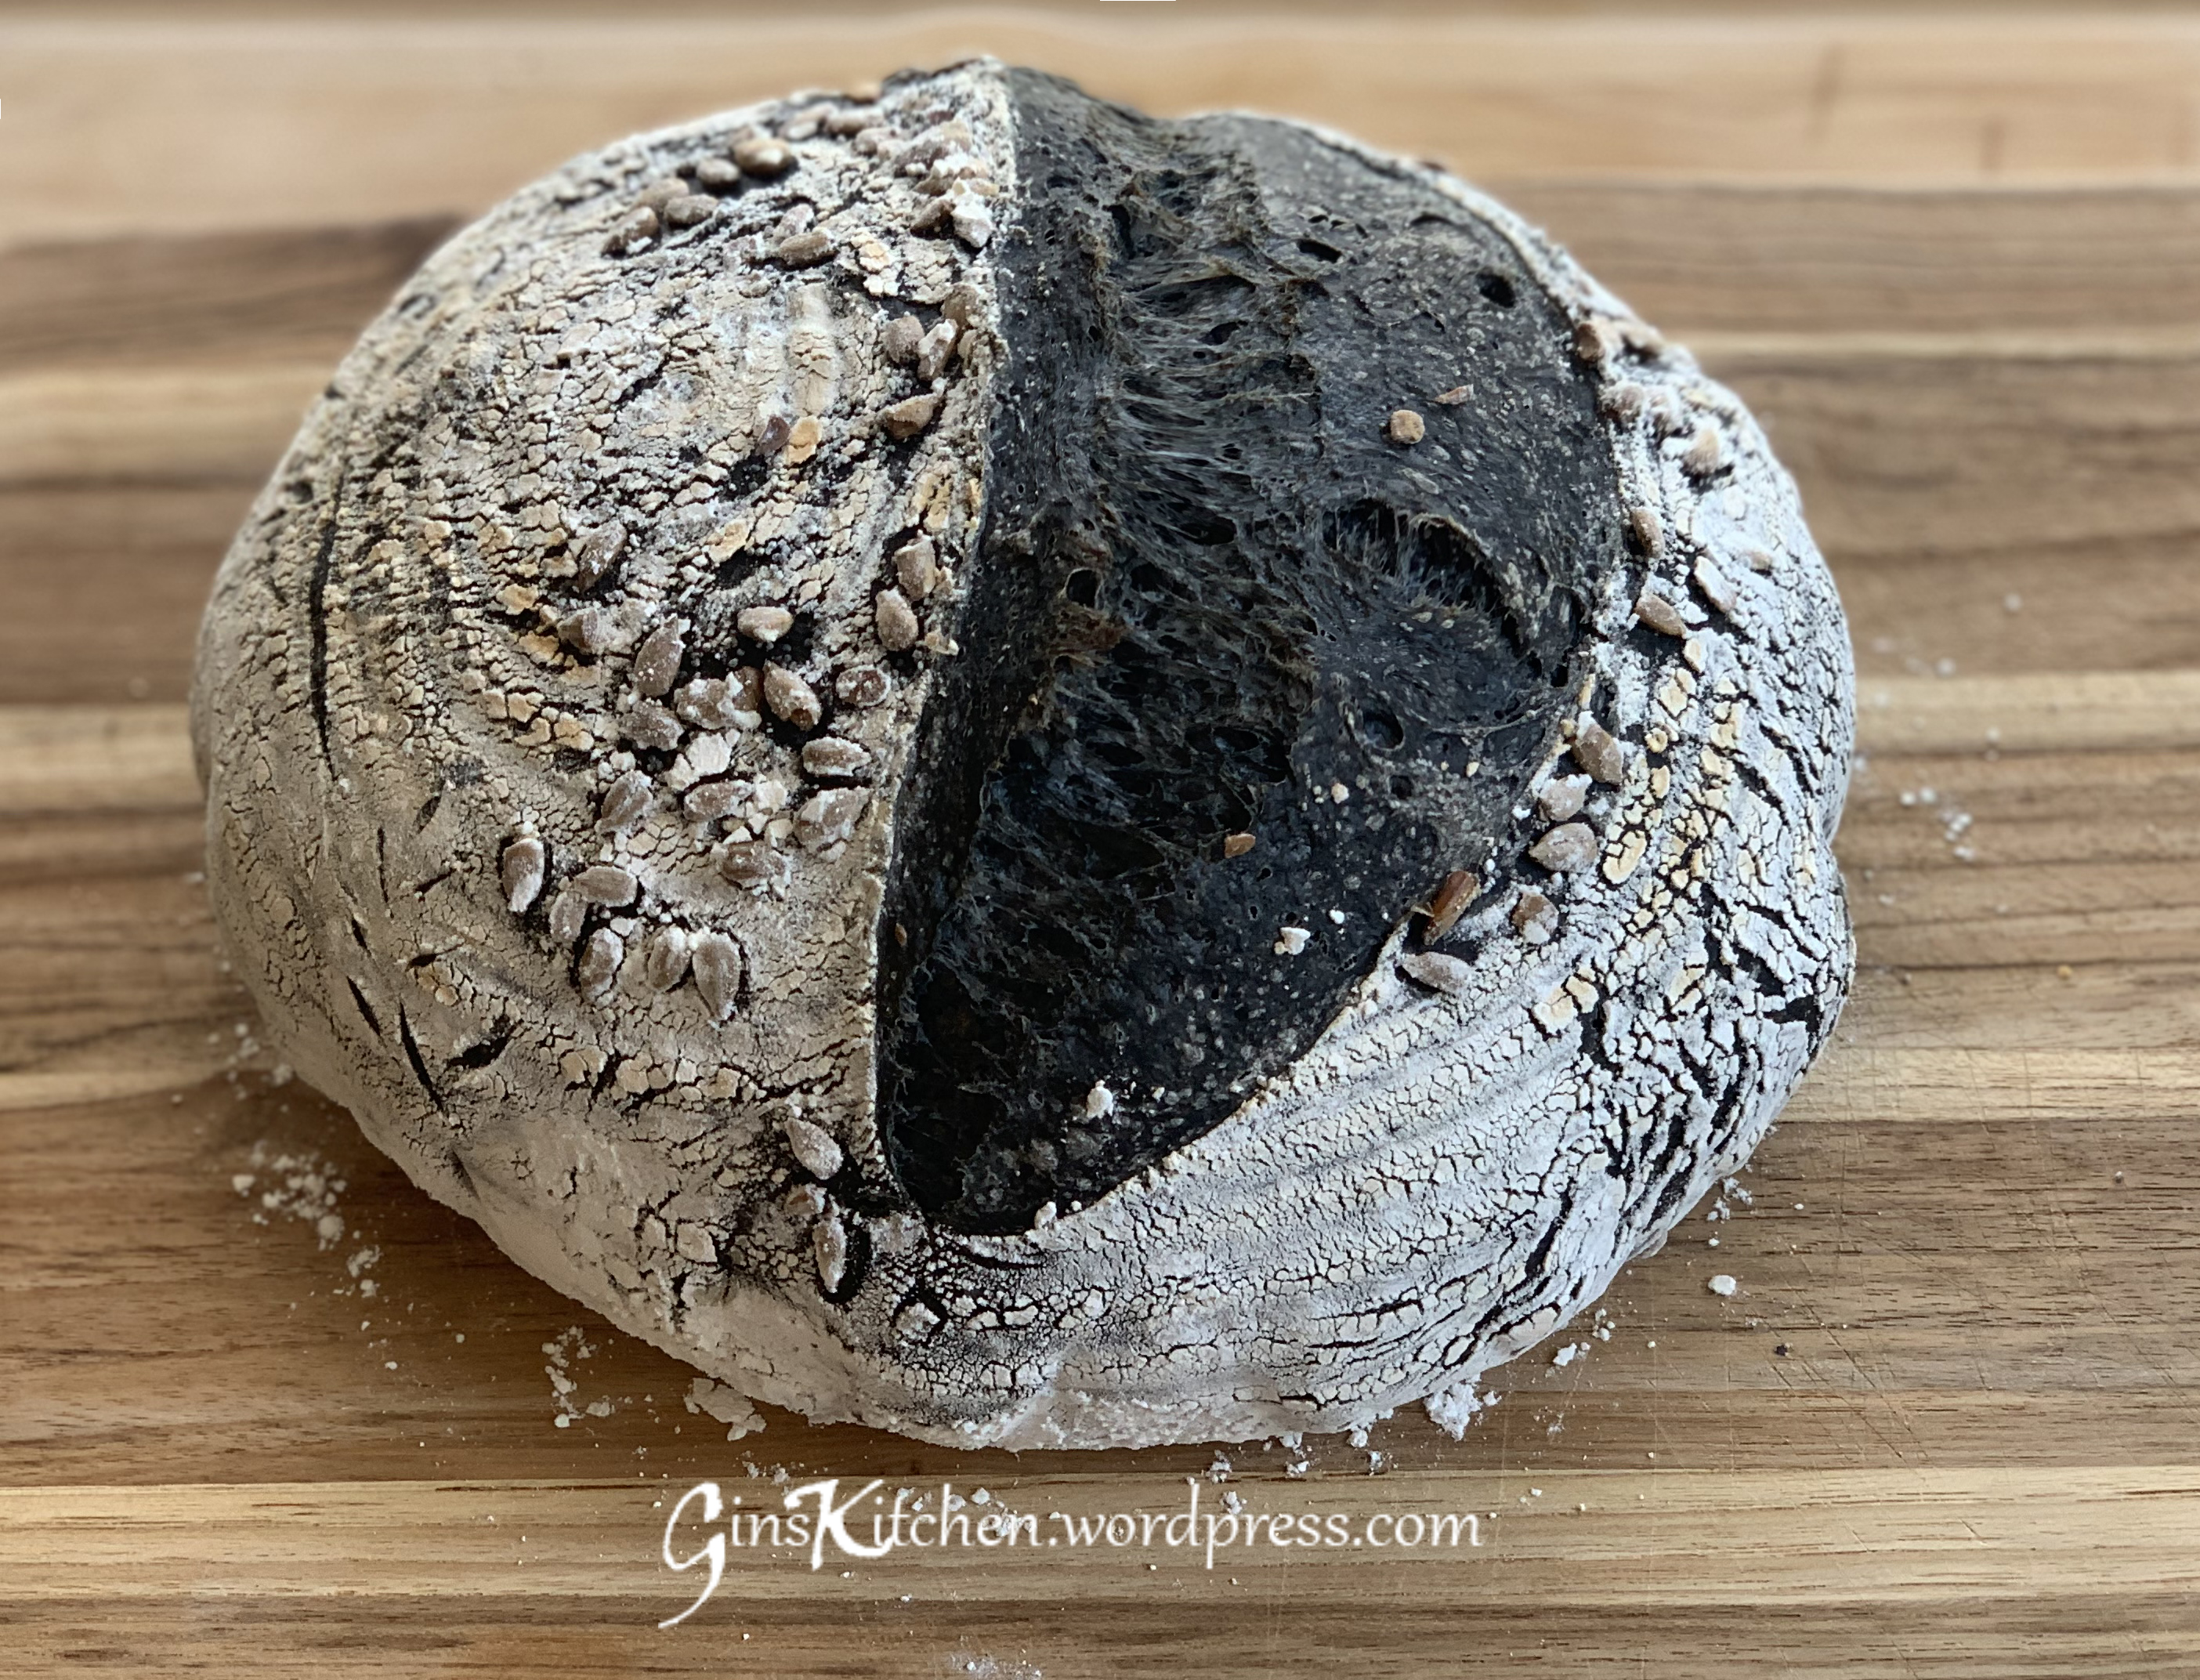
You can score the dough either a line or a cross. (Picture 20)
Remove the cast iron pan from the oven and slide the dough to the pan. (Picture 21)
Cover the cast iron pan and turn the oven temperature down to 450F and set the timer to bake for 20 minutes. (Picture 22)
After 20 minutes, uncover the pan and continue to bake for another 20 minutes.** (Picture 23)
Let the bread cool down completely on a cooling rack before slicing it.
**Note: Each oven is different, you may need to adjust the cooking time for longer.
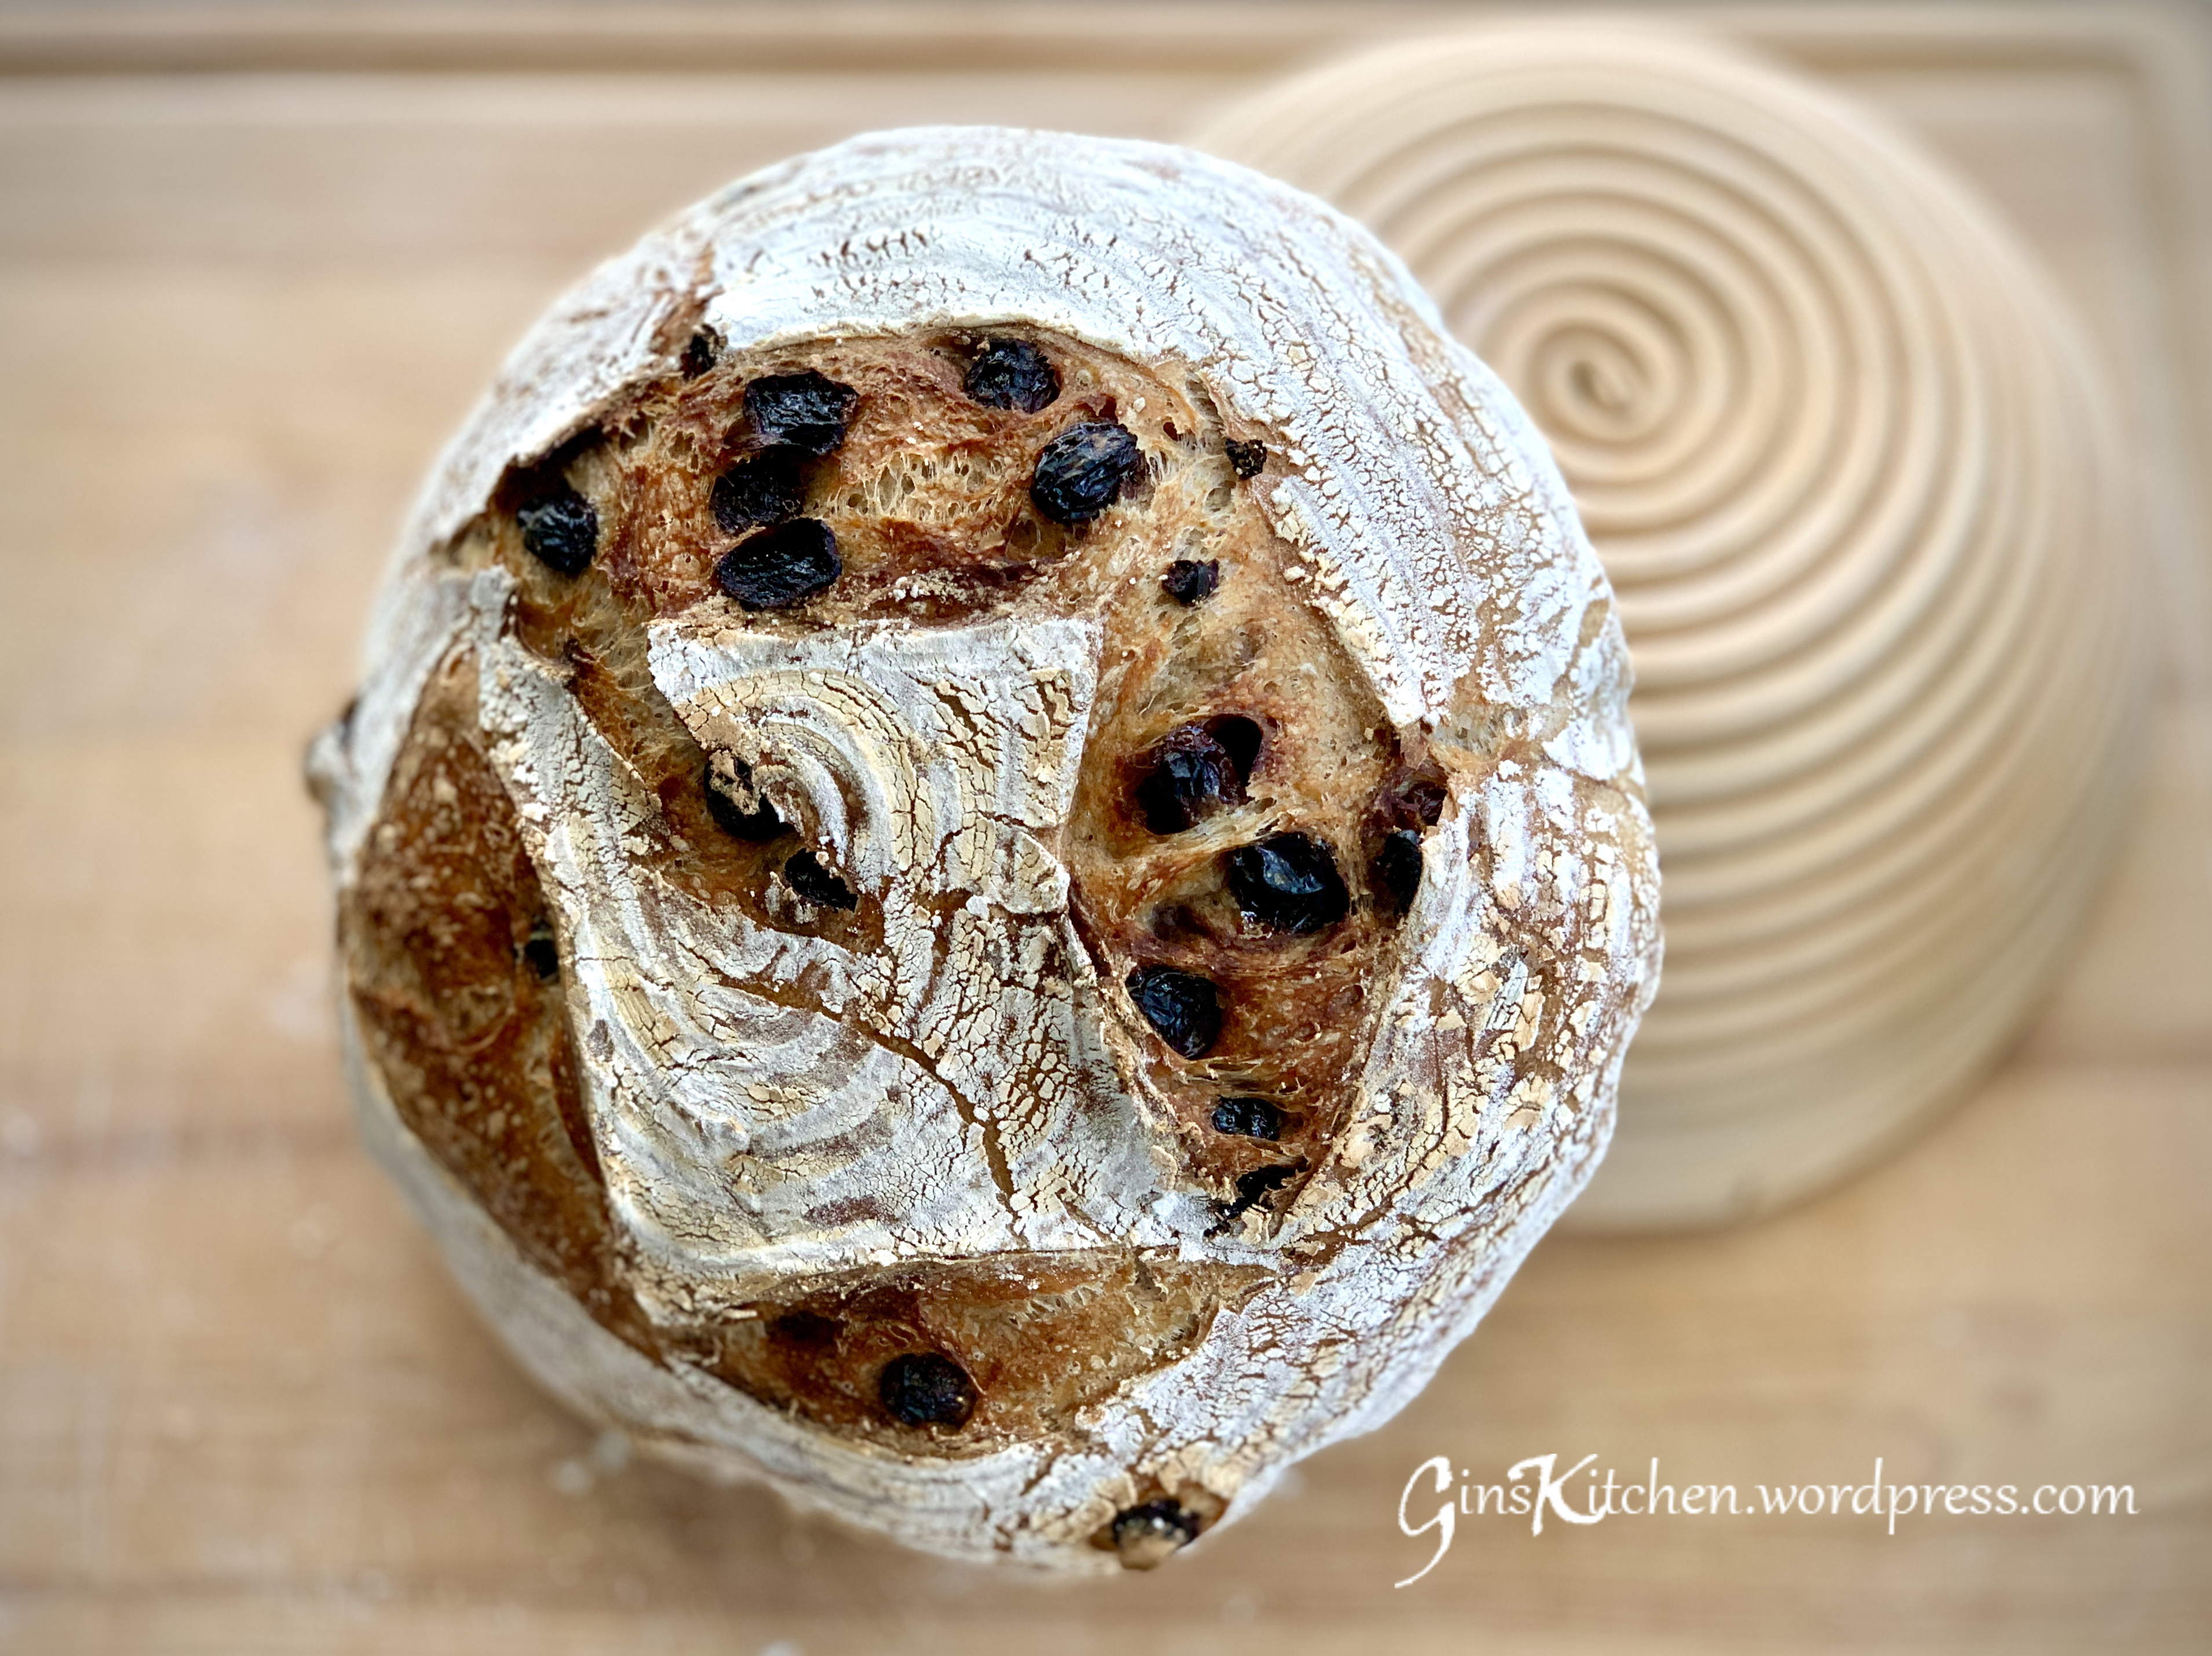
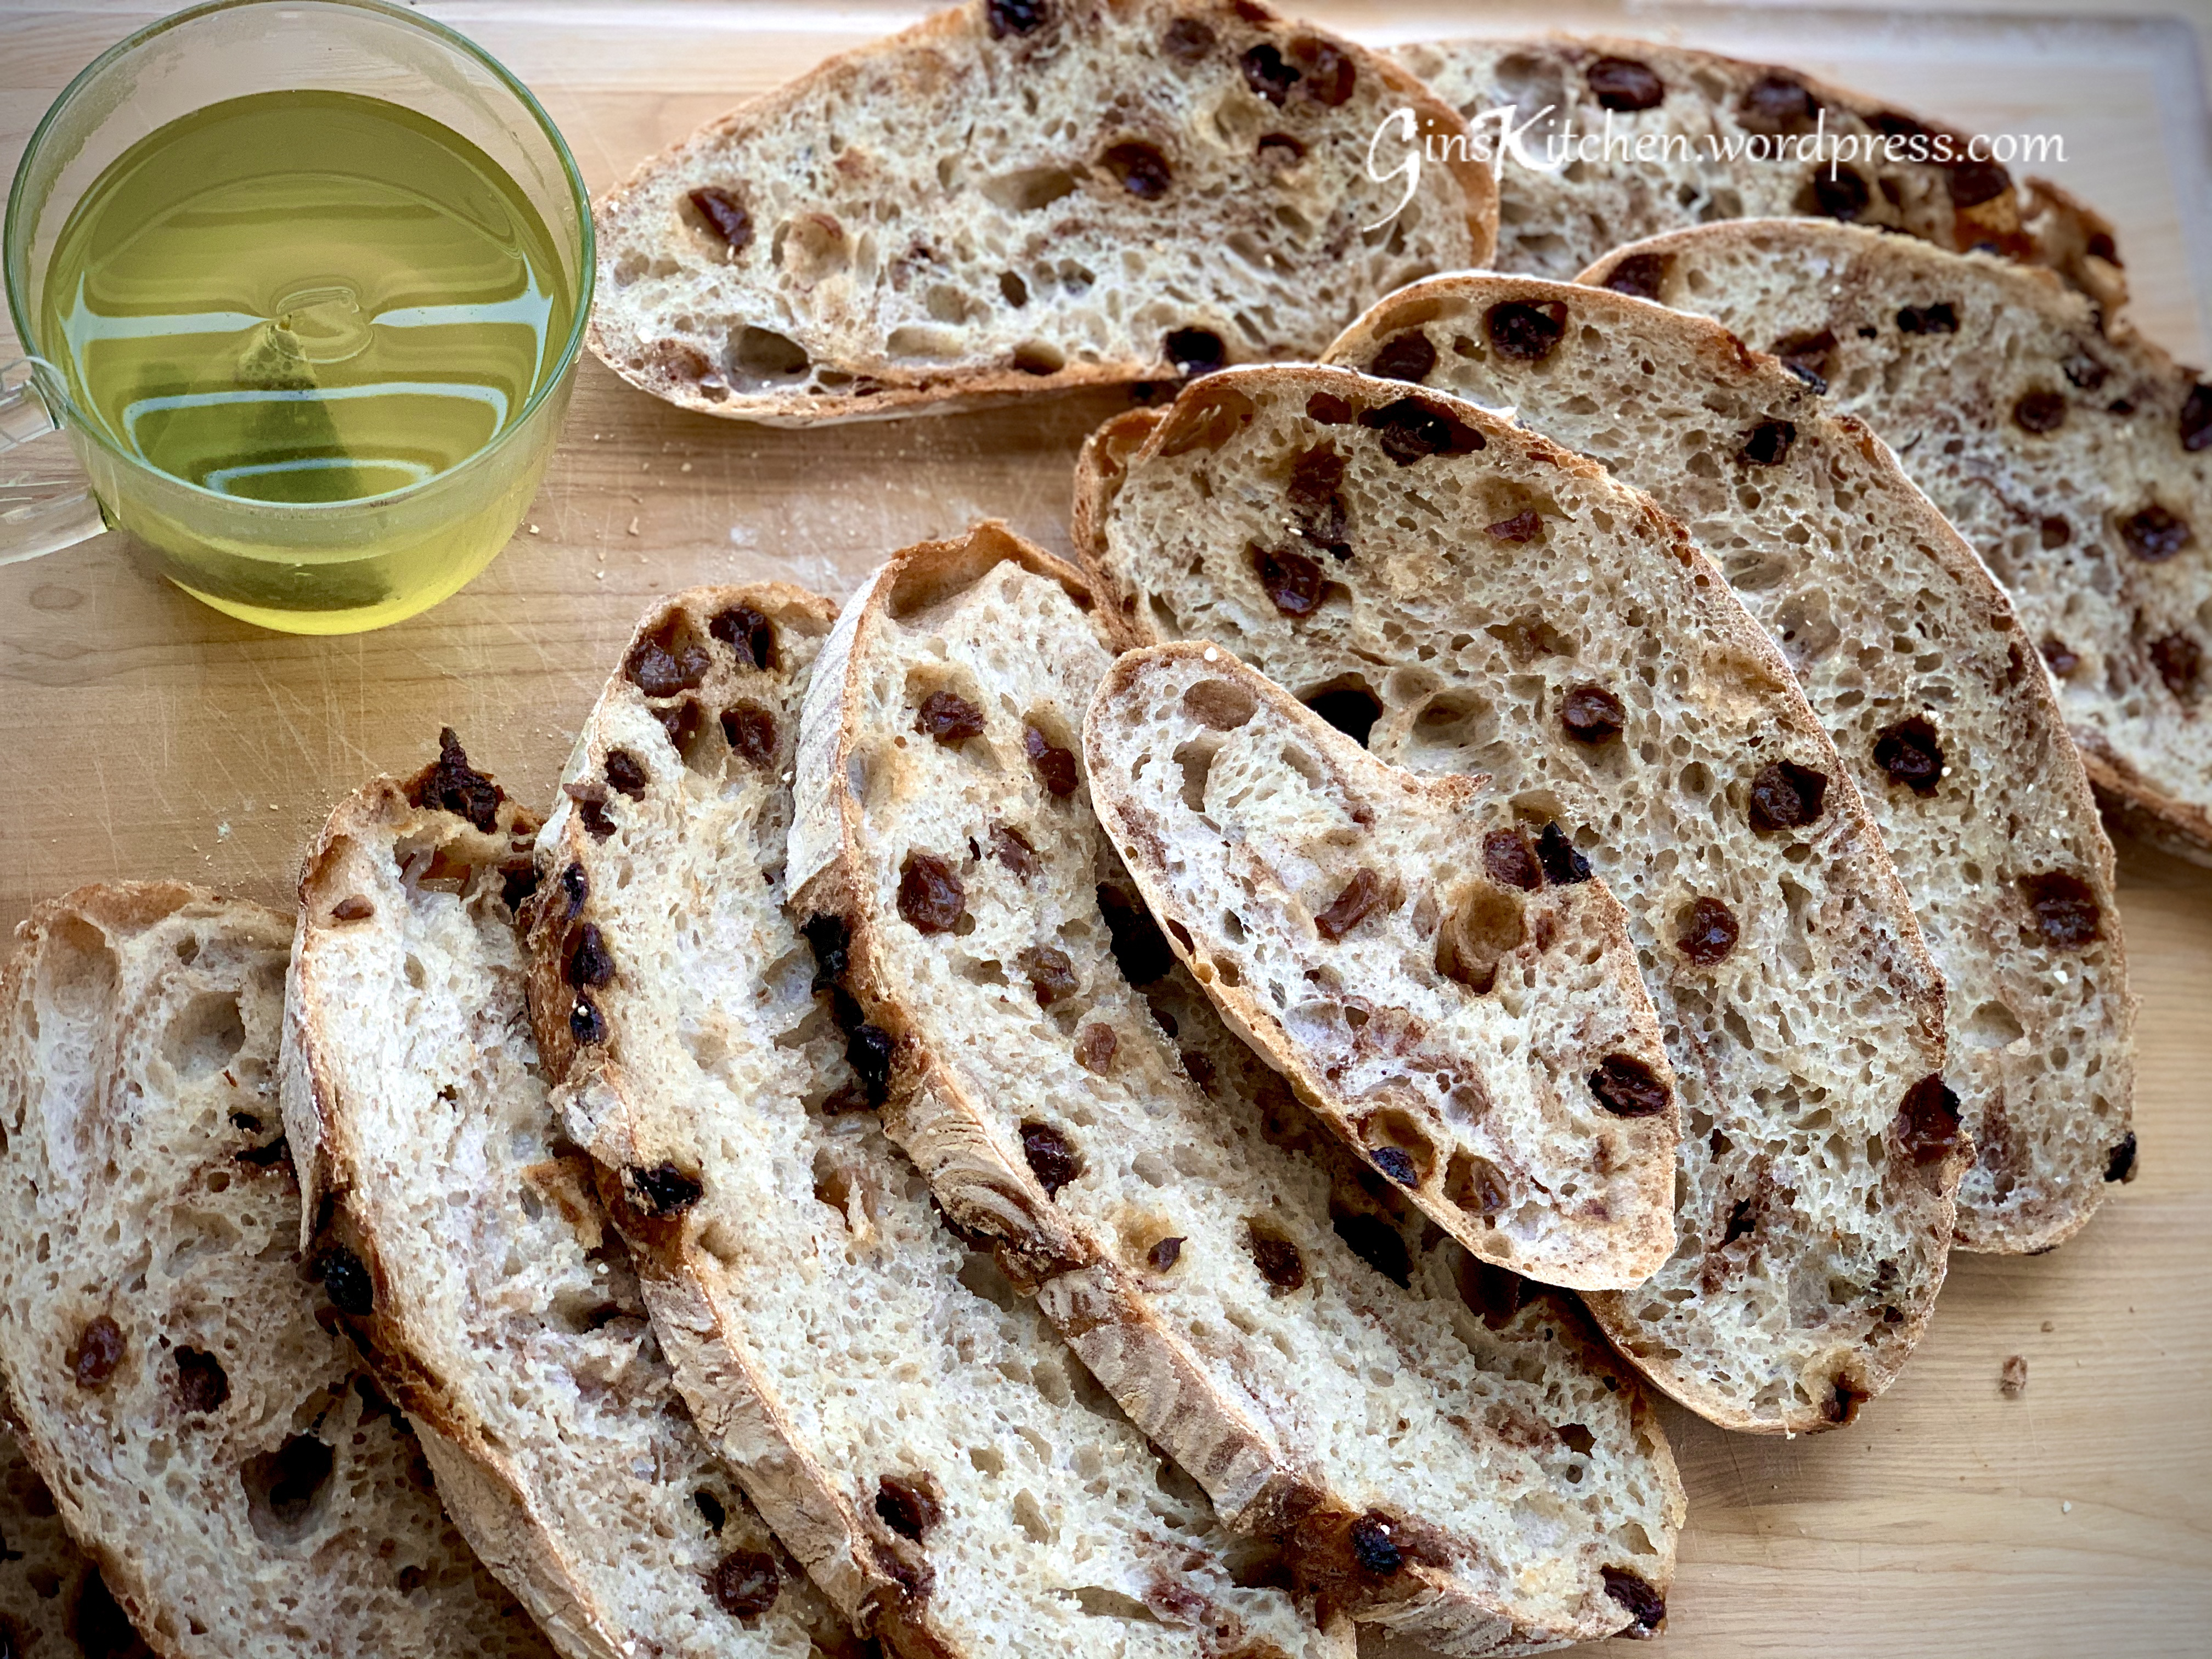
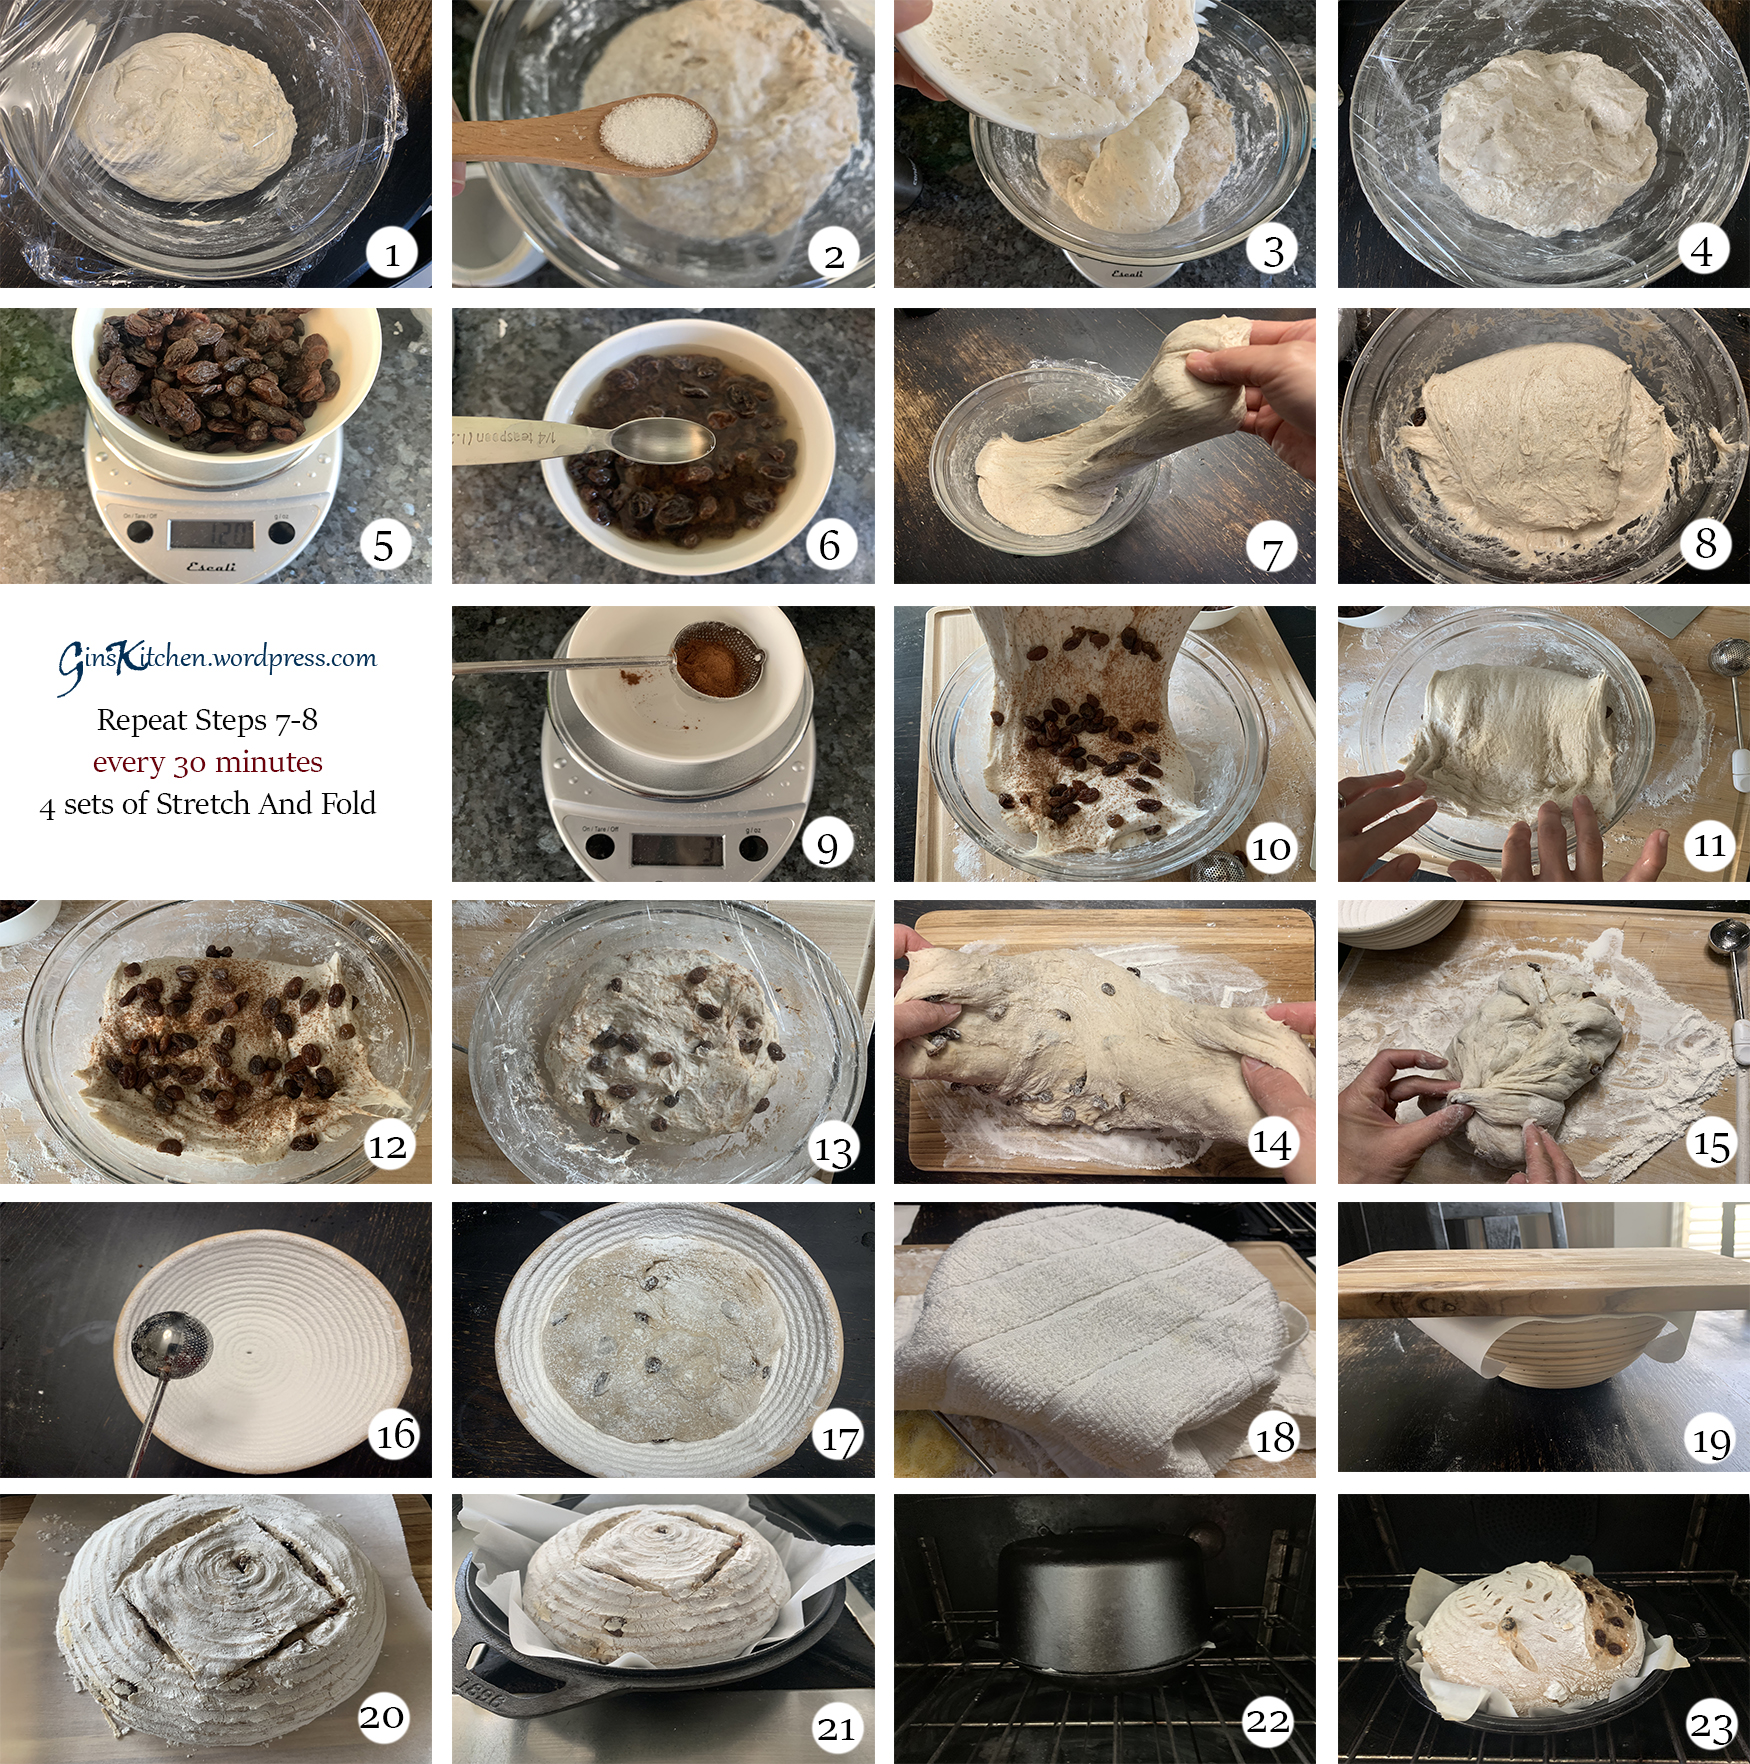
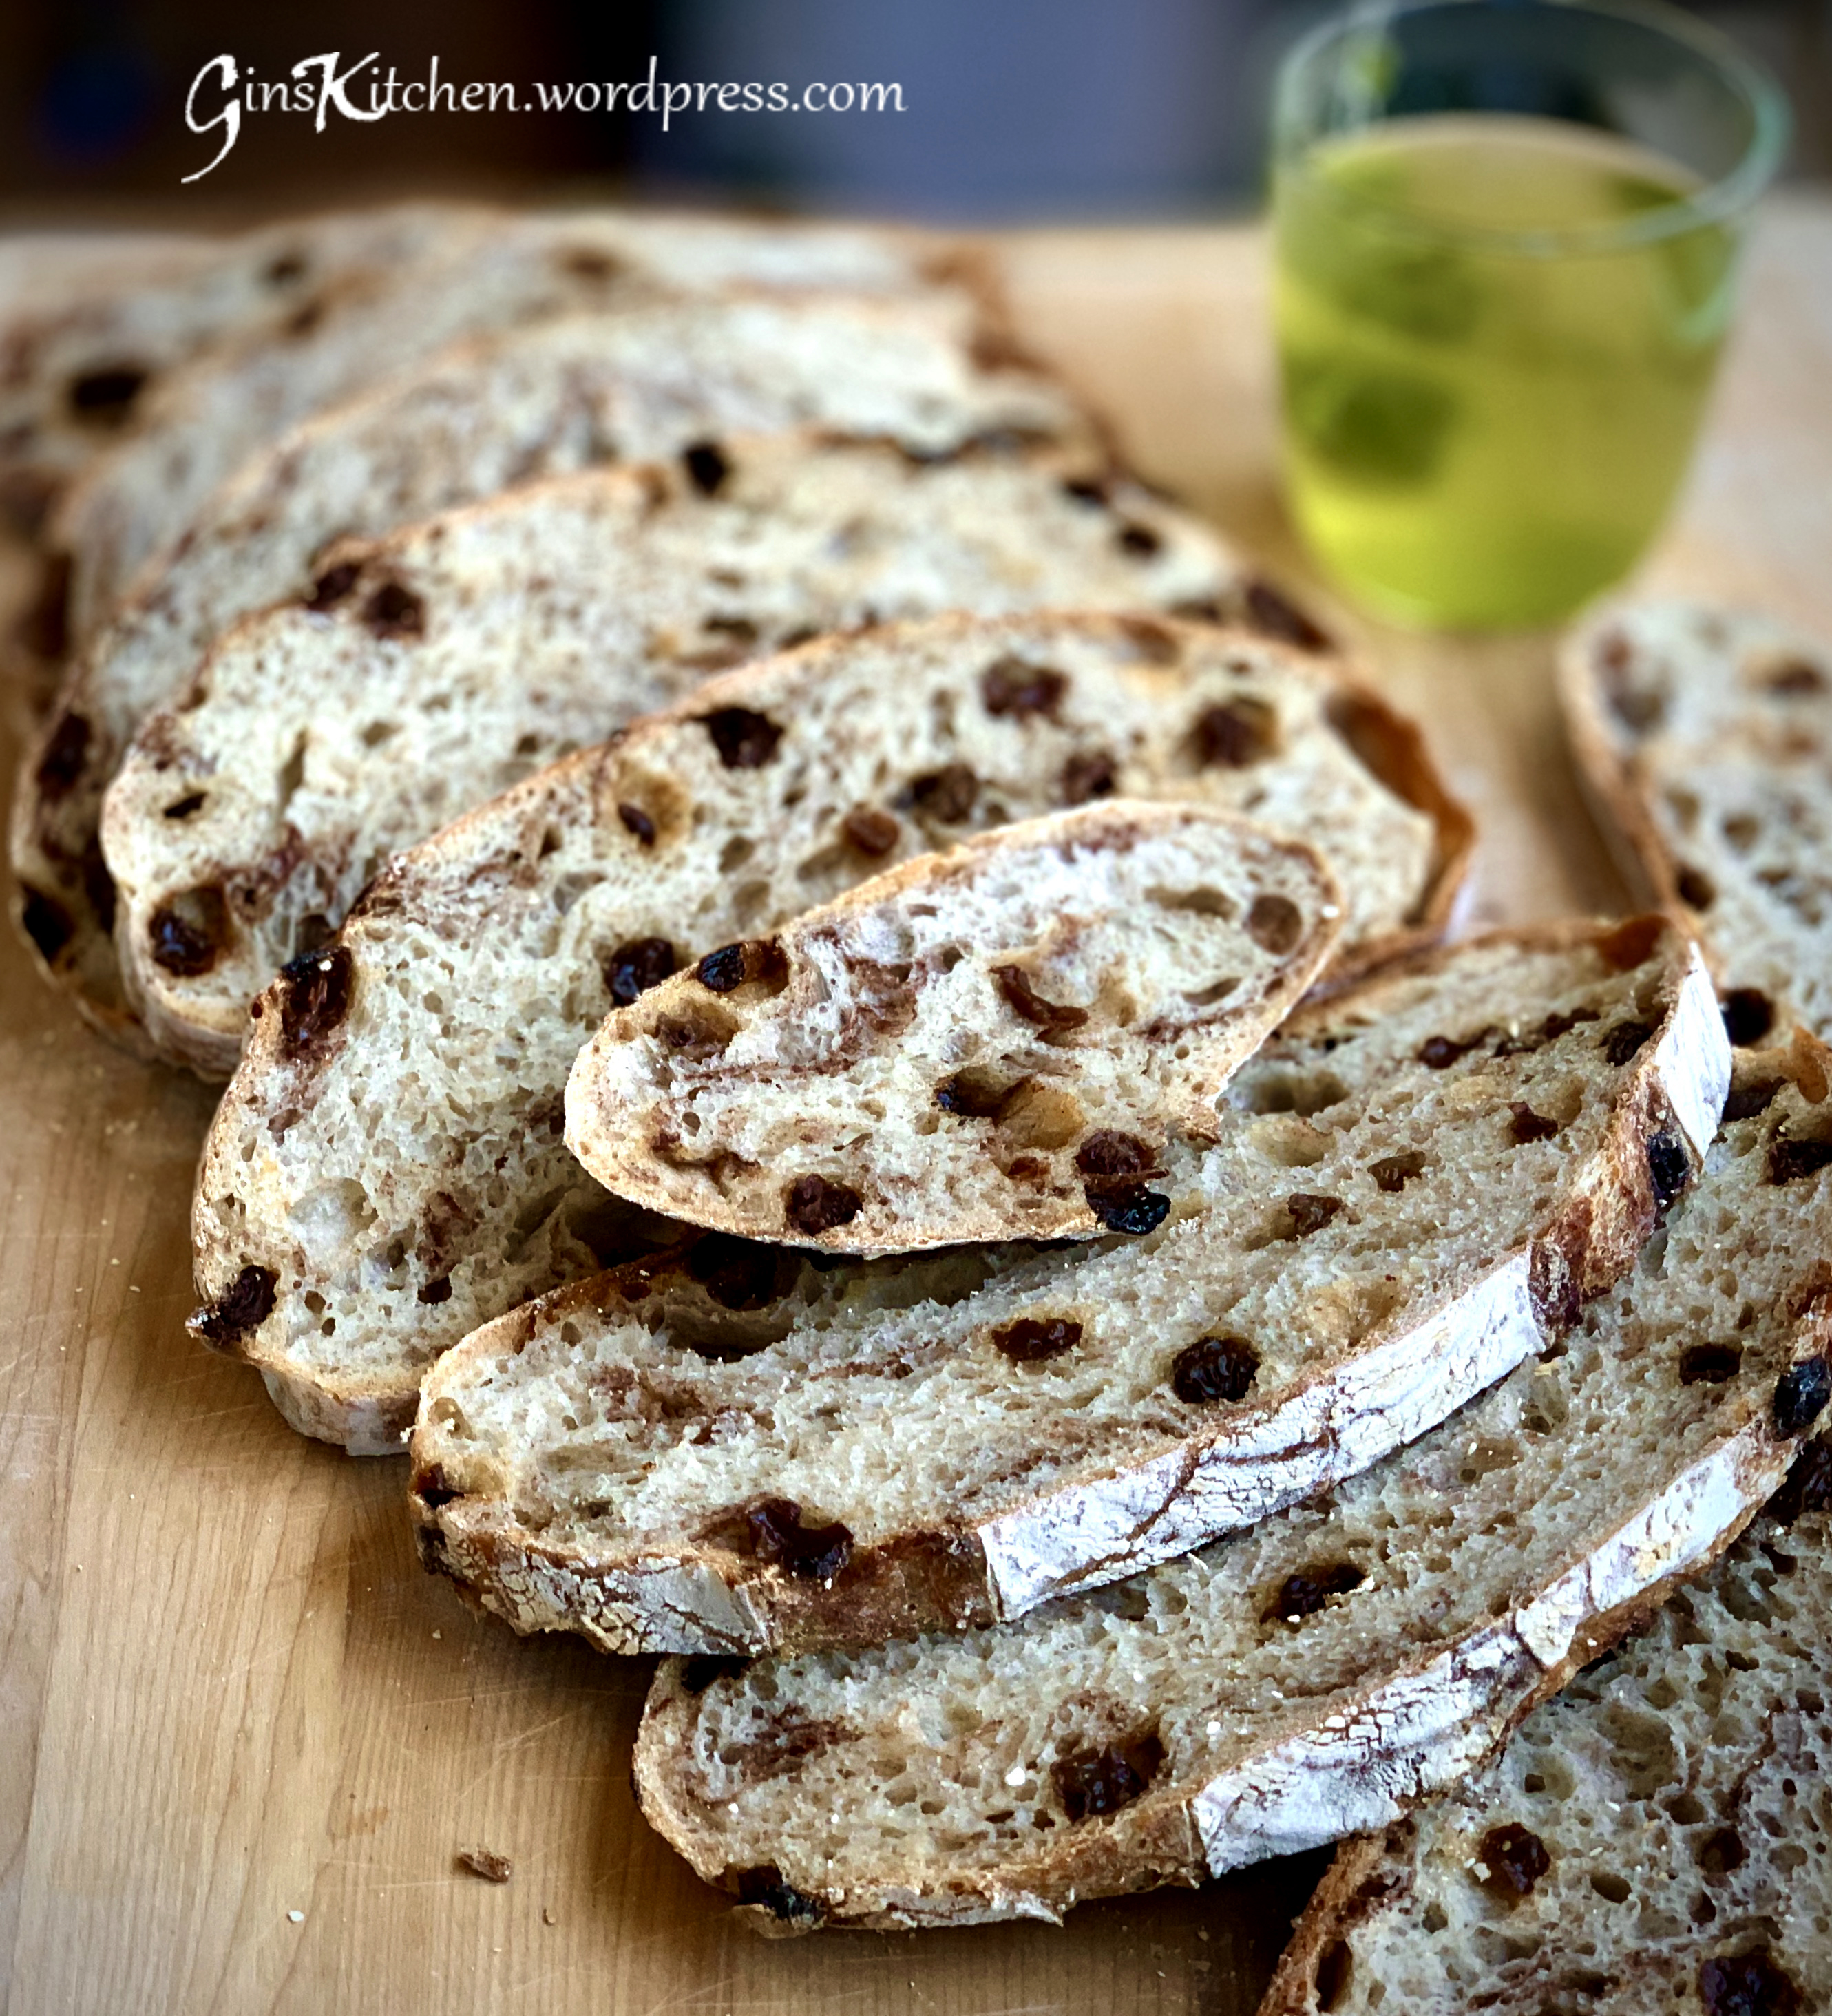
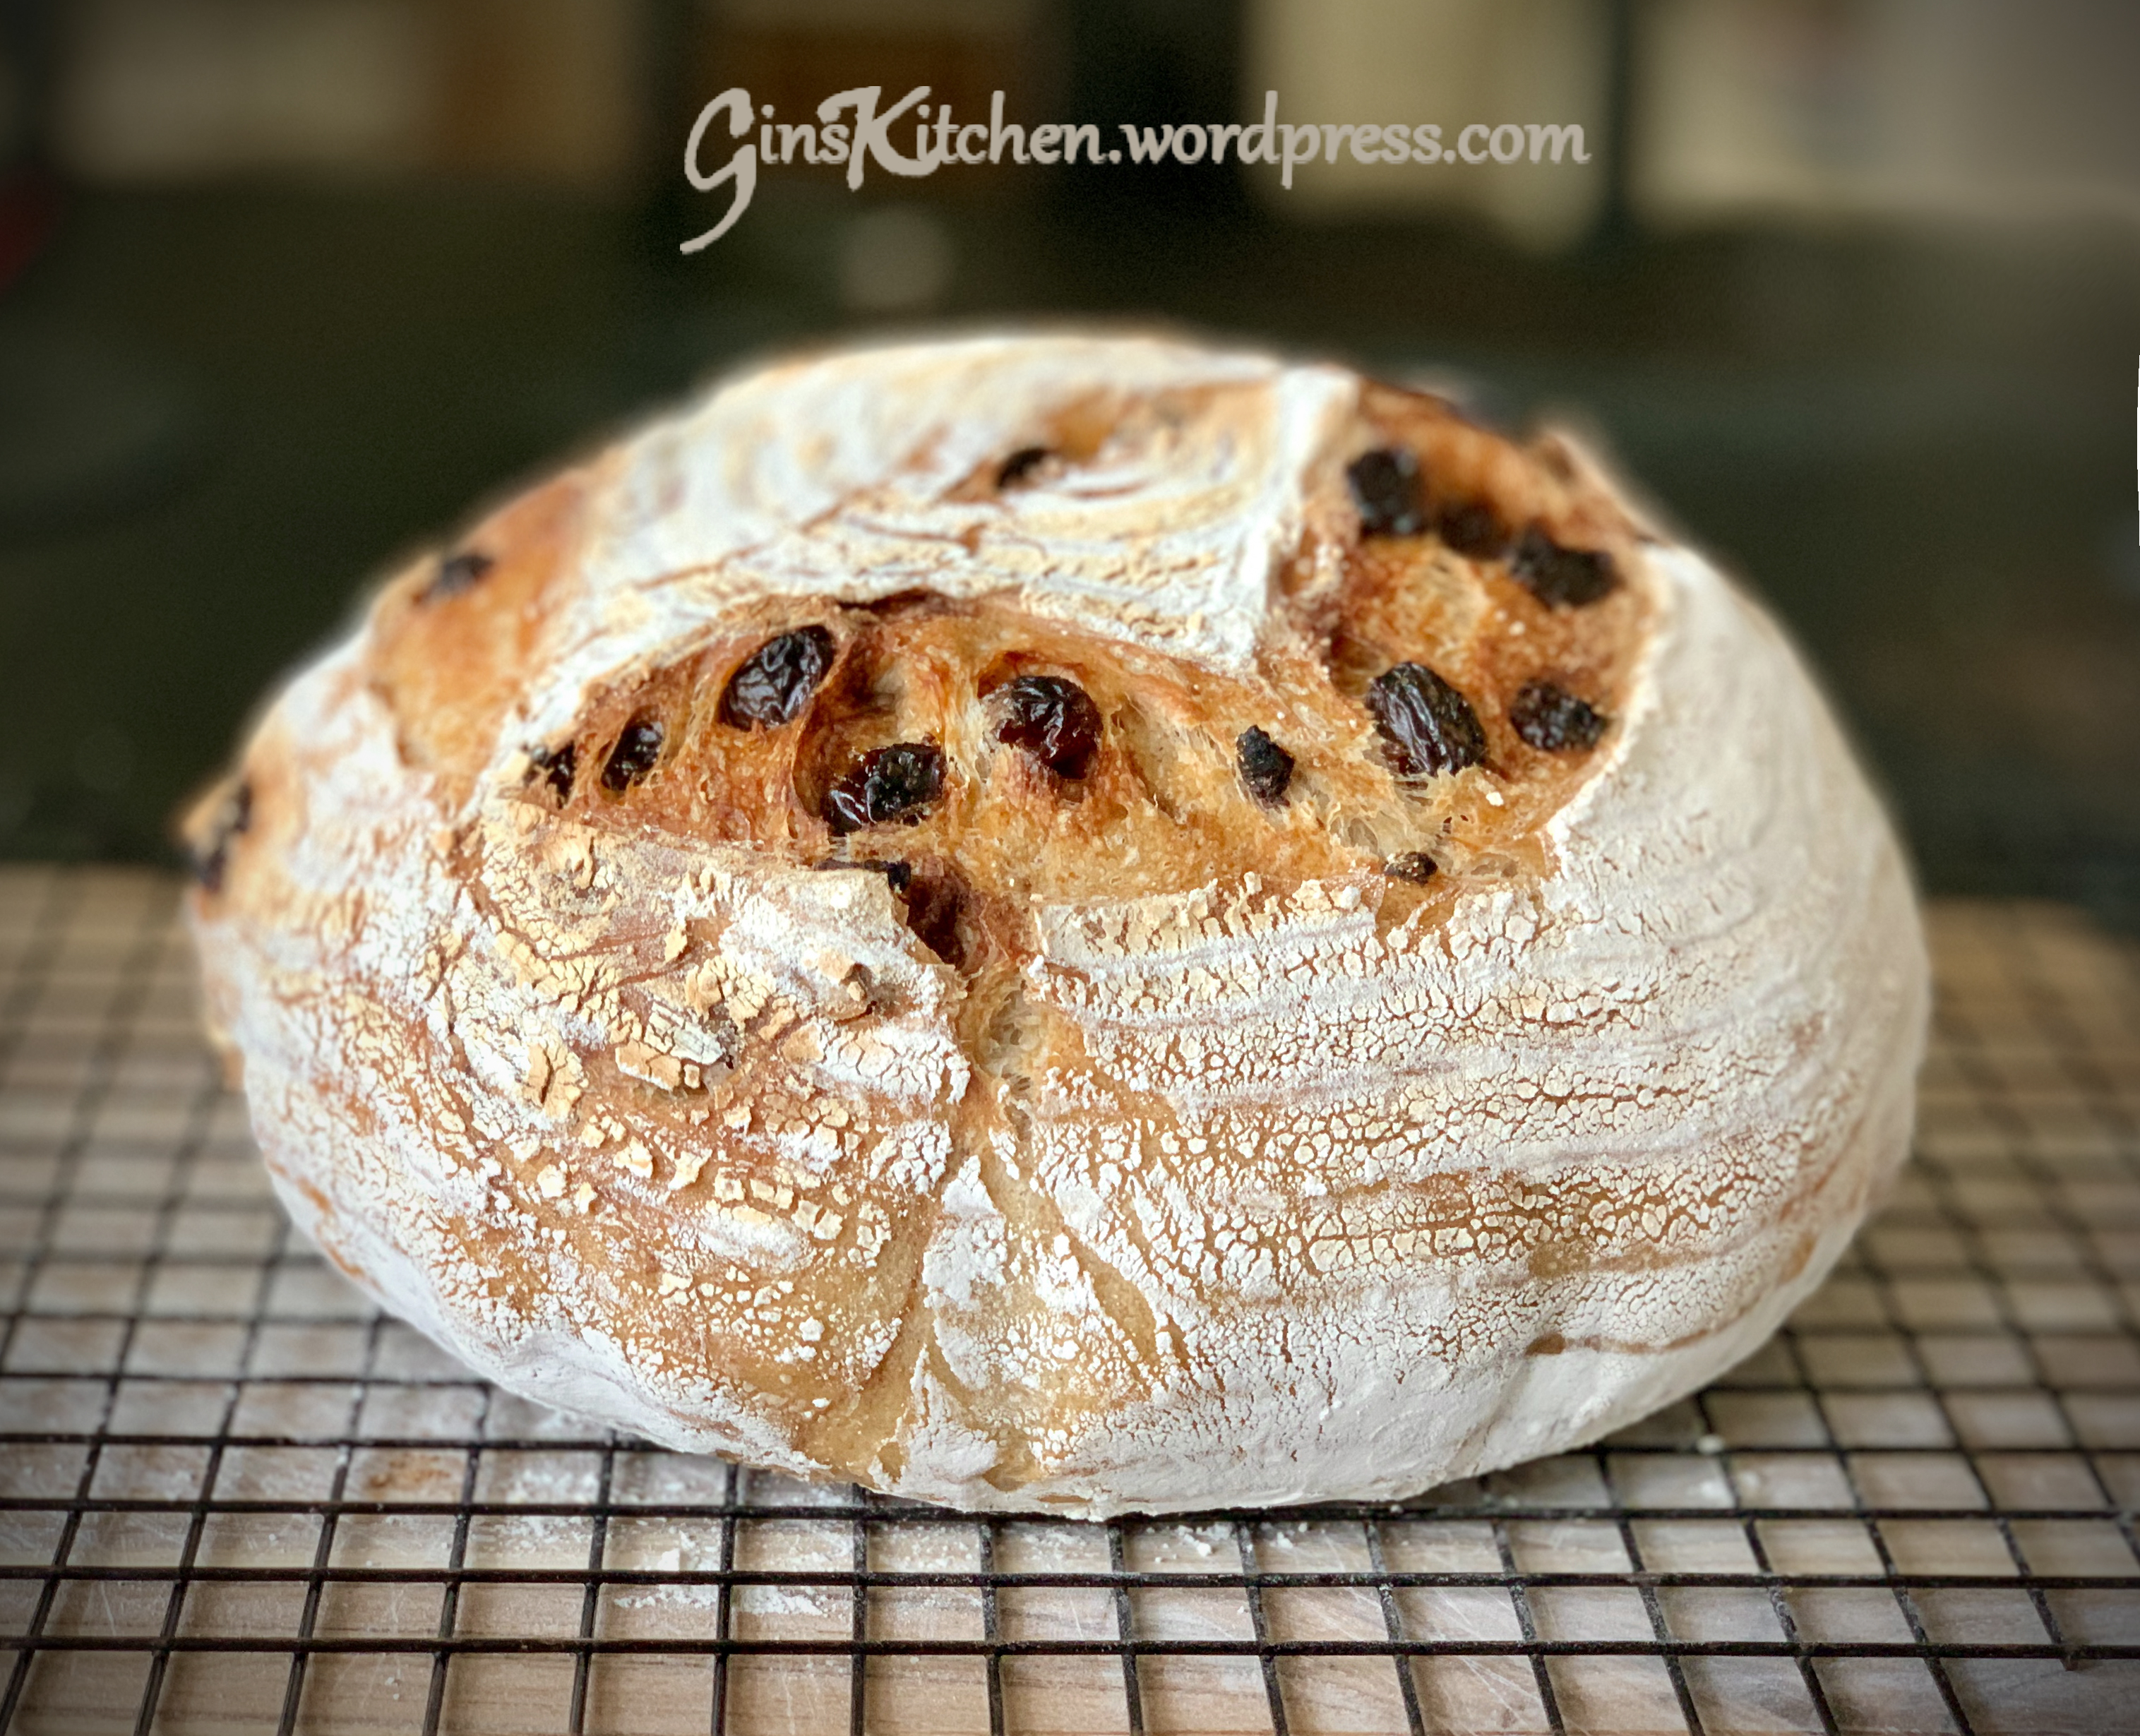
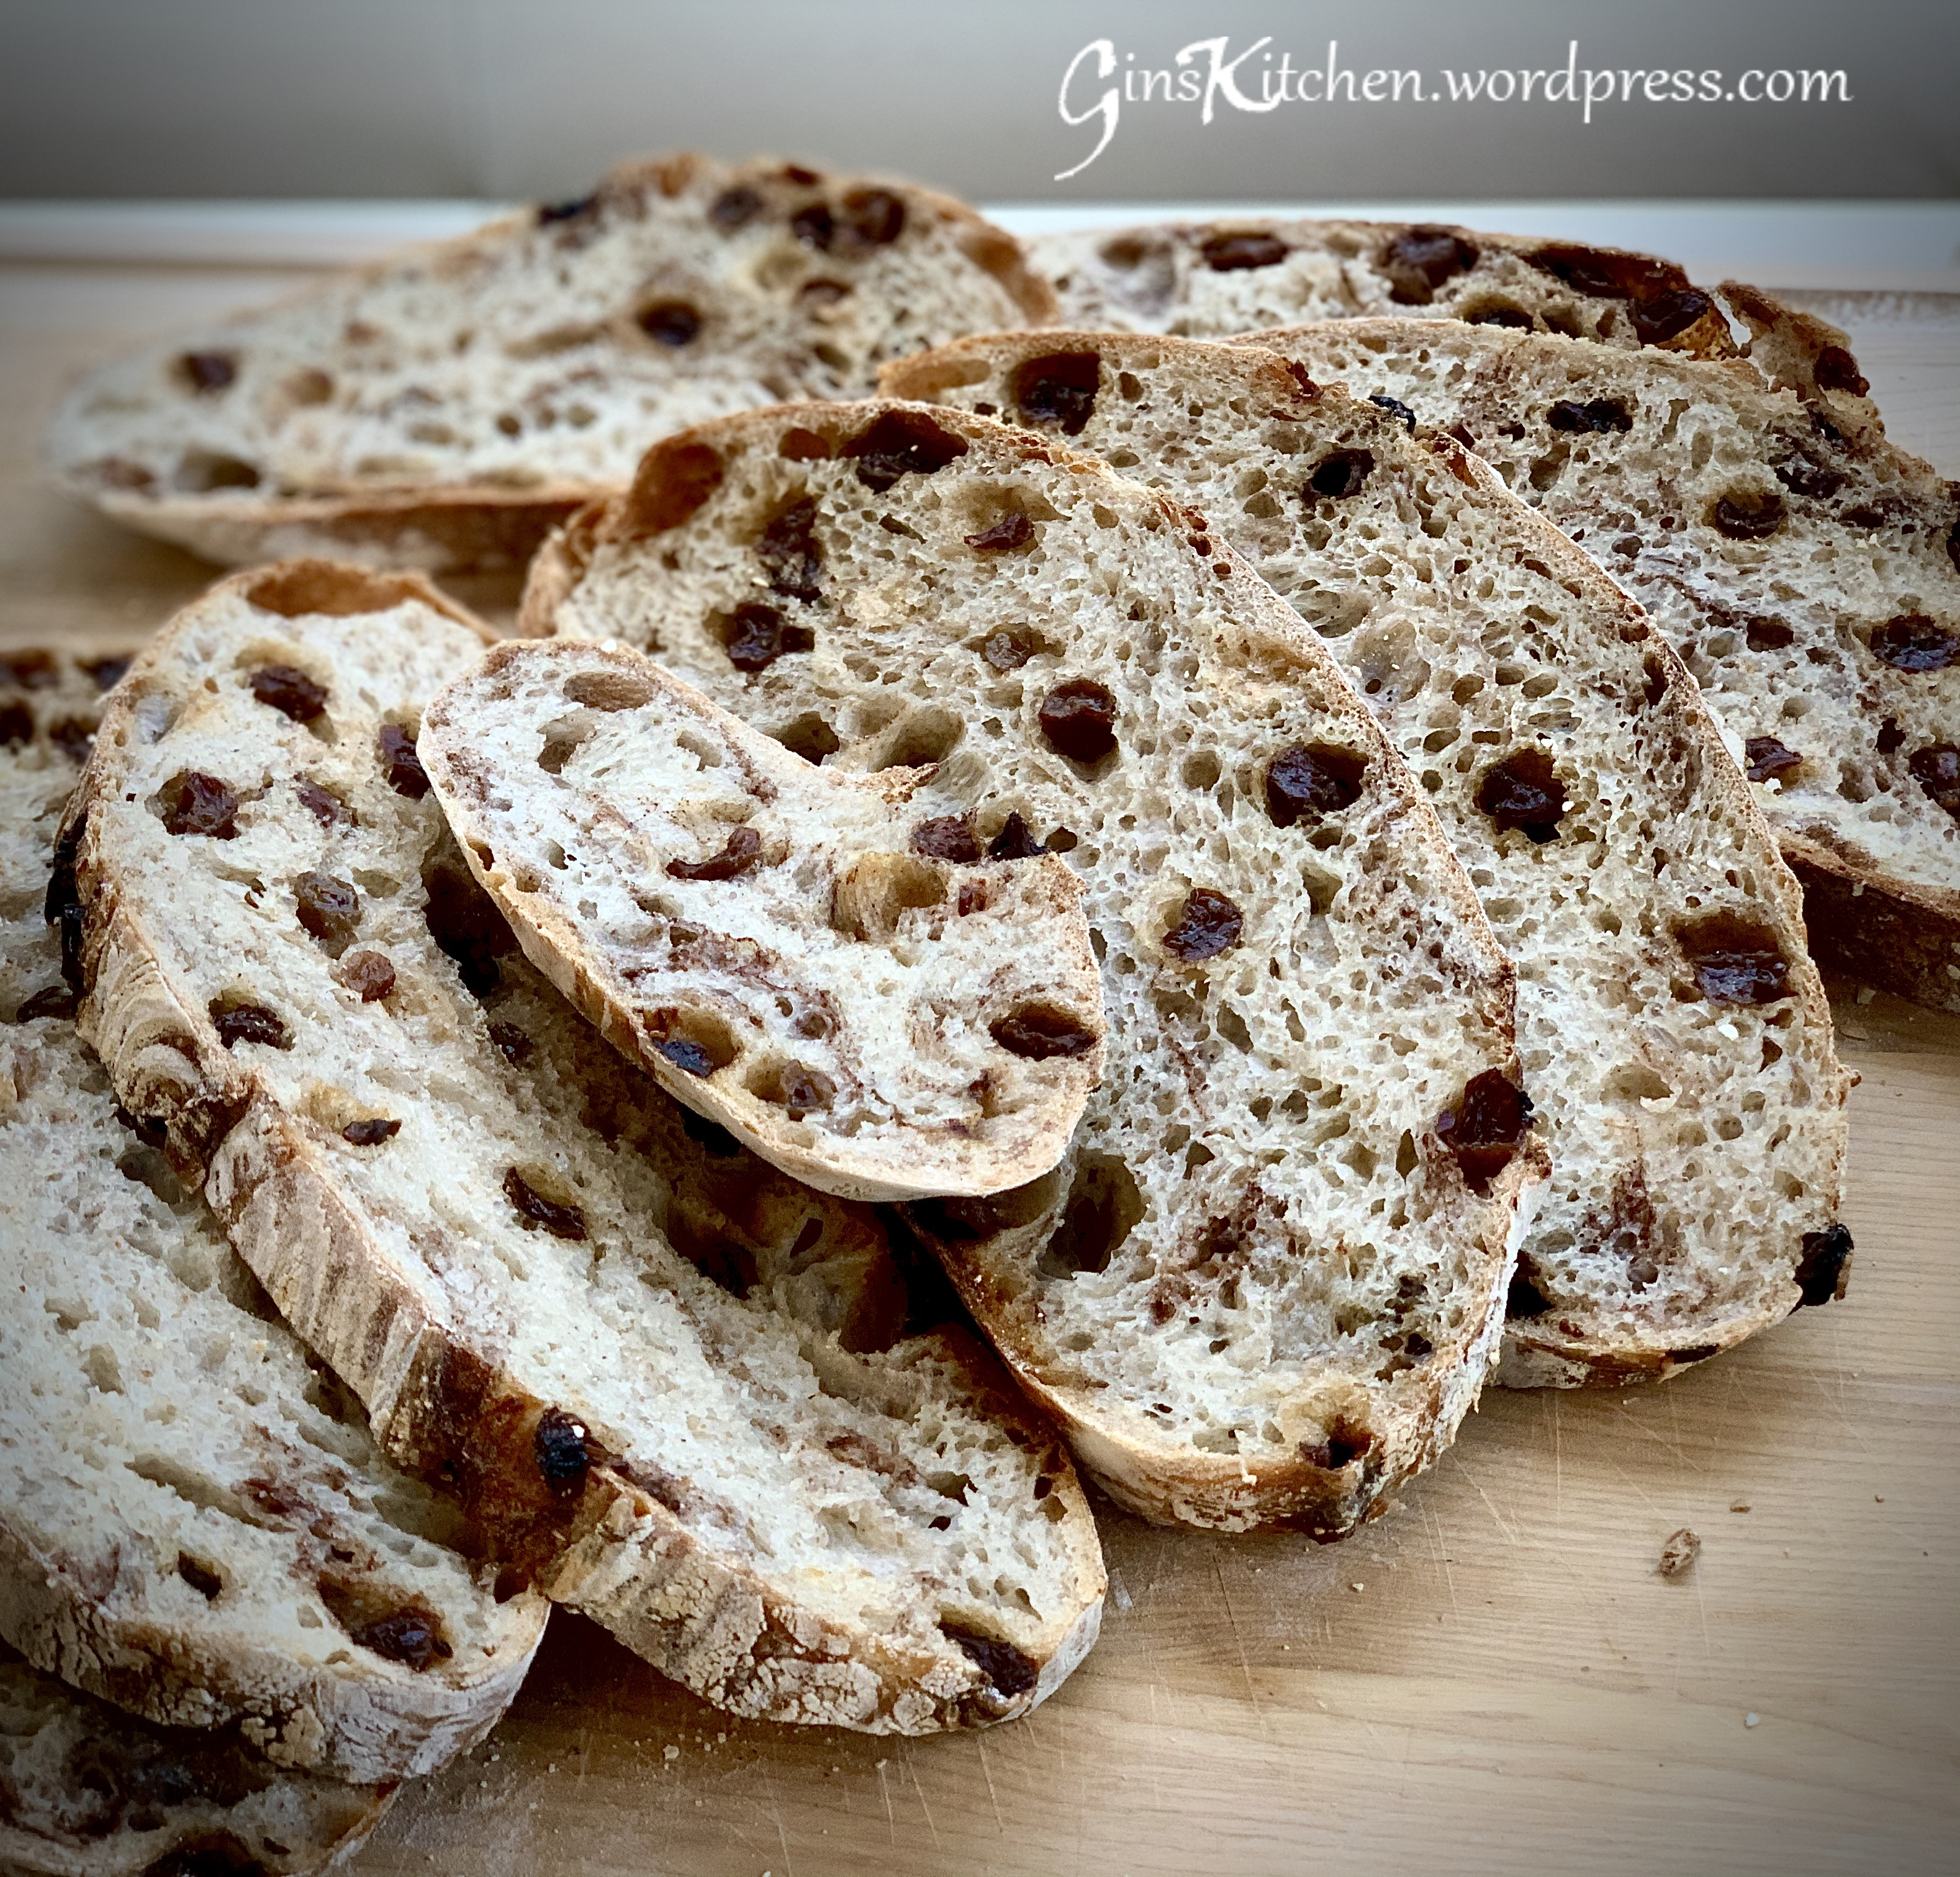
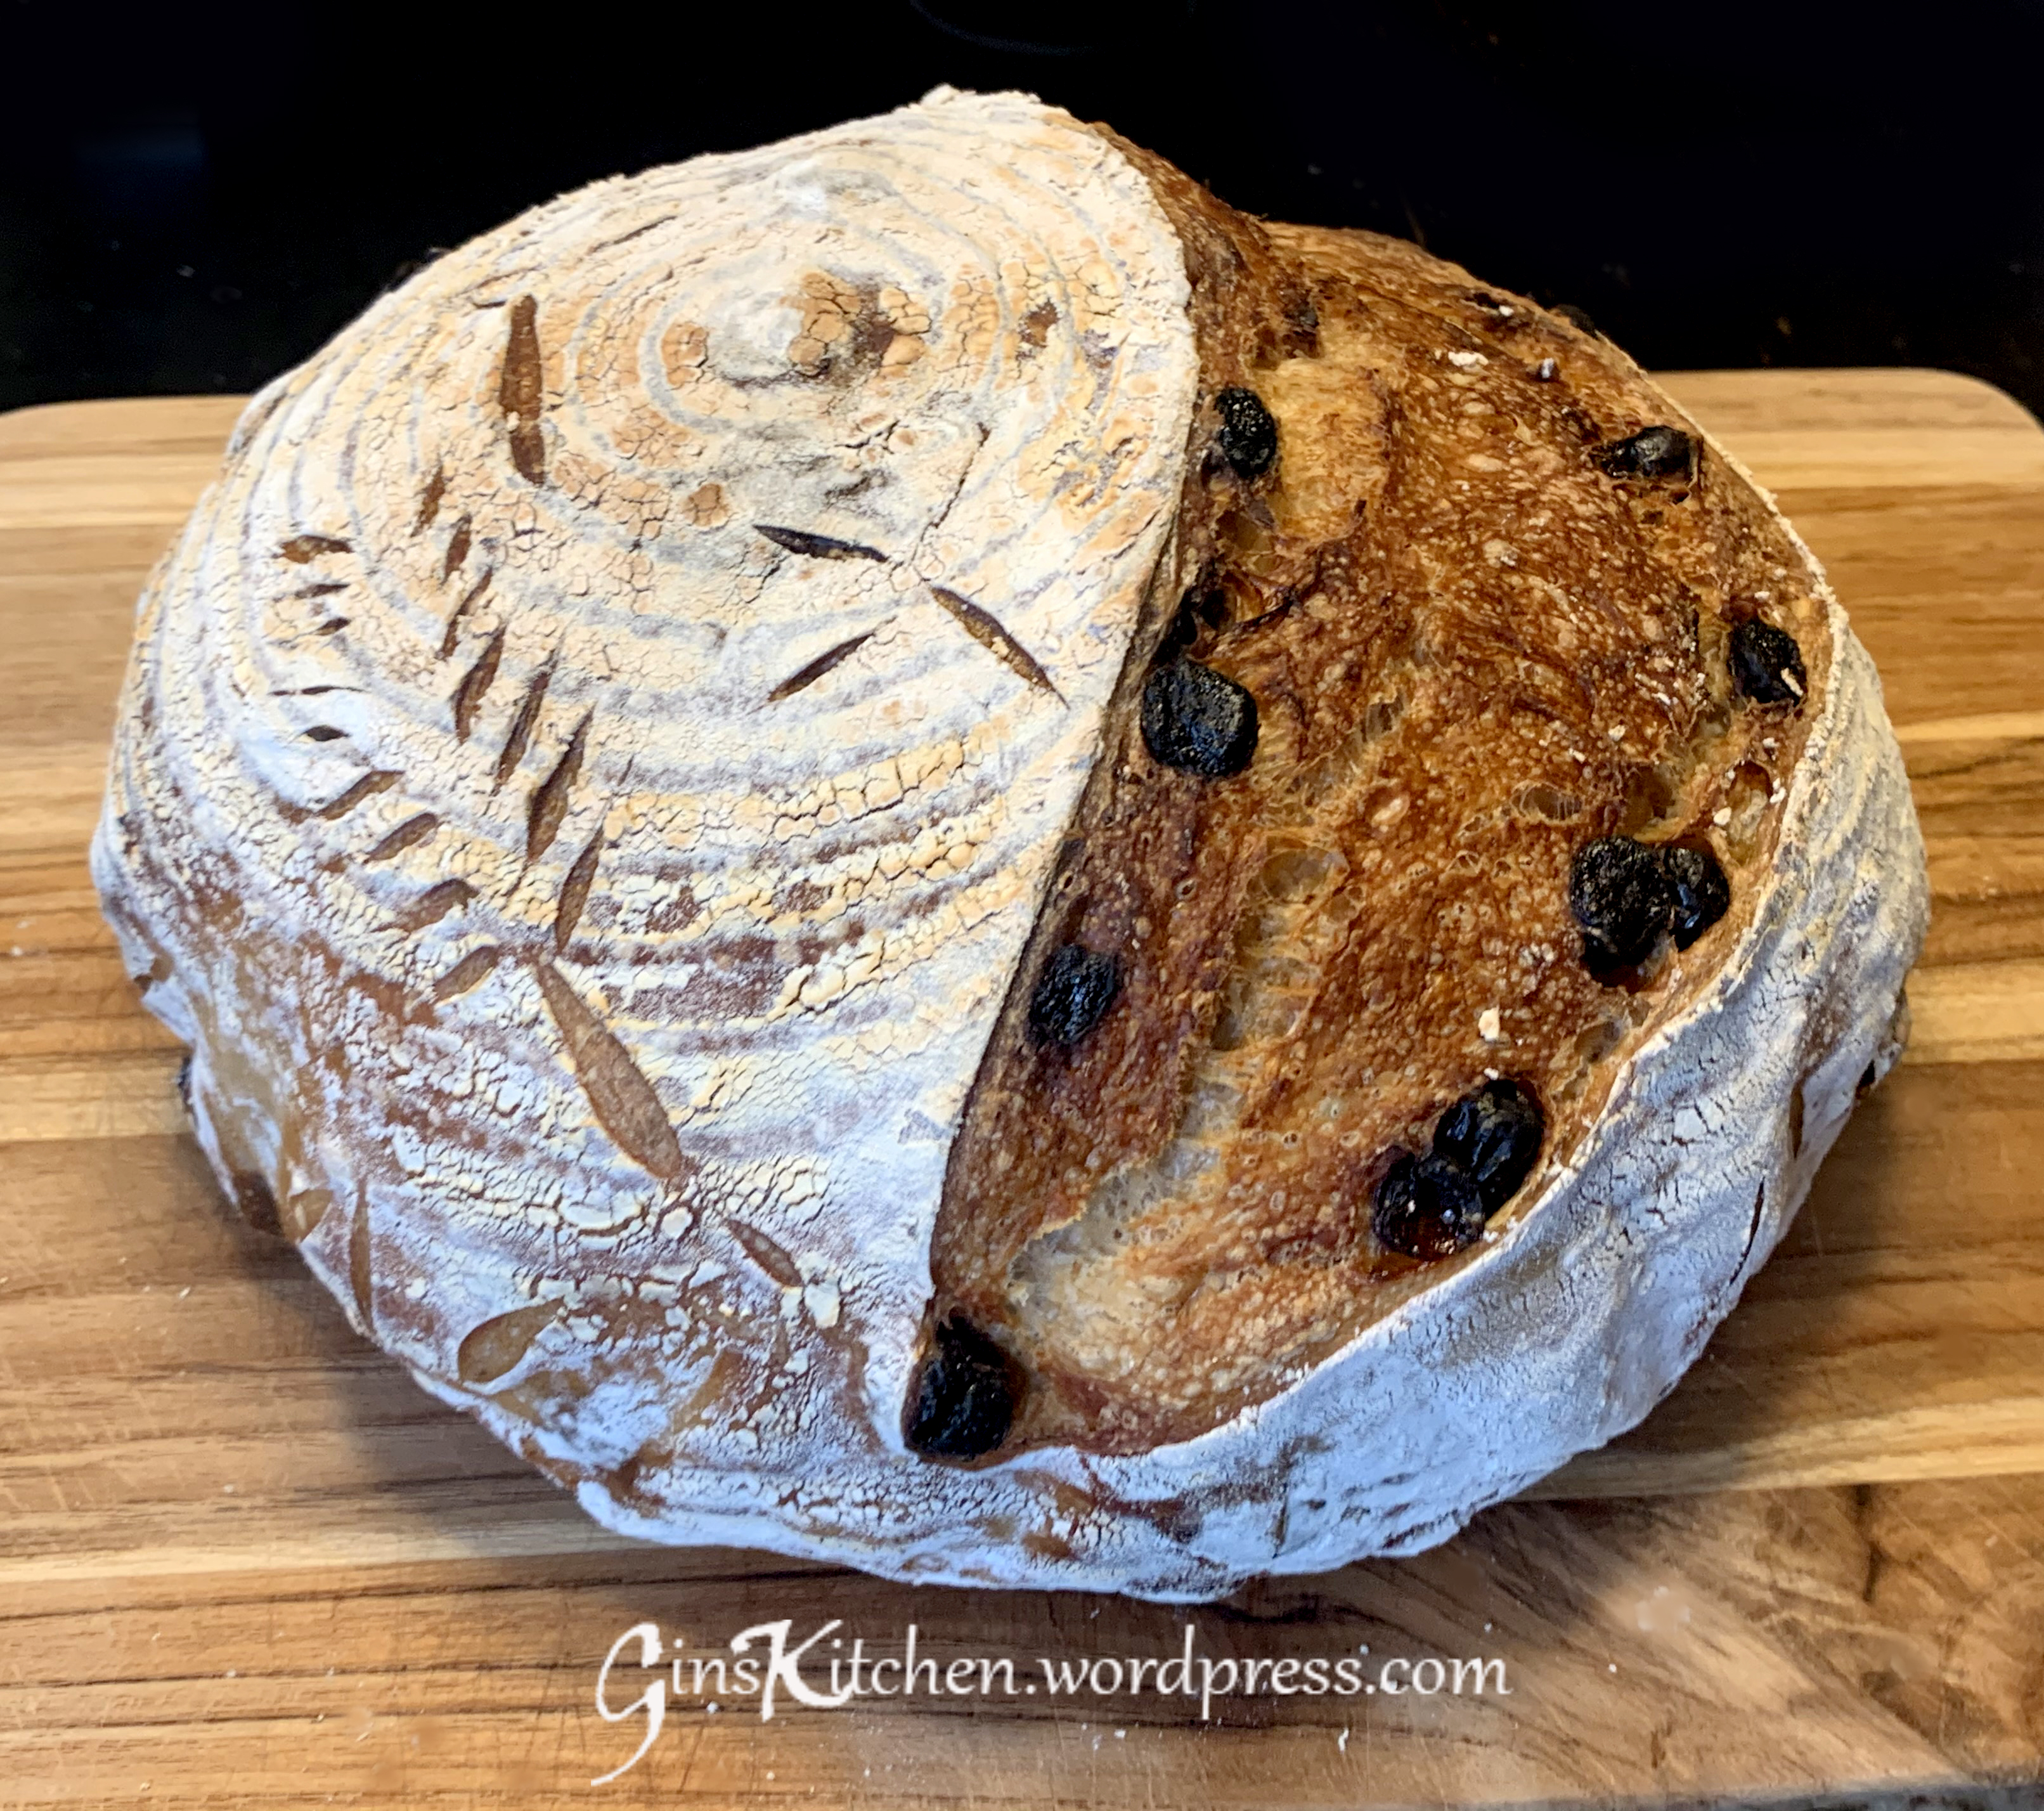
Lately, I feel like I’m hooked to sourdough baking. Not only is the texture and the taste of the bread addictive, but the whole bread making process is addictive as well. I just can’t describe the excitement I had when I took one successfully baked loaf out of my oven. My friend is an amazing baker whose Instagram is yhsourdough; you can follow her to see all the amazing sourdough bread she bakes. Although I didn’t get this Raisin Cinnamon Sourdough recipe from her, I learned from her that cinnamon breaks down gluten, and I should incorporate it to the dough towards the end of the bulk fermentation. I still have a lot to learn, but this raisin cinnamon bread surely has a good texture and taste.
Ingredients (Hydration is about 72%):
Step 1 – Mix and rest for 1 hour
400g
Bread Flour
35g
Dark Rye Flour
15g
Spelt Flour
320g
Water
Step 2 – Mix and rest for 30 mins
10g
Salt
90g
Starter
3g
Ground Cinnamon
Step 3 – Soak the Raisins
120g
Raisin
¼ tsp
Vanilla extract
½ cup
Water
If you already have your own sourdough starter, get it ready. To make it from scratch, plan at least 7 days ahead of time (it may take up to 2 weeks if the weather is cold), please follow King Arthur’s sourdough starter recipe here.
Directions:
Feed your starter with equal amount of water, flour and starter until it is active and ready to use (you will see a lot of bubbles, or you can run the float test if a levain is ready to use. A small amount of levain is scooped out and dropped into a glass of room temperature water, and if it floats, it’s ready). (Pictures above)
In a mixing bowl, combine all flour and water. Cover with a towel or plastic wrap and let it rest in room temperature for 1 hour. (Pictures 1)
After 1 hour, add 90g of starter, 10g of salt. Use your hand to pinch and fold the dough over and over to get it nice and mixed. The dough is much more wet and sloppy than it was during the first mix. Cover the dough and set the timer for 30 minutes. (Pictures 2 & 4)
Soak 120g raisins with 1/2 cup of water (water should be enough to cover the raisins). Add 1/4 teaspoon of vanilla extract, mix well. (Pictures 5 & 6)
Now we are going to stretch and fold the dough – Lift one side of the dough straight up until you meet resistance and fold it across the center. Turn the bowl 90 degree and perform the stretch-and-folds (the dough is probably very relaxed in the beginning). Once you have finished all the way around the bowl back to where you started, you have completed one set. Cover the dough with plastic wrap and set the timer for 30 minutes. (Pictures 7 & 8)
Repeat Step 4 above three more times.
After the last set of stretch-and fold, stretch the dough and sprinkle cinnamon and raisins. Fold the dough down and sprinkle another layer of cinnamon and raisins to the dough. Repeat this step until you finish all the cinnamon and raisins. (Pictures 9-12)
Cover the dough with plastic wrap and let it rest for 1-2 hours. (Picture 13)
Dust your work surface with flour, fold the dough a couple of times and shape the dough to a ball. (Pictures 14-15)
Dust the banneton basket with rice flour, carefully transfer the dough to the basket. Cover with a towel and put it in the refrigerator for 5-10 hours/overnight. (Pictures 16-18)
Baking the bread:
During the dough’s last 45 minutes of final proof, preheat the oven and the cast iron pan at 500F (preheating the pan for at least 45 minutes).
Remove the basket from the fridge. Put a piece of parchment paper on top of the banneton basket and put a chopping board on top of the parchment paper. (Picture 19)
Now hold the basket and chopping board tight and flip over the banneton basket. You can score the dough now. (Picture 20)
Remove the cast iron pan from the oven and slide the dough to the pan. (Picture 21)
Cover the cast iron pan and turn the oven temperature down to 450F and set the timer to bake for 20 minutes. (Picture 22)
After 20 minutes, uncover the pan and continue to bake for another 20 minutes.** (Picture 23)
Let the bread cool down completely on a cooling rack before slicing it.
Note: Each oven is different, you may need to adjust the cooking time for longer.
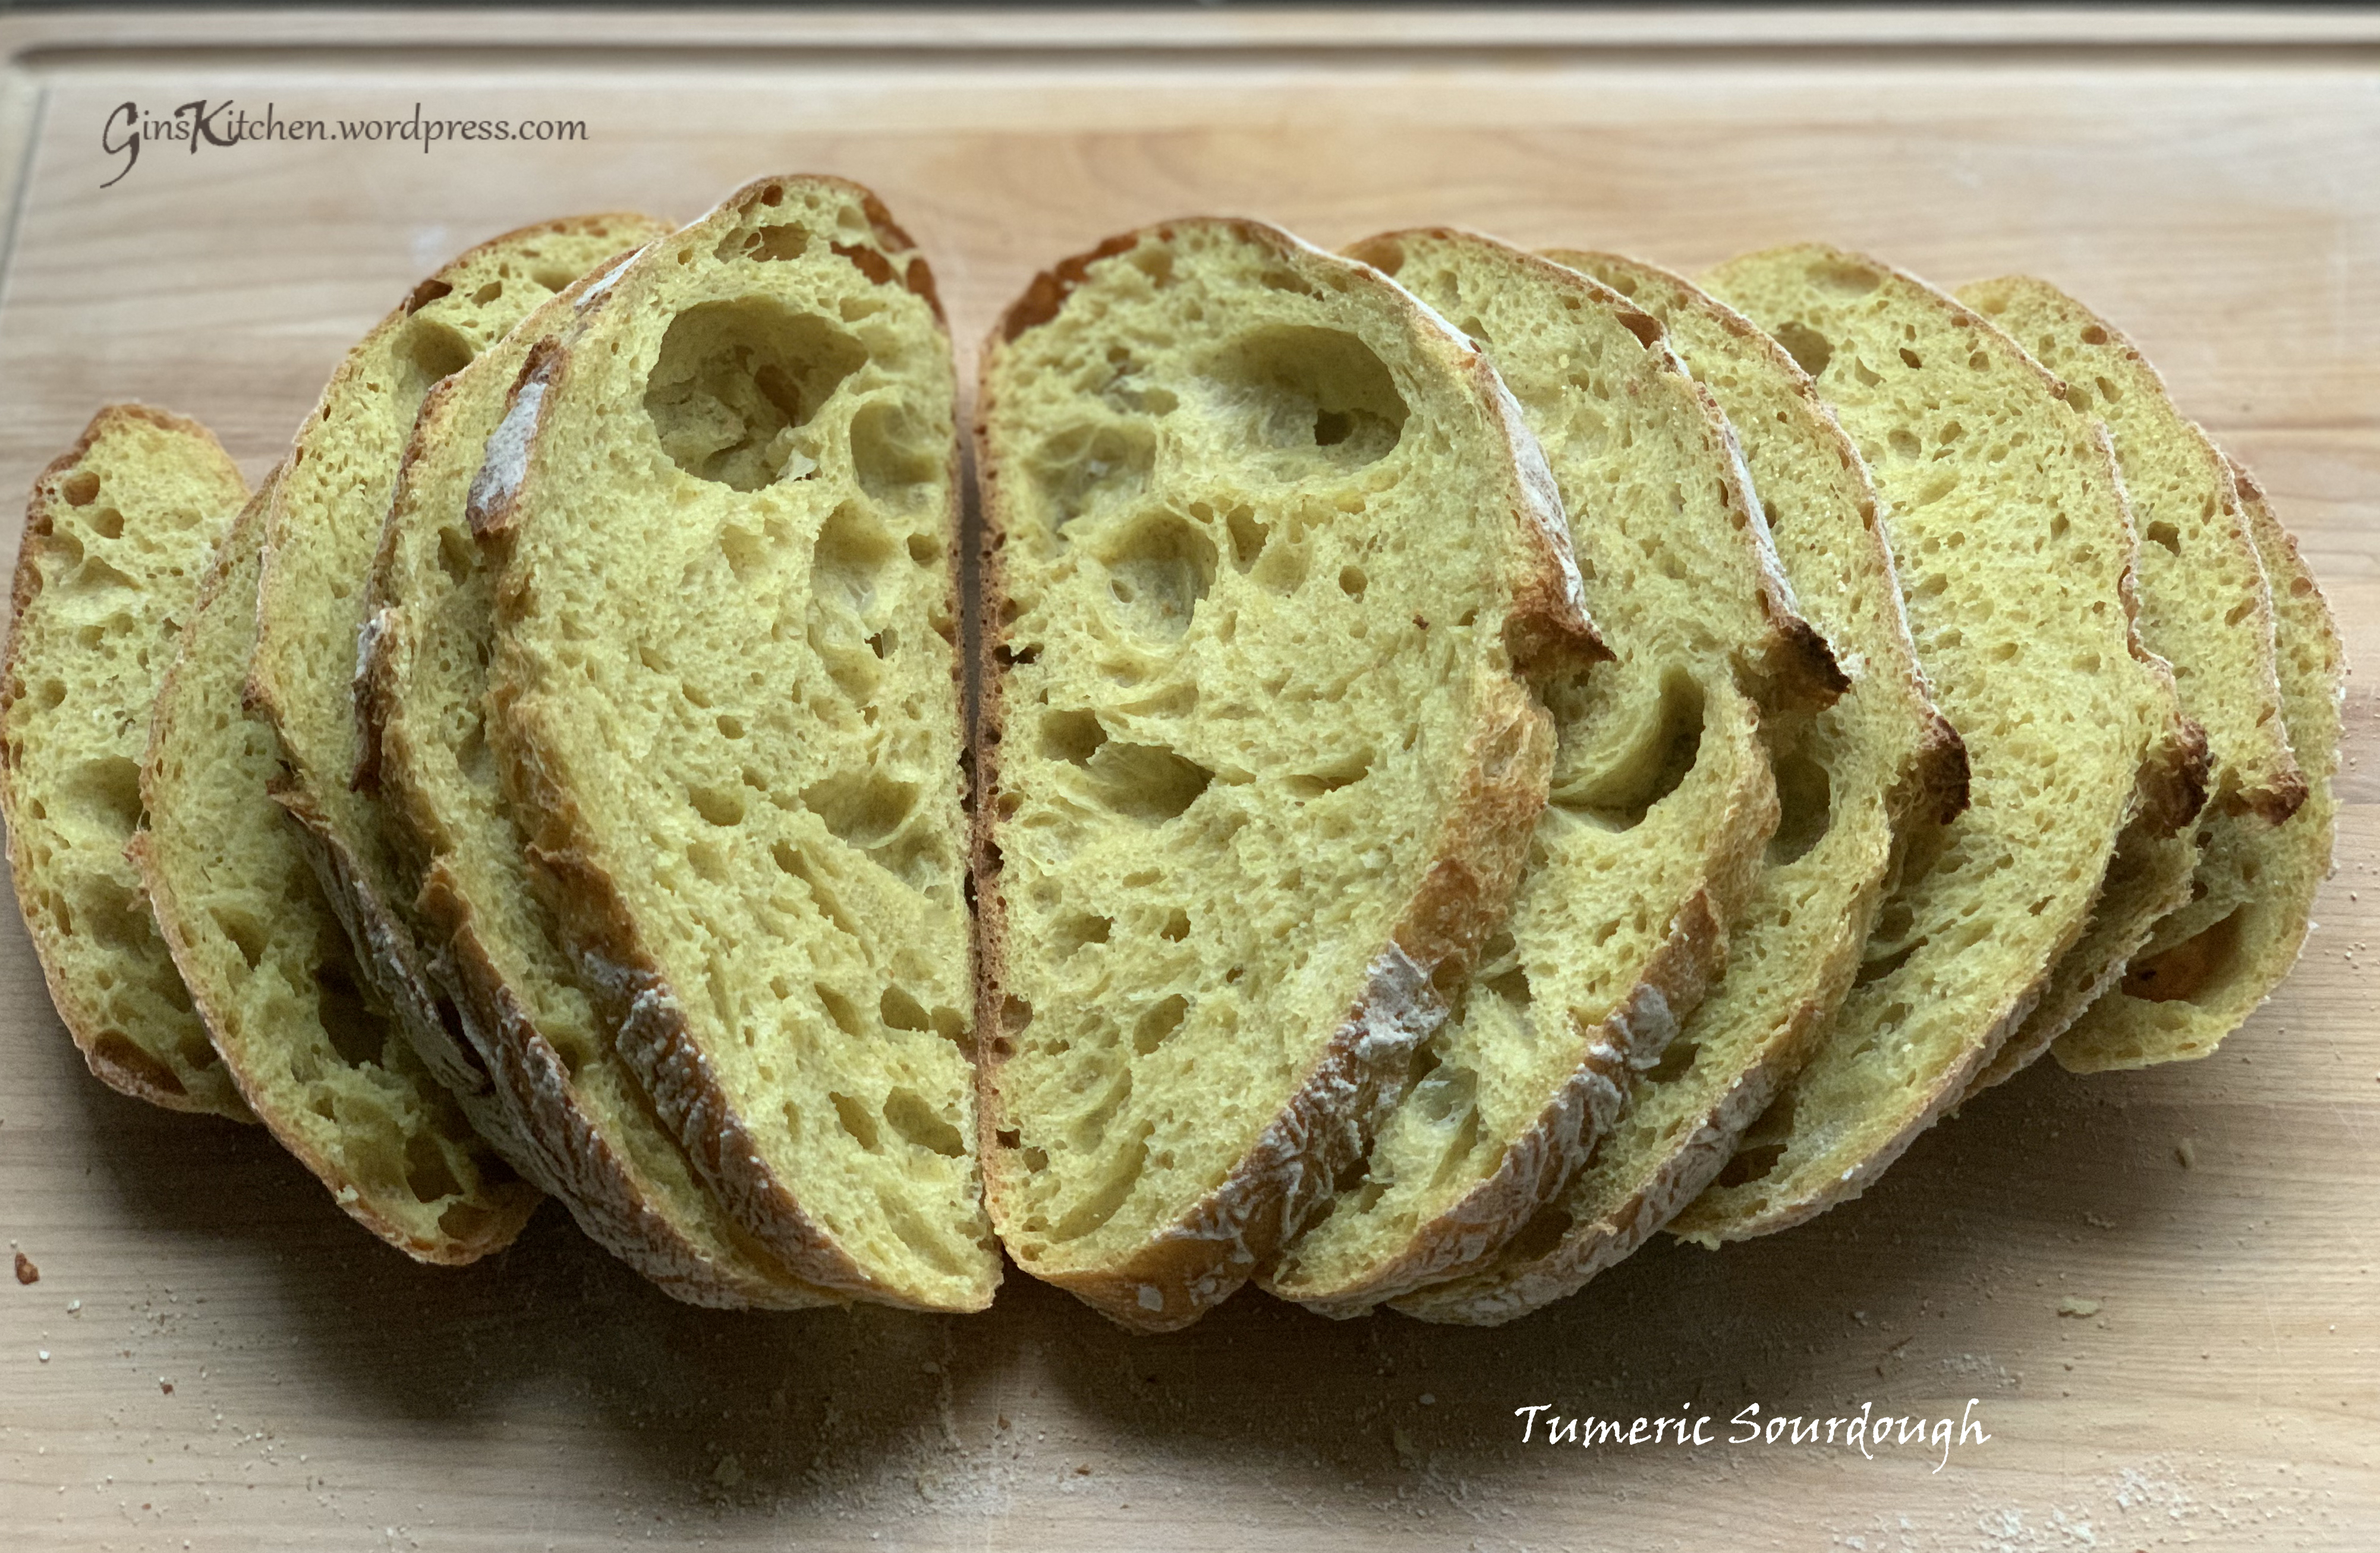
Turmeric, known as the Golden Spice, originated in India where it was used as a culinary spice. It comes from the root of the Curcuma longa plant which is part of the ginger family. It’s interesting to learn that, before it was commonly used as a spice for food, it was used to as a natural dye for skin and clothing.
Turmeric is high in antioxidants and contains powerful anti-inflammatory properties, which is why it has been used in Chinese medicine for thousands of years. It is still used for menstrual pain, traumatic injuries, spleen, etc. and also has shown strong evidence of being a preventative herb, helping to ward off many diseases like cancer, diabetes and heart disease.
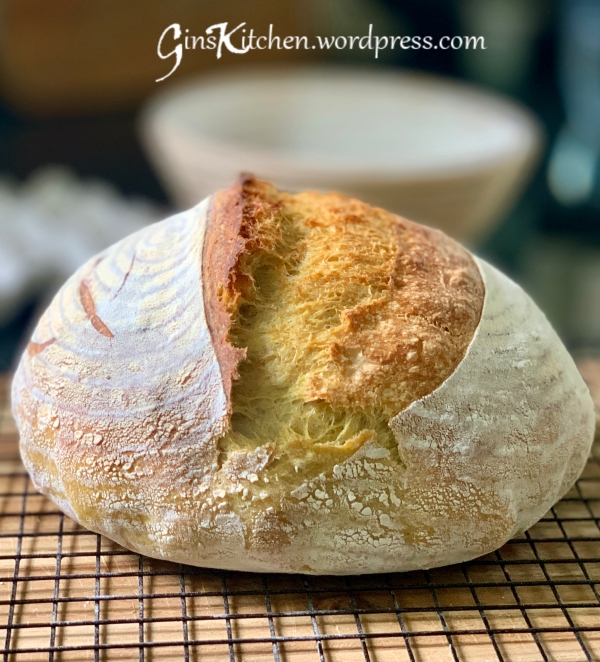
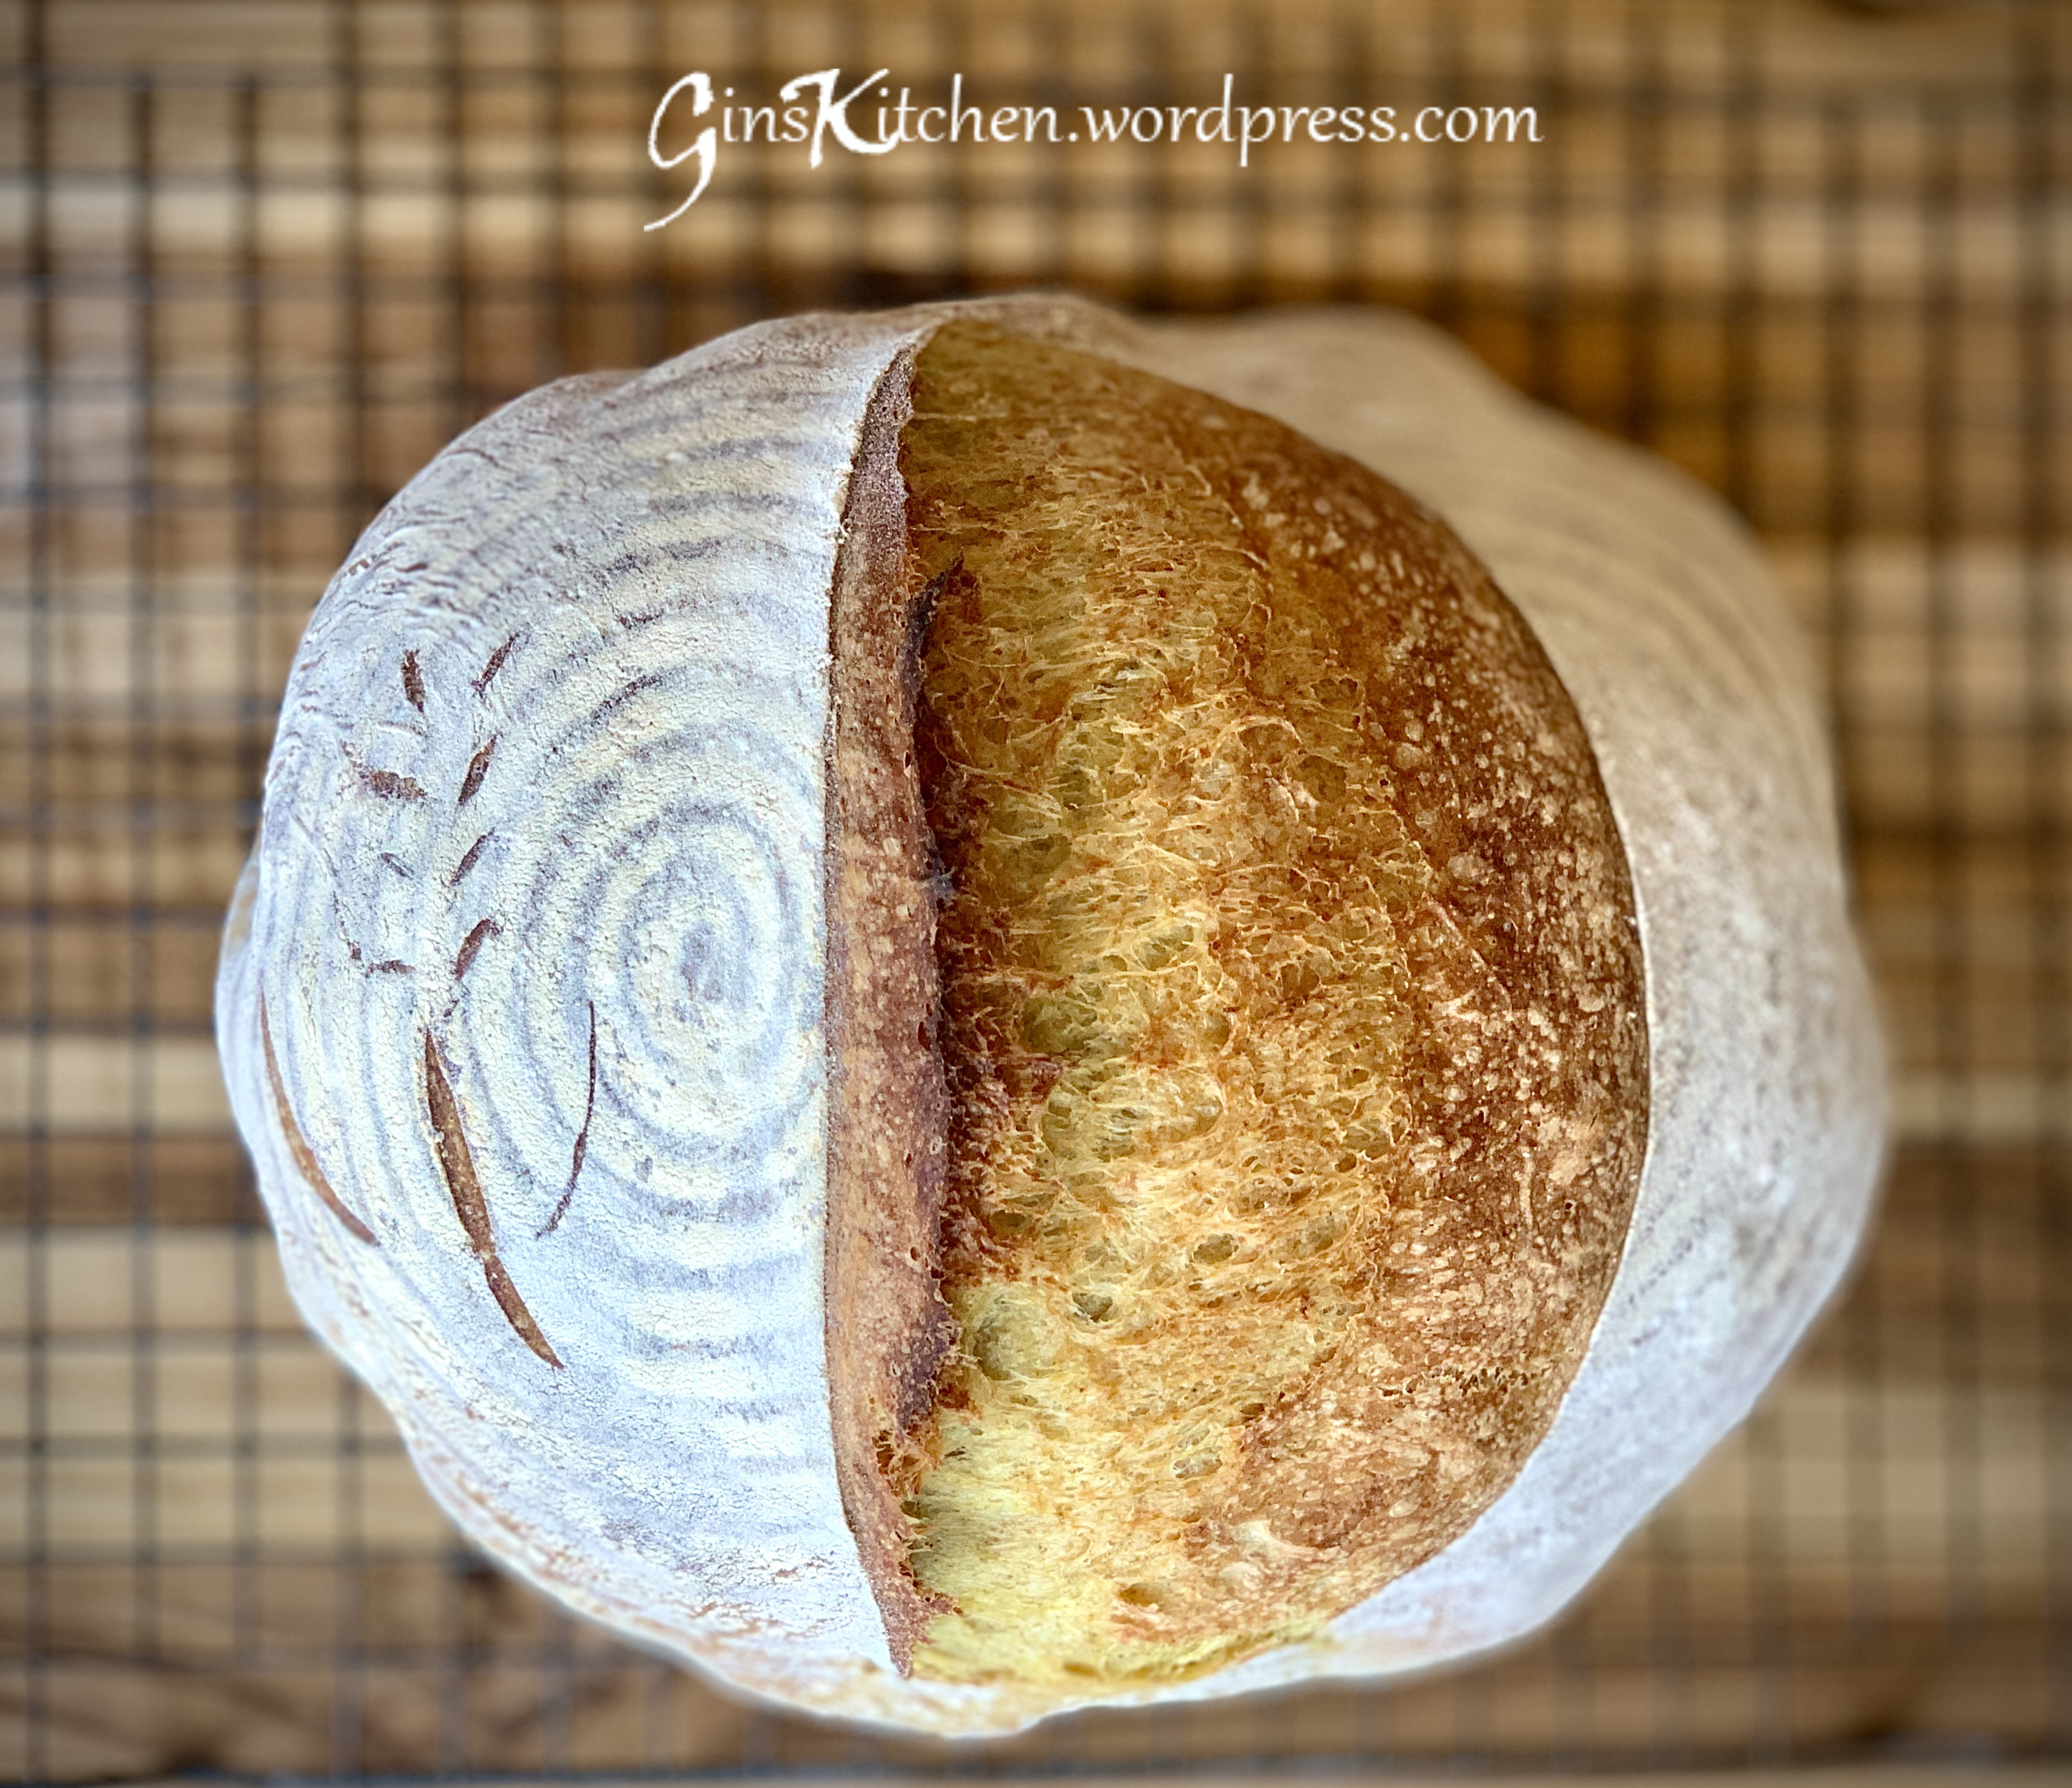
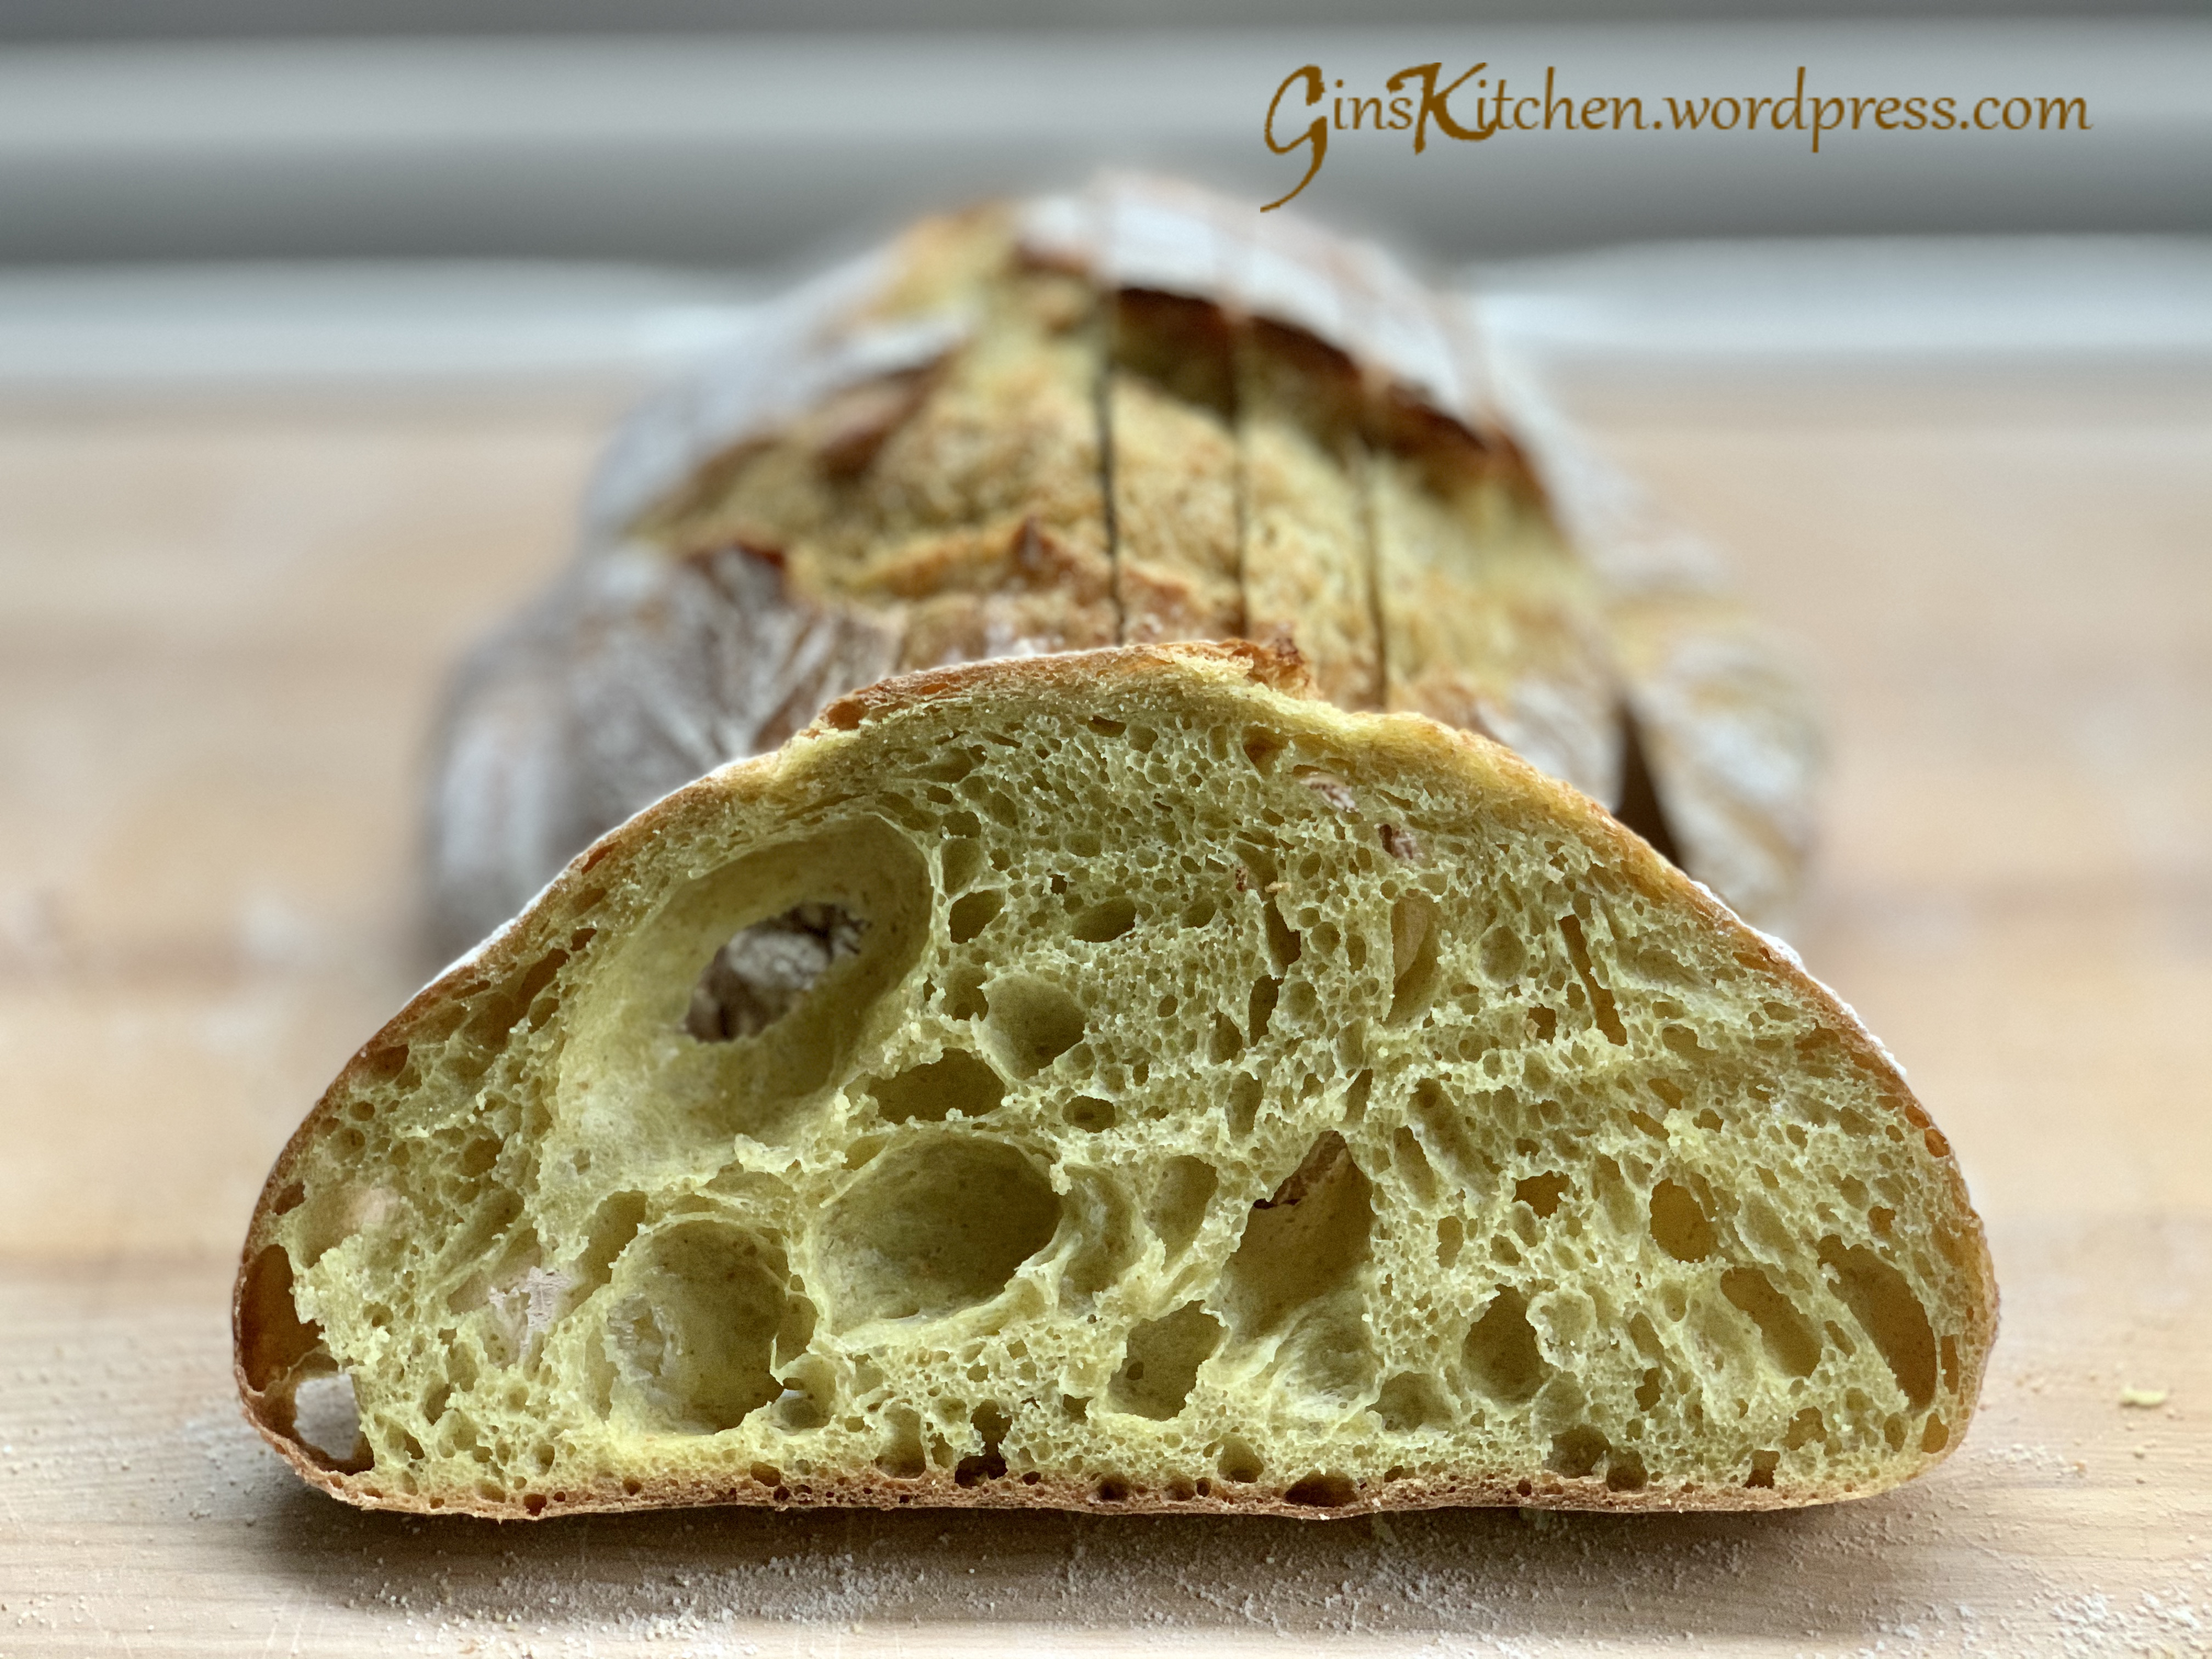
When I make curry, I usually add a teaspoon of turmeric. Turmeric has a spicy and bitter flavor, so adding too much turmeric to your dish will probably overtake the flavor. Today, I made my sourdough by adding just 1/4 teaspoon of turmeric. The color is beautiful and it doesn’t affect the flavor of my sourdough.
Ingredients (Hydration is about 72%):
Step 1 – Mix and rest for 1 hour
400g
Bread Flour
30g
Dark Rye Flour
15g
Spelt Flour
¼ tsp
Turmeric
320g
Water
Step 2 – Mix and rest for 30 mins
10g
Salt
90g
Starter
Directions:
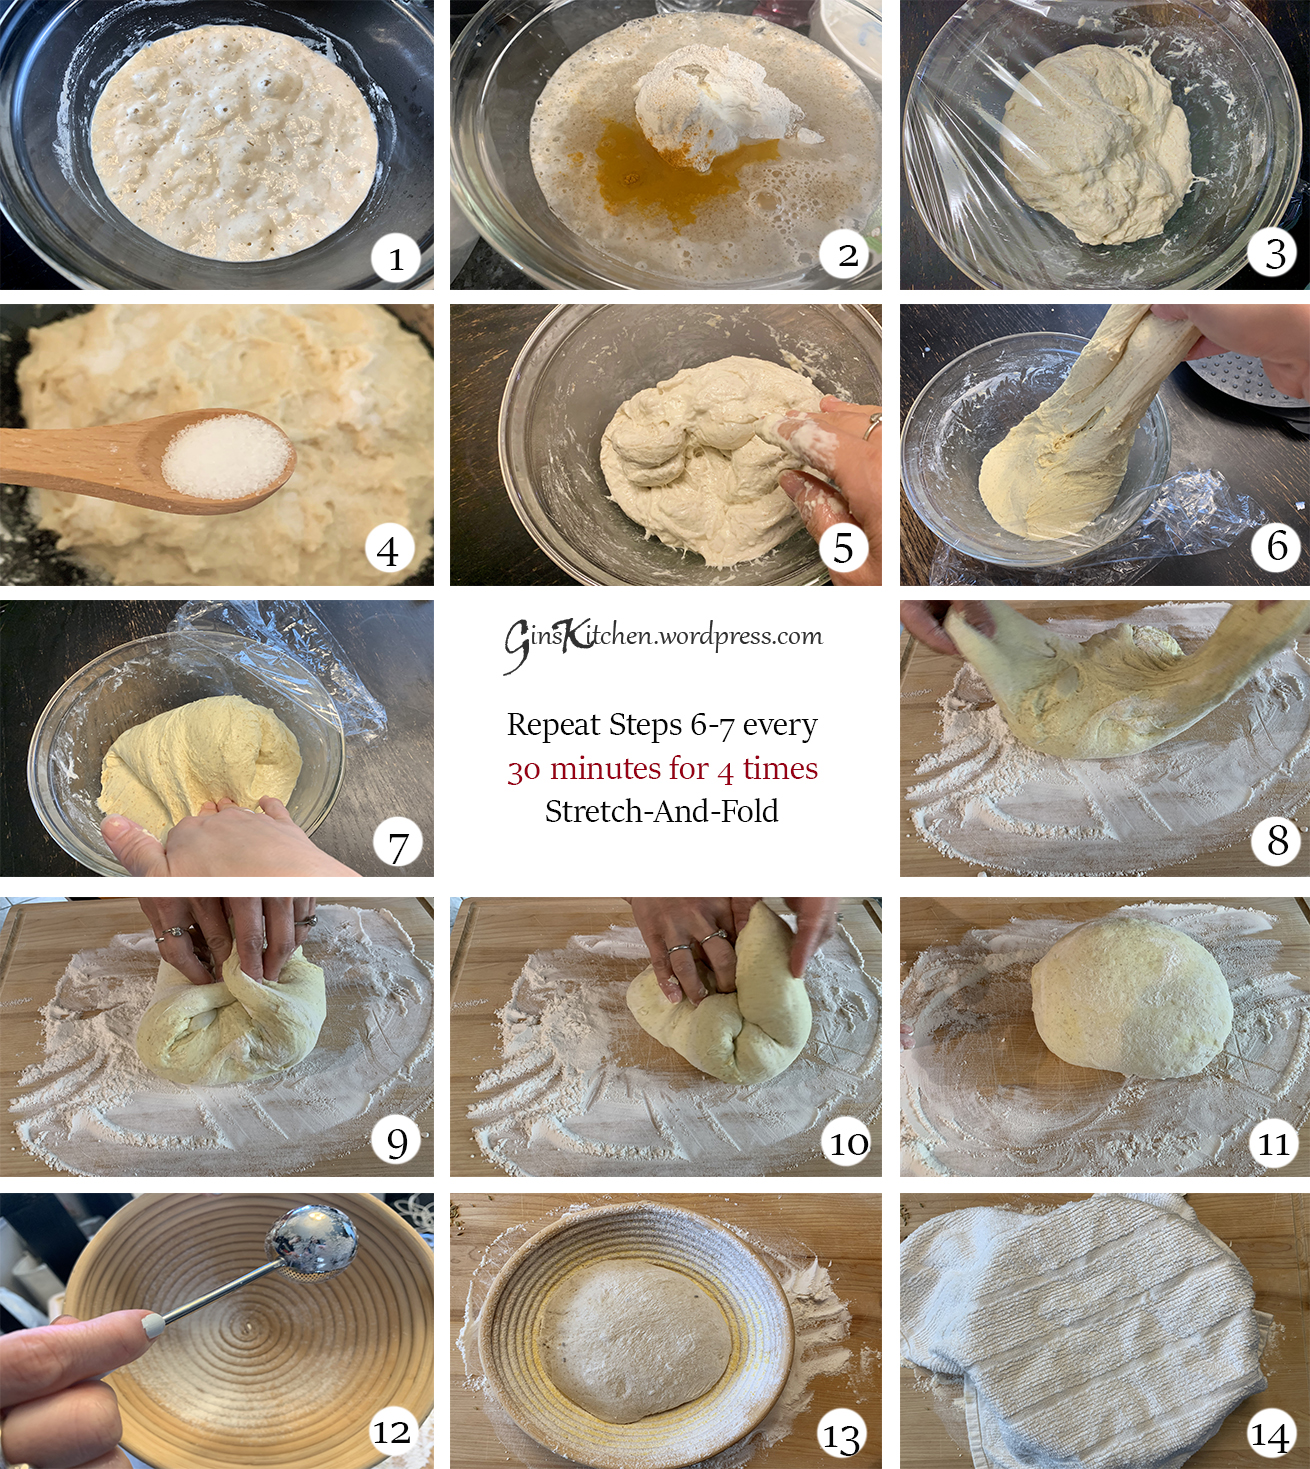
Feed your starter with equal amount of water, flour and starter until it is active and ready to use (you will see a lot of bubbles). (Picture 1)
In a mixing bowl, combine all flour, turmeric and water. Cover with a towel or plastic wrap and let it rest in room temperature for 1 hour. (Pictures 2-3)
After 1 hour, add 90g of starter and 10g of salt. Use your hand to pinch and fold the dough over and over to get it nice and mixed. The dough is much more wet and sloppy than it was during the first mix. Cover the dough and set the timer for 30 minutes. (Pictures 4 & 5)
Now we are going to stretch and fold the dough – Lift one side of the dough straight up until you meet resistance and fold it across the center. Turn the bowl 90 degree and perform the stretch-and-folds (the dough is probably very relaxed in the beginning). Once you have finished all the way around the bowl back to where you started, you have completed one set. Cover the dough with plastic wrap and set the timer for 30 minutes. (Pictures 6 & 7)
Repeat Step 4 above three more times.
After the last set of Stretch-And-Fold, lightly fold the dough a couple of times, cover the dough and let it rest for 1-2 hours.
Dust your work surface with flour, and fold the dough a couple of times and shape the dough to a ball. (Pictures 8-11)
Dust the banneton basket with rice flour, carefully transfer the dough to the basket. Cover with a towel and put it in the refrigerator for 5-10 hours. (Pictures 12-14)
Baking the bread:
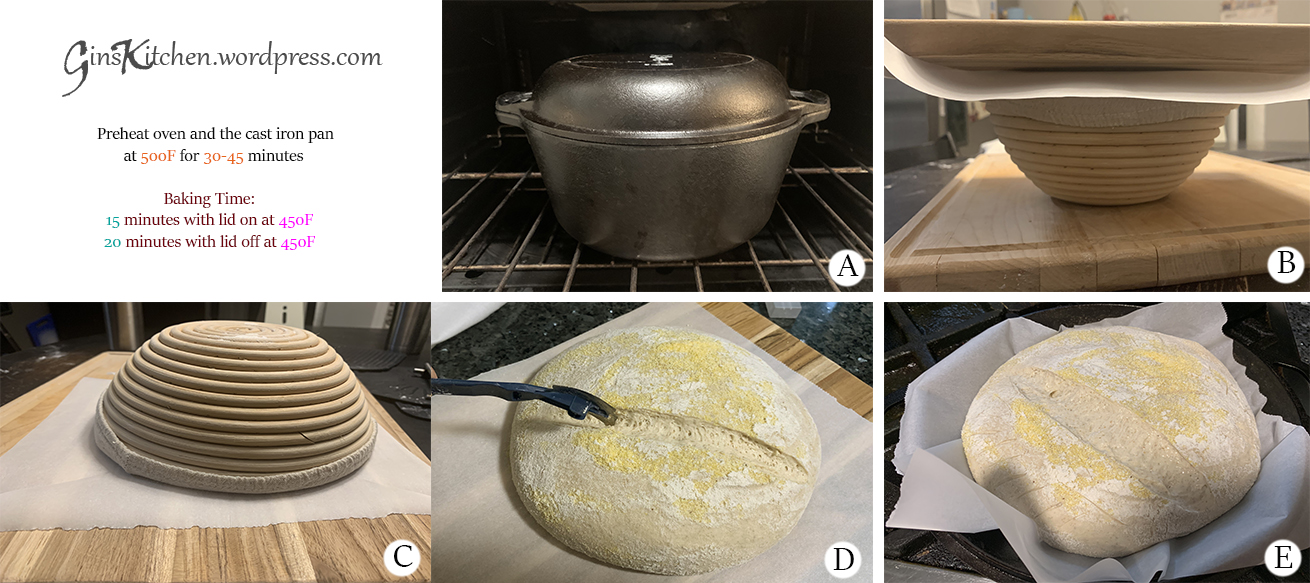
During the dough’s last 45 minutes of final proof, preheat the oven and the cast iron pan at 500F (preheating the pan for at least 45 minutes). (Picture A)
Remove the basket from the fridge. Put a piece of parchment paper on top of the banneton basket and put a chopping board on top of the parchment paper. (Picture B)
Now hold the basket and chopping board tight and flip over the banneton basket. (Picture C)
You can score the dough either a line or a cross. (Picture D)
Remove the cast iron pan from the oven and slide the dough to the pan. (Picture E)
Cover the cast iron pan and turn the oven temperature down to 450F and set the timer to bake for 20 minutes.
After 20 minutes, uncover the pan and continue to bake for another 20 minutes.**’
Let the bread cool down completely on a cooling rack before slicing it.
Note: Each oven is different, you may need to adjust the cooking time for longer.
Sourdough is known to be healthier and have a more complex flavor than white bread. Good sourdough bread should have chewy crust and an airy moist interior characterized by lots of holes. However, it will take some practice to make a good sourdough.
To make your own sourdough starter, you can follow King Arthur Flour’s page. I am very lucky to have a sourdough starter passed down to me from my co-worker, who is also my good friend. She has great enthusiasm for sourdough baking. She practiced uncountable times to make perfect sourdough and started to be creative by using different ingredients. Her energy motivated me, but I failed many times to reach today’s result. This is one recipe that I tested out a few times and adjusted the ingredients to suit my taste.
I’m using the “Stretch-And-Fold” technique for my sourdough as the hydration is 78%. When the dough is very wet, the traditional kneading method is impossible to handle. Before you make this bread, make sure you have time staying home to stretch and fold your dough every 30 minutes for 2 hours.
Ingredients:
Step 1 – Mix and rest for 1 hour
445g
Bread flour
320g
Water
Step 2 – Mix and rest for 30 mins
10g
Salt
25g
Water
90g
Starter
Ingredients to add before final proof:
60g
Jalapeno
170g
Cheddar Cheese/Mozzarella Cheese (save some for sprinkling on top of the dough)
Making the Dough:
Feed your starter with equal amount of water, flour and starter until it is active and ready to use (you will see a lot of bubbles). (Picture 1)
In a mixing bowl, combine 445g of bread flour and 320g of water. Cover with a towel or plastic wrap and let it rest in room temperature for 1 hour. (Pictures 2-4)
After 1 hour, add 90g of starter, 10g of salt and 25g of water. Use your hand to pinch and fold the dough over and over to get it nice and mixed. The dough is much more wet and sloppy than it was during the first mix. Cover the dough and set the timer for 30 minutes. (Pictures 5-9)
Now we are going to stretch and fold the dough – Lift one side of the dough straight up until you meet resistance and fold it across the center. Turn the bowl 90 degree and perform the stretch-and-folds (the dough is probably very relaxed in the beginning). Once you have finished all the way around the bowl back to where you started, you have completed one set. Cover the dough with plastic wrap and set the timer for 30 minutes. (Pictures 10-12)
Repeat Step 4 above three more times.
After the last set of Stretch-And-Fold, lightly fold the dough a couple of times, cover the dough and let it rest for 1-2 hours.
Chop jalapeno in small pieces. Leave the seeds if you like spicy food. (Picture 13)
Cut cheese into small chunks. (Picture 14)
Final proof – Lay 1/2 of the cheese and jalapeno into the middle of your dough, fold the dough and lay the second 1/2 of the cheese jalapeno onto the dough. Dust your work surface with flour, and carefully transfer the dough and gently shape the dough to a ball. (Pictures 15-16)
Dust the banneton basket with rice flour. Lightly flour the surface of the dough and place the dough in the banneton basket (seam side down). (Pictures 17-18)
Cover the basket with a towel and put it in the refrigerator for 5-10 hours. Proofing the dough in the fridge will improve the gluten structure. (Picture 19)
Baking the bread:
During the dough’s last 45 minutes of final proof, preheat the oven and the cast iron pan at 500F (preheating the pan for at least 45 minutes). (Picture A)
Remove the basket from the fridge. Put a piece of parchment paper on top of the banneton basket and put a chopping board on top of the parchment paper. (Picture B)
Now hold the basket and chopping board tight and flip over the banneton basket. (Picture C)
You can score the dough now and sprinkle shredded cheese on top. Remove the cast iron pan from the oven and slide the dough to the pan. (Pictures D and E)
Cover the cast iron pan and turn the oven temperature down to 450F and set the time to bake for 20 minutes.
After 20 minutes, uncover the pan and continue to bake for another 20 minutes.**
Let the bread cool down completely on a cooling rack before slicing it.
Note: Each oven is different, you may need to adjust the cooking time for longer.
My friend, Janet who loves to cook and bake, was nice to share her buns with me last week. It was a lovely purple color as it was made with purple yam. When food is turned into an art piece, it makes the food more appealing. Since it tasted and looked so good, I decided to make some, but with carrot juice to get a bright orange color.
I posted a recipe for making the milk mantou 4 years ago, and I used that recipe for the white petals. Both milk mantou and carrot juice mantou recipes are listed below (for a total of 24 pieces).
Ingredients for orange petals:
500g
All purpose flour
300ml
Carrot juice
35g
Sugar
5g
Yeast
1/4 tsp
Salt
1 Tbsp
Vegetable oil
Ingredients for white petals:
500g
All purpose flour
300ml
Fat free milk
35g
Sugar
5g
Yeast
1 Tbsp
Vegetable oil
Directions:
You will need 3-4 carrots to get 300ml of carrot juice depending on the size of the carrots.
Prepare all ingredients, one set for the orange petals and one set for the white petals. Combine all ingredients for the orange petals in a mixing bowl, attach the dough hook and mix the ingredients with low speed. Knead the dough until smooth (about 10 minutes). Let the dough rest for 10 minutes. Repeat this step for the ingredients for the white petals (pictures 1, 2 and 3).
During the 10-minute resting period, make sure to cover the container with plastic wrap. (picture 4)
Take the dough out, punch down with your hands to deflate, and cut into half. Cover the second half with plastic wrap to keep it soft. Roll out the dough and roll it tightly to form a log. (picture 5)
Cut the log into pieces and each piece should weigh about 20g. Cover pieces with plastic wrap. (picture 6)
Repeat steps 3 and 4 for the orange petals. (picture 7)
Roll each piece thinly like gyoza wrappers. (picture 8)
You will need 3 pieces of the orange dough and 3 pieces of the white dough, alternate the colors. (picture 9)
Roll the dough up (roll from the right hand side) to form a small thick log. (picture 10)
Cut the rolled up dough in half from the center. When you turn the dough up, you will see the pretty rose shape and shape the petals with your fingers. (picture 11)
Pour some cold water in the bottom of the steamer. Place rose shaped buns in the steamer lined with parchment paper, cover and let the buns rise for 20 minutes. Make sure to space out the buns (picture 12)
After the final rise, boil water and steam the buns for 15 minutes until they are cooked and puffed.
Note:
Don’t skip the final rise, otherwise the bun outer layer won’t be fluffy.
Don’t uncover the pot right away after steaming, leave the buns covered in the pot for another 15 mins. This is to prevent the buns from shrinking.
Whenever we visit a Chinese dumpling restaurant, we always order green onion pancakes. When served hot, these flaky and savory pancakes are crispy outside, and chewy and soft inside. Many people like them, even though they are not fond of green onions. Most restaurants make good scallion pancakes, but occasionally we had some doughy and thick ones which my kids didn’t even touch. If you never tried Green Onion Pancakes, just remember they are not pancakes at all as they are not made out of a batter. They are more like crispy, multi-layered flat bread filled with green onions.
Ingredients: (Makes four 6” pancakes)
260g (2 Cups)
120 ml (½ Cup)*
50 ml (¼ Cup)*
2-3 stalks
All purpose flour
Boiling water
Room temperature water
Green onion (minced)
More flour for dusting
* I used milligram (ML), it’s more accurate as 1/4 cup is about 60 ml, then the water amount is a little too much.
Ingredients for oil mixture:
2 Tbsp
1 tsp
3 Tbsp
All purpose flour
Salt
Cooking oil
Directions:
Place 2 cups of flour in a mixing bowl, add ½ cup of boiling water, mix well. Then add ¼ cup of room temperature water and mix well (when adding cold water, do not pour in all water at once, you will need to feel the dough when kneading. It should not be too hard or too sticky) . (Picture 1)
Knead the dough until the surface becomes smooth and is no longer sticky. If the dough is too dry, add 1 Tbsp of water to the dough; if the dough is too wet, add a Tbsp of flour to the dough. Cover the dough with plastic wrap and let it rest for 20-30 minutes. (Picture 2)
In the meantime, prepare green onions and oil mixture – Cut green onions into small pieces. Set aside. (Picture 3)
Put 2 Tbsp. of flour, 1 tsp. of salt and 3 Tbsp. of cooking oil into a small bowl and mix well. (Picture 4)
Divide dough into 4 portions. (Picture 5)
Working with one dough ball at a time. Place the dough ball on a lightly floured work surface and roll the dough to a thin disc with a rolling pin. (Picture 6)
Apply a thin layer of oil mixture to the disc. (Picture 7)
Sprinkle green onion to the disc but leave one edge open for sealing. (Picture 8)
Start to roll the dough into a cylinder. (Picture 9)
Flatten the log a little and coil it up like a sneak. (Picture 10)
Turn the dough so that the swirl side is facing up. (Picture 11)
Flatten the dough out with a rolling pin. (Picture 12)
Repeat steps 6-12 for the rest of the dough.
Now the dough is flattened, add a tablespoon of cooking oil into a skillet over medium heat. (Picture A)
Transfer the pancake dough onto the pan and cook until both sides are lightly brown (keep flipping the pancake). (Picture B)
Scrunch up the pancake a little bit by using serving tongs or two wooden spoons/turners. (Picture C). Serve immediately.
See how flaky the pancake is. It’s crispy outside and soft inside.
It was Super Bowl night. Super Bowl Sunday still holds the record for most pizza delivered in a single day. Studies showed that 1.25 billion chicken wings would be consumed and 29 million slices were projected to sell on Super Bowl Sunday. I’m not surprised as almost 95% of Americans planned to watch the Super Bowl. Today, I joined the party (not to watch the game but make my own pizza)! The pizza dough and pizza sauce were made from scratch. The sauce recipe was adapted from KitchenTreaty and was made with fresh tomatoes. I can taste its freshness.
Ingredients (Pizza sauce) (about 3 cups sauce):
1 Tbsp
4 cloves
1 tsp
2 pounds
1 tsp
1/2 tsp
Oil
Garlic (minced)
Dried oregano
Tomatoes
Brown sugar
Kosher salt
Black pepper to taste
Directions:
Dice tomatoes and set aside (picture 1).
In a medium sauce pan, heat oil over medium high heat. Add minced garlic and cook until aromatic. Add tomatoes, dried oregano, sugar, salt and black pepper. Keep stirring (picture 2).
Leave over medium heat, stir occasionally, until boiling. Reduce heat to low and simmer UNCOVERED for 45 minutes or until sauce is thickened (picture 3).
Allow the sauce to cool and blend the sauce in a food processer (picture 4).
Pour sauce into a bowl and let it cool (picture 5).
Ingredients (Pizza dough) (make about 5 small pizzas):
Active dry yeast
Warm water
Bread flour
Sugar
Salt
Olive oil
Directions:
Place all ingredients (except dry yeast) inside the pan in the breadmaker. Fill the yeast dispenser with dry yeast (usually it is on the top of the breadmaker). Select the “Pizza dough” mode (refer to manual of your breadmaker to select the dough program). After the kneading process, allow the dough to rise in the breadmaker for about 1 1/2 – 2 hours.
Deflate the dough, bunch it back and divide it into 5 pieces – You can use the dough at this point, but for a finer and nicer texture, after deflating and punching the dough, roll it into a ball and put it back into an airtight container and refrigerate overnight. About 2 hours before you are going to make your pizza, remove the dough from the fridge, deflate again, and split into 5 equal portions. Roll each portion into a ball and cover with plastic wrap. Let them sit at room temperature for 2 hours.
Assembling Pizzas:
Ingredients (pizza toppings):
Pepperoni, thinly sliced
Italian sausages, cook ahead
Mushrooms, thinly sliced
Red onion, thinly sliced
Yellow bell pepper, thinly sliced
Red bell pepper, thinly sliced
Mozzarella cheese, shredded
Mild cheddar cheese, shredded
Fresh basil leaves, chopped
Cornmeal (to slide the pizza onto the pizza stone)
** I made my pizzas with the above ingredients, of course you can add anything you want to your pizza, such as ham, BBQ chicken, even Kimchi.
Directions:
In a small sauce pan over medium-high heat, warm 1 tablespoon of the oil. Add red onion and cook until it is slightly tender. Transfer onion to a paper towel-lined plate. (Picture 1)
In the same pan over medium-high heat, warm 1 tablespoon oil. Add the bell peppers, stirring frequently, until just softened. Transfer the peppers to the same paper towel-lined plate. (Picture 2)
Now warm 1 tablespoon oil. Add the mushrooms, salt and pepper and cook (stirring occasionally) until softened. Transfer the mushrooms to the plate with the peppers and onion.
Preheat oven to 500 ºF and heat up the baking stone (or baking pan) in the oven.
Using a rolling pin to roll out your dough ball, flatten disc into an 8-inch circle. If you don’t know how to shape your pizza dough by tossing it in the air, simply start at the center and work outwards, use your fingertips to press the dough to 1/2-inch thick. Stretch the dough until it will not stretch further. (picture 1)
Lightly sprinkle your pizza peel with corn meal. Transfer one prepared flattened dough to the pizza peel. If the dough has lost its shape in the transfer, lightly shape it to the desired dimensions. (picture 2)
Top dough with a layer of sauce. (picture 3)
Then sprinkle with cheese, and place your desired toppings on the pizza, sprinkle more cheese on top at the end. (picture 4)
Slide the pizza off of the peel and on to the baking stone in the oven. Bake pizza one at a time until the crust is browned and the cheese is golden, about 10 minutes. (picture 5)
You can use the pizza peel or a stainless steel spatula to remove the pizza from the pizza stone. Serve immediately (picture 6)
For years I had no idea why this bun was named “Pineapple Bun” 菠蘿包 as it contains no pineapple. Instead, the name comes from its appearance where the sugary/buttery crust resembles a pineapple. The traditional crust of the bun is made of lard, but this recipe (original recipe from Christine Ho) substitutes lard with butter for a slightly healthier version. Everyone knows what is a Bo Lo Bao in Hong Kong. It is very popular, and commonly found in bakeries, just like muffins and bagels in the States. We eat it for breakfast (plain), lunch (with meat filling) or dessert (with custard or shredded coconut filling). The plain one is still one of my favorite bakery items! If you ever get a chance to visit Hong Kong, pineapple buns are a must try item so make sure you grab one at the bakery.
Cream softened butter with an electric mixer over medium speed until smooth. Add sugar and continue to beat until fluffy.
Add milk powder, egg yolk, evaporated milk, condensed milk, baking powder, combine well. Sift in flour and ammonia powder (optional) and incorporate well. The mixture is quite moist and sticky. Use a piece of cling wrap to roll into several small logs. Chill for 30 to 40 minutes. When it becomes harder, it’s ready to use and shape it.
* Keep the extra egg yolk and egg white for egg wash.
To make buns:
Place all ingredients inside the pan in the breadmaker, the wet ingredients first, then followed by the dry ingredients: tangzhong (recipe here), milk, whisked egg, sugar, salt, milk powder and flour. Fill the yeast dispenser with dry yeast (usually it is on the top of the breadmaker).
Select the “dough” mode (refer to the manual of your breadmaker to select the dough program). When all ingredients are combined, add butter. The kneading process in the breadmaker is usually about 30 minutes, and the proofing time is about an hour (depending on the machine).
When the first round of proofing is finished, transfer the dough to a clean floured surface and deflate the dough (Picture 1).
Divide into 12 equal portions and roll each portion into a ball (Picture 2). Place dough on a parchment-lined baking sheet. Let them complete the 2nd round of proofing until nearly doubled (if weather is too cold, you can proof at 90◦F in an oven with a pot of boiling water for 30 to 50 minutes. The water will keep the humidity at certain level).
When the dough portions are doubled in size, preheat oven to 410°F. Remove topping paste from fridge, cut into 12 equal portions and roll in balls. Roll each portion into a flat disc (Picture 3).
Place the topping paste on top of dough. Repeat this step with the remainder (Picture 4).
Brush the top with whisked egg yolk and bake in a preheated oven for 5 minutes (Pictures 5 and 6). Reduce the temperature to 350°F and bake for another 10 minutes.
Notes:
If you don’t have condensed milk, increase the total sugar amount to 140g.
Ammonia powder can be substituted with 1/2 tsp baking powder, 1/2 tsp baking soda.
Ammonia powder is quite hard to work with and not easy to find. If use too little, you’d be disappointed with the patterns appear on the topping (no crackling patterns). If use too much, your buns will smell weird. So, this ingredient can be omitted. Instead, you can use a sharp knife to make criss crosses, like a checkboard across the top of the topping.
If you do not have a breadmaker, you can knead the dough with your hands. Make a well in the center of the flour, whisk and combine all wet ingredients, then add into the well of the dry ingredients. When all ingredients are combined, knead in the softened butter. The dough is quite sticky and messy at this stage. Keep kneading until the dough is smooth, not sticky and elastic. Shape dough into a ball. Place in a greased bowl and cover with a wet towel or cling wrap. Let it proof till it’s doubled in size, about 40 minutes.
Over-kneaded dough tends to turn the loaves tough and chewy, and under kneaded-dough will make the loaves flat and dense in texture. To get a loaf of light and fluffy bread, practice is important. Of course if you use a bread machine to knead your dough, you will never over knead it. Baking bread is really all about technique, I neither practiced nor read enough. So I chose the no-knead version. Is this cheating? Not really, it’s just another way to make your bread and it’s effortless :-). All you need to do is to plan ahead of time as this bread needs at least 12-18 hours to rise.
All-purpose flour
Active dry yeast
Salt
Chopped fresh rosemary
Roasted garlic (roughly chopped)
Chopped lemon zest
Directions:
In a large bowl, combine the flour, yeast, salt, rosemary, roasted garlic and lemon zest. Add 1 5/8 cups water and stir until blended; the dough will be shaggy and very sticky. Cover the bowl with plastic wrap. Let the dough rest at warm room temperature (about 70°F) until the surface is dotted with bubbles, 12 to 18 hours.
Place the dough on a lightly floured work surface. Sprinkle the dough with a little flour and fold the dough over onto itself once or twice. Cover loosely with plastic wrap and let rest for 15 minutes.
Using just enough flour to keep the dough from sticking to the work surface or your fingers, gently and quickly shape the dough into a ball. Generously coat a cotton towel, preferably a flour sack towel (not terry cloth), with cornmeal. Put the dough, seam side down, on the towel and dust with more flour or cornmeal. Cover with another cotton towel and let rise until the dough is more than double in size and does not readily spring back when poked with a finger, about 2 hours.
At least 30 minutes before the dough is ready, put a 2 3/4-quart cast-iron pot in the oven and preheat the oven to 450°F.
Carefully remove the pot from the oven. Slide your hand under the towel and turn the dough over, seam side up, into the pot; it may look like a mess, but that is OK. Shake the pan once or twice if the dough is unevenly distributed; it will straighten out as it bakes. Cover with the lid and bake for 30 minutes. Uncover and continue baking until the loaf is browned, 15 to 30 minutes more.
Transfer the pot to a wire rack and let cool for 10 minutes. Using oven mitts, turn the pot on its side and gently turn the bread; it will release easily. Makes one 1 1/2-lb. loaf.
Mantou are originating from Northern China. These buns are soft and fluffy in texture, pretty plain in taste, not sure if everyone will like it but I’m a big fan. I like to eat them fresh straight after steaming (plain) or deep fry them. You can also give it a little sweet flavor by dipping in condensed milk.
In a small bowl, dissolve dried yeast in warm water.
Combine all ingredients in a mixing bowl, attach the dough hook and mix the ingredients with low speed. Knead the dough until it’s smooth, around 10 minutes. Let the dough rest for 10 minutes.
Dust a clean work surface lightly with flour, roll out the dough to a 25” x 6” rectangle. Fold it into thirds and roll it out again to approx. 17” x 10” rectangle. Brush the surface with water.
Roll the dough tightly from the longer edge to form a log. Cut the log into half and cut out 4 even pieces from each log.
Prepare 8 square pieces of parchment paper, slightly larger than the bun. Put parchment paper under each bun.
Place buns in a large steamer (most steamers have multi layers), pour some cold water in the bottom of the steamer, cover and let the buns rise for 20 minutes.
After the final rise, steam the buns for 20 minutes until they are cooked and puffed.
If not eaten immediately, they can be stored in the freezer for up to 3 months. Reheat them in a steamer for 5 minutes after removing them from the freezer.


 Sourdough is known to be healthier and have a more complex flavor than white bread. Good sourdough bread should have chewy crust and an airy moist interior characterized by lots of holes. However, it will take some practice to make a good sourdough.


