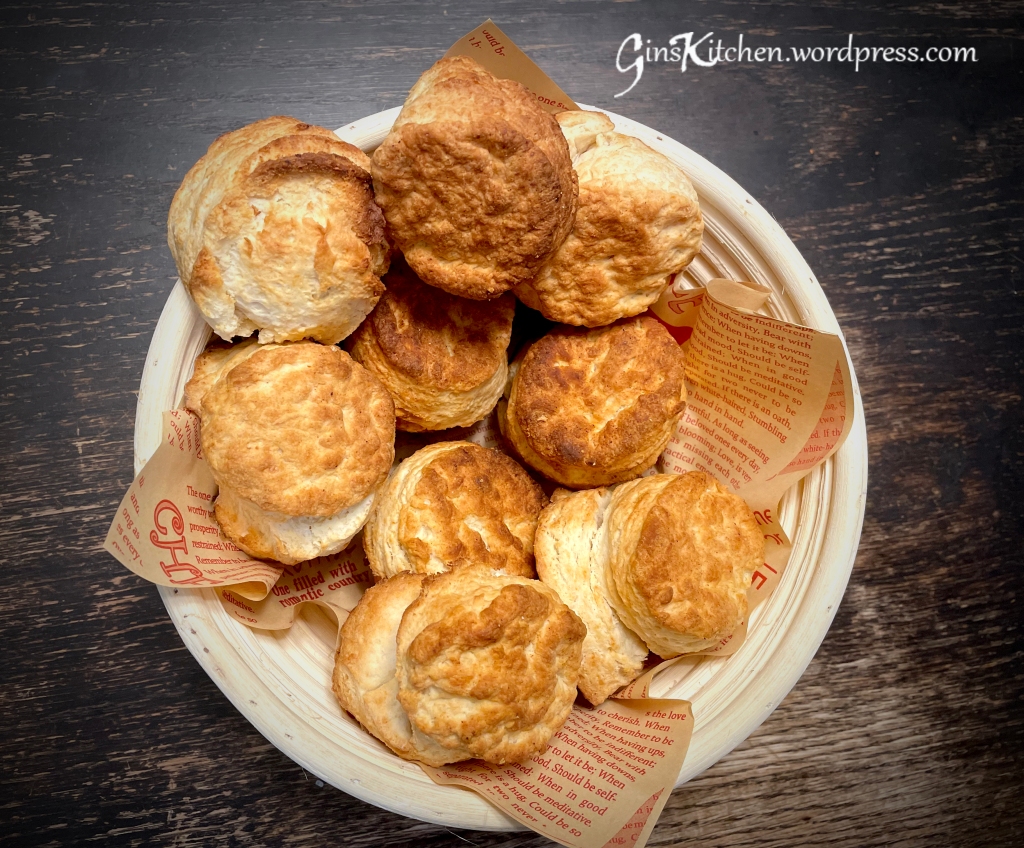
Homemade Biscuits


These buttery, flaky biscuits are the perfect side dish for holidays—they go well with turkey, prime rib, or any seafood main course. You will love these biscuits as there are lots of layers, the tops are nicely golden brown, and the bottoms are crispy. Not only they are good for holidays meals, but also for breakfast along with scrambled eggs, bacon, and sausage. Most importantly, they are so simple to make and great for beginners as well. So, stop eating those biscuits out of a can and try making them from scratch.

Ingredients:

370g (2 1/2 cup)All purpose flour
2 TbspBaking powder
1 TbspGranulated sugar
1 CupButtermilk (very cold)
1 stickButter (chilled and grated)
1 tspKosher Salt

Method:

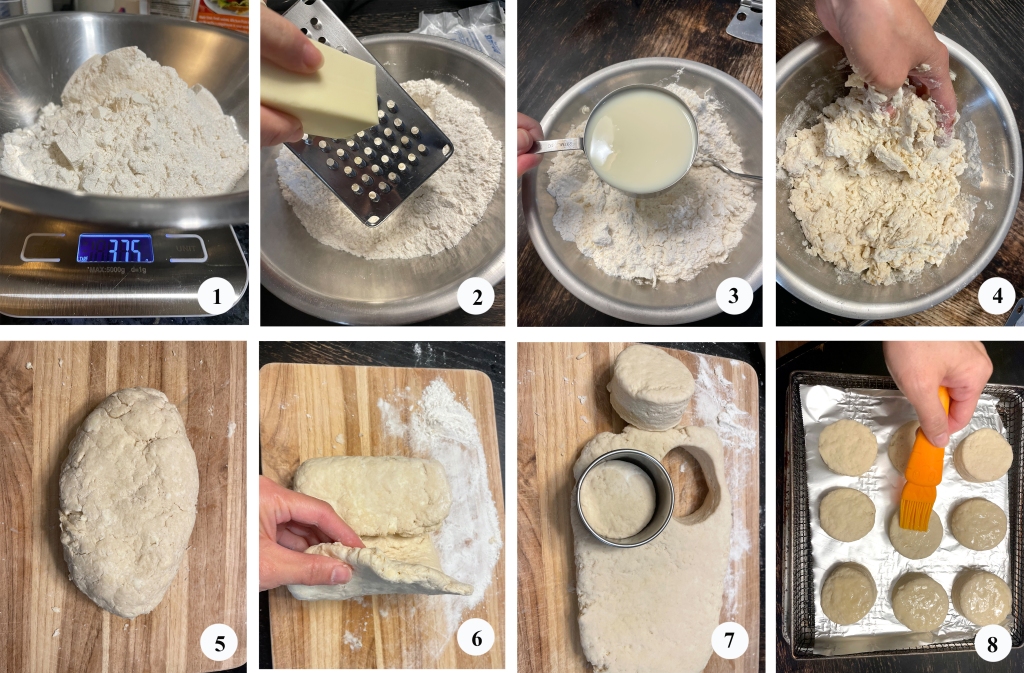
  1. In a large mixing bowl, combine flour, baking powder, salt and sugar. (Picture 1)
  2. Use a grater to grate butter over the flour mixture and quickly toss with your hands. (Picture 2)
  3. Pour in buttermilk and stir until just combined. (Pictures 3 & 4)
  4. Transfer the dough to a clean work surface / chopping board. (Picture 5)
  5. Shape the dough into a rectangle, about 1″ thick, fold the dough into thirds. (Picture 6)
  6. Use a rolling pin, slightly roll it back into a 1″ thick rectangle (do not roll hard to flatten it), repeating the folding process (step 5 above) 2 more times.
  7. Now that the dough is back to a 1″ thick rectangle after folding 3 times, use a small round cookie cutter (about 2″ in diameter) to press down and cut out the biscuits. (Picture 7)
  8. Line air fryer basket with parchment paper, place biscuits 1/2″ apart, brush tops with melted butter. (Picture 7)
  9. Cook at 400F until tops are lightly golden (about 10-12 minutes).
  10. Serve warm.

** If you bake these in the oven, preheat the oven to 425F while mixings the dough. Bake for about 20 minutes until tops are lightly golden.
Yellowtail Collars (Hamachi Kama)


Yellowtail Collar

What are fish collars? The collar is a cut from the shoulder area of the fish where the fin is attached. Collar meat is tender, moist and full of delicious flavor. I would say it is the best part of the fish!  Salmon and yellowtail collars are very popular and can be found easily in Japanese supermarkets. They are also served as appetizers in some Japanese restaurants. I personally like yellowtail collars best.  If you want to make it yourself, it is the simplest thing to cook — it doesn’t need anything but salt.

Ingredients:

1-2 pieceYellowtail Collars
2 TbspOil
Salt

Directions:

  1. Use your fingers to sprinkle collars with salt, turn the collars over and sprinkle some on the other side to make sure each piece is evenly coated (picture 1).
  2. Add 2 tablespoons of cooking oil into a frying pan and heat for a minute or so.
  3. Add collars (skin side up) and pan fry with medium heat until golden brown (picture 2).
  4. Use the tongs to turn the collars over and fry the other side until skin is golden brown (picture 3).
  5. Serve immediately.
yellowtail

Green Onion Pancakes (Scallion Pancakes) 葱油餅


Green Onion Pancake

Whenever we visit a Chinese dumpling restaurant, we always order green onion pancakes.  When served hot, these flaky and savory pancakes are crispy outside, and chewy and soft inside.  Many people like them, even though they are not fond of green onions.  Most restaurants make good scallion pancakes, but occasionally we had some doughy and thick ones which my kids didn’t even touch.  If you never tried Green Onion Pancakes, just remember they are not pancakes at all as they are not made out of a batter.  They are more like crispy, multi-layered flat bread filled with green onions.

Ingredients: (Makes four 6” pancakes)

260g (2 Cups)
120 ml (½ Cup)*
50 ml (¼ Cup)*
2-3 stalks
All purpose flour
Boiling water
Room temperature water
Green onion (minced)
More flour for dusting

*  I used milligram (ML), it’s more accurate as 1/4 cup is about 60 ml, then the water amount is a little too much.

Ingredients for oil mixture:

2 Tbsp
1 tsp
3 Tbsp
All purpose flour
Salt
Cooking oil

Directions:

  1. Place 2 cups of flour in a mixing bowl, add ½ cup of boiling water, mix well.  Then add ¼ cup of room temperature water and mix well (when adding cold water, do not pour in all water at once, you will need to feel the dough when kneading.  It should not be too hard or too sticky) . (Picture 1)
  2. Knead the dough until the surface becomes smooth and is no longer sticky.  If the dough is too dry, add 1 Tbsp of water to the dough; if the dough is too wet, add a Tbsp of flour to the dough.  Cover the dough with plastic wrap and let it rest for 20-30 minutes.  (Picture 2)
  3. In the meantime, prepare green onions and oil mixture – Cut green onions into small pieces.  Set aside.  (Picture 3)
  4. Put 2 Tbsp. of flour, 1 tsp. of salt and 3 Tbsp. of cooking oil into a small bowl and mix well.  (Picture 4)
  5. Divide dough into 4 portions.  (Picture 5)
  6. Working with one dough ball at a time.  Place the dough ball on a lightly floured work surface and roll the dough to a thin disc with a rolling pin.  (Picture 6)
  7. Apply a thin layer of oil mixture to the disc.  (Picture 7)
  8. Sprinkle green onion to the disc but leave one edge open for sealing.  (Picture 8)
  9. Start to roll the dough into a cylinder.  (Picture 9)
  10. Flatten the log a little and coil it up like a sneak.  (Picture 10)
  11. Turn the dough so that the swirl side is facing up.  (Picture 11)
  12. Flatten the dough out with a rolling pin.  (Picture 12)
  13. Repeat steps 6-12 for the rest of the dough. 

green onion pancakes

  1. Now the dough is flattened, add a tablespoon of cooking oil into a skillet over medium heat.  (Picture A)
  2. Transfer the pancake dough onto the pan and cook until both sides are lightly brown (keep flipping the pancake).  (Picture B)
  3. Scrunch up the pancake a little bit by using serving tongs or two wooden spoons/turners.  (Picture C).  Serve immediately.

Green Onion Pancake

See how flaky the pancake is.  It’s crispy outside and soft inside.

Green onion pancake

Baked Empanadas


Empanadas

Empanadas

I adapted this recipe from my friend, Angela, who makes the best empanadas.  These delicious hand pies can be made with so many different types of fillings.  There are classic savory fillings and sweet dessert fillings.  You can swap the pork for chicken or beef, or simply use the ingredients you have available in your refrigerator.

Ingredients:  

Filling:
250g
1 Tbsp
1 tsp
1 tsp
1 tsp
230g
½
1 Tbsp
1
2
90g
¼ tsp
¼ tsp
1-2 tsps
Ground pork
Light soy sauce
Oyster sauce
Brown sugar
Corn starch
Red potatoes (diced)
White onion (diced)
Minced garlic
Carrot stick (minced or shredded)
Medium size tomatoes (diced)
Green peas
Dried oregano (crushed)
Salt
Fish sauce
Dough:
250g
8 oz
200g
1
All-purpose flour
Cream cheese (softened)
Unsalted butter (softened) (a little less than 2 sticks)
Egg, lightly beaten (for egg wash only)

Directions – for filling:

  1. Prepare all ingredients — dice potatoes, carrots, onion and tomatoes.  (picture 1)  Marinate ground pork with light soy sauce, oyster sauce, brown sugar and corn starch, set aside.
  2. Heat 2 Tbsps of oil in a large skillet over high heat, add 2 gloves of garlic and cook until aromatic.  Now add diced potatoes, pan fry until slightly brown.  Add water and cover to simmer until water evaporated.  Set aside.  (picture 2)
  3. Heat 1 Tbsp of oil in a large skillet over medium heat, add onion and garlic, cook until tender (picture 3).  Add ground pork and stir well.  Breaking up the meat with a turner or wooden spoon, cook meat until brown.  (picture 4)
  4. Add carrot and tomatoes and keep stirring.  Cook for about 5 minutes (add a few tablespoons of water if necessary) (picture 5).  Return potatoes to the pan and add green peas, stir until all ingredients are combined (picture 6).  Add oregano, ½ tsp of salt and 1 tsp of fish sauce (add more if necessary).
  5. Allow the mixture to cool thoroughly before filling in the dough.

Fillings for empanadas

Directions – for Dough:

  1. Cream butter and cream cheese together until smoothly blended (picture 1).
  2. Beat in the flour until just combined (picture 2).
  3. Shape dough into 2 smooth balls, wrap in cling wrap and refrigerate for an hour or overnight (picture 3).

Dough for Empanadas

Assemble the Empanadas:

  1. Preheat oven to 375 degrees Fahrenheit.
  2. Remove dough from refrigerator and work on a lightly floured work surface.
  3. Roll chilled dough thin, cut with a 3 or 4 inch round cookie cutter.  (picture 1)
  4. Place a proportional amount of filling in the center of the dough circle (about 1 tablespoon full).  (picture 2)
  5. Fold 1 side over so that the edges meet, press to seal.  To braid the edges of empanadas, start at one corner of the empanada with your thumb and index finger, fold the seal edge down over itself (press down and seal), and repeat this step until you reach the other end.  (picture 3)
  6. Place on parchment-lined baking sheets, brush tops with egg wash.  (picture 4)

How to wrap empanadas

  • Bake for 30-40 minutes.

empanadas

Japanese Salad


Japanese Salad

I found this salad dressing recipe from Allrecipes.com.   It tasted exactly like the one we ate at the sushi restaurant.  The only change I made was to substitute olive oil for peanut oil.  I guarantee this will be a hit.

Ingredients:

3 head
1
Romaine Lettuce
Carrot

Ingredients for dressing:

1/2 Cup          Minced white onion

1/2 Cup          Olive oil

1/3 Cup          Rice wine vinegar

2 Tbsp           Water

2 Tbsp           Minced fresh ginger

2 Tbsp           Minced celery

2 Tbsp           Ketchup

4 tsp              Light soy sauce

2 tsp              Granulated sugar

2 tsp              Fresh lemon juice

1/2 tsp           Minced garlic

1/2 tsp           Salt

1/4 tsp           Black pepper

Directions:

  1. Wash, peel and julienne carrot; wash and cut lettuce.  Combine both vegetables and set aside.
  2. In a blender, combine all ingredients for the dressing and blend on high speed for about 30 seconds or until all of the ingredients are well-pureed.
  3. Serve the salad with a few tablespoons of dressing.

Chicken Lettuce Wraps


Chicken Lettuce Wraps

When it comes to Chinese cooking, we spend quite a lot of time in preparation (to cut, dice, mince, julienne, chop, etc.).  As a working mom, lettuce wraps is only a weekend dish as I don’t have enough time to cook it after work.  People may find this recipe complicated but it’s worth your time and once you get a handle on it, it is pretty easy.  There are a lot of 30 minute meal recipes, but sometimes we just need to slow down and enjoy cooking and eating.

Marinate for Chicken:

2 pounds
1 tsp
1 Tbsp
2 tsp
1 tsp
Chicken breasts (ground)
Cornstarch
Light soy sauce
Rice cooking wine
Salt

Ingredients:

8
5 Tbsp
1 Tbsp
1 Tbsp
2 stalks
2-3
10
1 package
1 head
Dried shiitake mushrooms (soaked and diced)
Oil
Fresh ginger (minced)
Garlic (minced)
Green onions (cut into small pieces)
Small dried chilies (Optional)
Fresh water chestnuts (minced)
Chinese vermicelli
Iceberg Lettuce

Cooking Sauce:

3 Tbsp
3 Tbsp
3 Tbsp
6 Tbsp
6 Tbsp
3 tsp
3 tsp
6 tsp
Hoisin sauce
Light soy sauce
Rice cooking wine
Oyster sauce
Water
Sesame oil
Light brown sugar
Cornstarch

Directions:

  1. To deep fry the vermicelli, pour 1 cup of oil into a saucepan over medium low heat.  Make sure the oil is hot enough by dropping one noodle into the oil. If the noodle immediately puffs and turns white, the oil is ready.  Fry the noodles in batches, make sure you won’t crowd the pan. Remove the noodles as they puff, and drain them on paper towels.
  2. Cover mushrooms with boiling water, let stand 30 minutes then drain.  Discard woody stems and dice mushrooms, set aside.
  3. Mix all ingredients for cooking sauce in a bowl and set aside.
  4. In a medium bowl, marinate chicken with cooking wine, soy sauce, salt, pepper and cornstarch.  Let it sit for 15 minutes.
  5. Add 3 Tbsp oil to a saucepan/wok over high heat, stir fry chicken until cooked.  Set aside.
  6. Add 2 Tbsp oil to a clean saucepan/wok, add ginger, garlic and chilies.  When garlic is slightly brown, stir in water chestnuts and mushrooms (about 2 minutes).  Return chicken to pan, add 1/3 of the cooking sauce and keep stirring.  The chicken should have a nice coat of sauce, if you see any white part (without a coat of sauce), add more sauce in.
  7. Turn off the fire and sprinkle green onions on top.
  8. Spoon chicken mixture into lettuce leaf and top with cooked vermicelli.
  9. The remaining sauce can be saved and served on the side with the lettuce wraps.  I normally like to bring the sauce to a boil or you can just serve it without cooking.

Note:  To save time, you can buy ground chicken at the market.  I like to rinse the meat before cooking and ground it myself with a food processor.

Stuffed Mushrooms with Ham and Cheese


Stuffed Mushrooms with ham and cheese

Stuffed mushrooms are perfect party finger food.  It can be done in advance so that it all comes together easily at the last minute.  My recipe is a simple one as I just grabbed whatever I had in the fridge intead of making a stop at the supermarket.

Ingredients:

16 oz           Big Mushrooms
½ cup          Parmesan Cheese or Cheddar cheese or 4 Cheese Mexican
¼ cup          Ham
3 strips        Bacon

Directions:

  1. Preheat oven to 350 ◦F, spray a baking sheet with cooking oil.
  2. Clean mushrooms and discard end of stems.
  3. In a frying pan, cook bacons until crispy (set aside).
  4. Chop ham into small pieces (you can use smoked ham, honey baked ham or the Costco ham.  I normally have some leftover ham after the big holiday feasts).
  5. Mix ham and cheese together and fill each mushroom cap with a generous amount of stuffing. Sprinkle salt and pepper.
  6. Bake for 20 minutes in the preheated oven, or until the mushrooms are piping hot.
  7. Sprinkle bacon bites on top of each mushroom.