Green Onion Pancakes (Scallion Pancakes) 葱油餅


Green Onion Pancake

Whenever we visit a Chinese dumpling restaurant, we always order green onion pancakes.  When served hot, these flaky and savory pancakes are crispy outside, and chewy and soft inside.  Many people like them, even though they are not fond of green onions.  Most restaurants make good scallion pancakes, but occasionally we had some doughy and thick ones which my kids didn’t even touch.  If you never tried Green Onion Pancakes, just remember they are not pancakes at all as they are not made out of a batter.  They are more like crispy, multi-layered flat bread filled with green onions.

Ingredients: (Makes four 6” pancakes)

260g (2 Cups)
120 ml (½ Cup)*
50 ml (¼ Cup)*
2-3 stalks
All purpose flour
Boiling water
Room temperature water
Green onion (minced)
More flour for dusting

*  I used milligram (ML), it’s more accurate as 1/4 cup is about 60 ml, then the water amount is a little too much.

Ingredients for oil mixture:

2 Tbsp
1 tsp
3 Tbsp
All purpose flour
Salt
Cooking oil

Directions:

  1. Place 2 cups of flour in a mixing bowl, add ½ cup of boiling water, mix well.  Then add ¼ cup of room temperature water and mix well (when adding cold water, do not pour in all water at once, you will need to feel the dough when kneading.  It should not be too hard or too sticky) . (Picture 1)
  2. Knead the dough until the surface becomes smooth and is no longer sticky.  If the dough is too dry, add 1 Tbsp of water to the dough; if the dough is too wet, add a Tbsp of flour to the dough.  Cover the dough with plastic wrap and let it rest for 20-30 minutes.  (Picture 2)
  3. In the meantime, prepare green onions and oil mixture – Cut green onions into small pieces.  Set aside.  (Picture 3)
  4. Put 2 Tbsp. of flour, 1 tsp. of salt and 3 Tbsp. of cooking oil into a small bowl and mix well.  (Picture 4)
  5. Divide dough into 4 portions.  (Picture 5)
  6. Working with one dough ball at a time.  Place the dough ball on a lightly floured work surface and roll the dough to a thin disc with a rolling pin.  (Picture 6)
  7. Apply a thin layer of oil mixture to the disc.  (Picture 7)
  8. Sprinkle green onion to the disc but leave one edge open for sealing.  (Picture 8)
  9. Start to roll the dough into a cylinder.  (Picture 9)
  10. Flatten the log a little and coil it up like a sneak.  (Picture 10)
  11. Turn the dough so that the swirl side is facing up.  (Picture 11)
  12. Flatten the dough out with a rolling pin.  (Picture 12)
  13. Repeat steps 6-12 for the rest of the dough. 

green onion pancakes

  1. Now the dough is flattened, add a tablespoon of cooking oil into a skillet over medium heat.  (Picture A)
  2. Transfer the pancake dough onto the pan and cook until both sides are lightly brown (keep flipping the pancake).  (Picture B)
  3. Scrunch up the pancake a little bit by using serving tongs or two wooden spoons/turners.  (Picture C).  Serve immediately.

Green Onion Pancake

See how flaky the pancake is.  It’s crispy outside and soft inside.
Green onion pancake

Linzer Cookies


Linzer Cookies

I was asked to make cookies for the Valentine’s day party for my son’s class.  I though about linzer cookies as they are so pretty.  As you may know, the main ingredients for linzer cookies are butter, flour, ground nuts and jam.  Nowadays, a lot of people are allergic to nuts and I did not want to take the risk, especially when I bake for little kids.  I made two batches, one with ground nuts, one with no nuts (basic butter cookies).  Below is the traditional linzer cookies recipe which was adapted from Joy of Baking.  Please go to my Halloween Witch Fingers Cookies post for the butter cookie recipe.  Happy Valentine’s Day everyone!

Ingredients:

2 Sticks (1 cup)
260g (2 cups)
150g
150g (1 cup)
¼ tsp
½ tsp
1 Tbsp
1 tsp
2
½ cup
¼ – ½ cup
Unsalted butter, softened
All purpose flour
Granulated sugar
Whole almonds (blanched)
Ground cinnamon
Salt
Lemon zest (from one small lemon)
Vanilla extract
Egg yolks
Strawberry jam
Powdered sugar (for dusting)

How to Blanch Almonds:

  1. Bring a small pot of water to a boil (good enough to cover your almonds).
  2. Place your raw almonds into the boiling water and boil them for just ONE minute.  To avoid almonds from getting soft, one minute is sufficient.  (picture 1)
  3. Drain the almonds in a colander and rinse them with cold running water immediately.  Pad dry the almonds with a paper towel.  Skins will be slightly wrinkled.(picture 2)
  4. Use your fingers to gently squeeze each almond out from the skin.  (picture 3)  Let almonds dry completely and discard the skins. (picture 4)
  5. To ground the almonds, preheat oven to 350 ◦F.  Place the almonds on a baking sheet and bake about 8-10 minutes, or until lightly browned. Place almonds in a food processor after they are cooled, along with 50 g of granulated sugar (save the remaining 100g sugar for making cookie dough).  (When sugar is added, the mixture tends to loosen a bit, it won’t be too pasty). (picture 5)  Process almonds until finely ground.  (picture 6)

blanch almonds

Directions:

Making cookie dough:

  1. In a separate bowl, combine the flour, cinnamon, salt, and lemon zest.  Set aside.  (Picture 1)
  2. Beat in a mixing bowl the butter and remaining 100g sugar until light and fluffy. Beat in the vanilla extract and egg yolks. (Pictures 2-3)
  3. Add in ground almonds and then the flour mixture. (Picture 4)
  4. Divide the dough, form 2-3 balls and cover each ball with plastic wrap, and refrigerate until firm (30-60 minutes, or overnight). (Picture 5)
  5. Preheat oven to 350 ◦F.   Line two baking sheets with parchment paper.
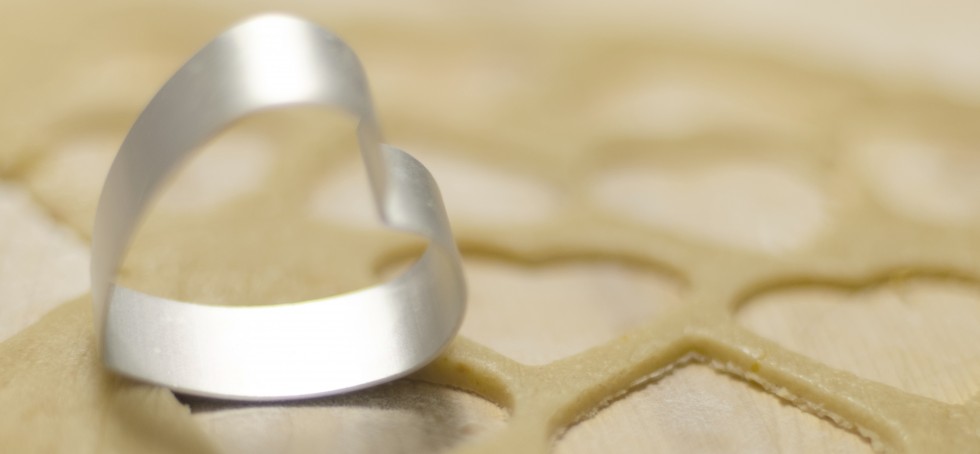
  6. Remove one ball of dough from the refrigerator.  On a lightly floured surface roll out the dough until it is about 1/8 inch thick (you can make it thicker, but not any thinner). Using a cookie cutter of any shape to cut out the cookies. Place the cookies on the prepared baking sheet.  (Picture 6)
  7. Use a smaller cookie cutter to cut out the centers of half of the cookies on the baking sheet.  Reroll any scraps and cut out the remaining cookies.  Repeat with the second ball of dough.   (Picture 7)
  8. Bake the cookies for about 12 minutes or until lightly browned around the edges. Remove from oven and place on a wire rack to cool.

Assemble Cookies:

  1. Place the cut out cookies on a baking sheet and lightly dust the tops with powdered sugar.  (Picture 8)
  2. Spread a thin layer of jam on the bottom surface of the full cookie (top of cookie will face out).  Place the cut-out cookie on top and gently sandwich them together.  (Picture 9)

Linzer Cookies

Notes:

  • Place the baking sheets with the unbaked cookies in the freezer for about 10 minutes to chill the dough. This will prevent the cookies from spreading and losing their shape when baked.
  • The filled cookies will soften when stored.  If you want the cookies to stay crisp, assemble the day of serving. The assembled cookies can be stored in the refrigerator, in an airtight container, for several days.

Mocha Chiffon Cake


Mocha Chiffon Cake

I was not sure if this cake would turn out good or not.  First, I am not a coffee drinker, I don’t even know how to brew a cup of coffee.  Second, I couldn’t find a recipe that is light in sugar and flour, the ones found online were more dense.  Since my friend gave me a pack of instant black coffee, I decided to give it a try.  Again, I created this recipe based on Christine Ho’s black sesame chiffon cake which is the first chiffon cake I posted on my blog.  The cake was decorated with whipped cream frosting, it was very moist, light and fluffy in texture.  Please scroll down to the bottom for the whipped cream frosting recipe.  This cake was gone in one day!!

Ingredients (for a 10″ pan):

7
95g
1 tsp
Egg whites
Caster sugar
Cream of tartar
125g
1/4 tsp
1 tsp
1 tsp
7
35g
58g
95ml
2 Tbsp (4g)
Cake flour
Salt
Baking powder
Vanilla extract
Egg yolks
Caster Sugar
Olive oil
Hot water
Instant black coffee

Method:

  • Preheat oven to 340F.
  • To separate eggs, place 3 small bowls side by side. Crack the first egg and pull the shell halves apart. Pass the yolk back and forth, letting the white fall into the first bowl. Put the yolk in the second bowl. Transfer the white to the third bowl and repeat with the remaining eggs.  By doing it this way, if you have one bad egg, you do not need to discard all egg whites.
  • Beat the egg whites with an electric mixer until bubbles form. It is best to begin at a slow speed and gradually move up to high when beating.  Add cream of tartar. After mixing well, add 90 grams of sugar in three batches, about one-third at a time, and beat well between additions.  Continue to beat until the egg whites are stiff and glossy.  Don’t over beat it, overbeaten whites look lumpy and watery.

beating egg white

  • Dissolve instant black coffee powder in 95ml of hot water, set aside and let it cool. (Picture 1)
  • Weigh all ingredients, combine cake flour, baking powder and salt in a bowl.   Set aside (Picture 2)
  • Mix egg yolks with 35g caster sugar until sugar dissolved.  Stir in oil until completely combined.  Add vanilla extract and black coffee and mix until well combined.  (Picture 3)
  • Sift the flour mixture into the egg yolk mixture, in three batches. Combine well.  The mixture is slight thicker now. (Picture 4)
  • Fold-in the beaten egg whites with a spatula in three batches.  (Picture 5)
  • Pour the batter into a 10″ tube pan and bake in the preheated oven for about 60 minutes.  (Picture 6)
  • After baking the first 15 minutes, if you find the cake surface gets browning, reduce heat to 320F.  Continue to bake until cooked through.  A needle comes out clean when inserted in the middle.

Mocha Chiffon  cake

  • Remove the cake from the oven.  Invert the pan immediately on a wire rack.  Let it cool completely (at least an hour).  (Picture below)

Chiffon Cake

  • Remove the cake by running a thin-bladed knife around the pan, angling the knife towards the pan to try to get the full crust on the cake.
  • I decorate the cake with whipped cream.  Please see below for the cocoa whipped cream frosting recipe.

Mocha Chiffon Cake

How to make Cocoa Whipped Cream Frosting:

Ingredients:

3 cups
3 Tbsp
3 Tbsp
2 Tbsp
1 Tbsp
Heavy Whipping Cream
Powdered Sugar
Vanilla Instant Pudding
Rum* (optional)
Instant black coffee

Method:

  1. Dissolve instant black coffee powder in 1 tbsp. of hot water, set aside.
  2. Whip the heavy whipping cream with medium speed until it is smooth and firm, add powdered sugar and whip for another 1-2 minutes.
  3. To make the cream more firm, add vanilla instant pudding and whip for 1-2 minutes.
  4. Add in coffee and/or rum and whip for another minute.

Mocha Chiffon Cake with Cocoa and Rum Cream frosting

Notes:

  • My friend worked at a restaurant, he told me to use Vanilla Instant Pudding to make the cream more firm.
  • *I only used 1 Tbsp. of rum as my kids are eating this cake.  If you prefer to have a stronger flavor, use 2 Tbsp. of rum.
  • Whipped cream can be made ahead of time and stored in the fridge.

Pizza


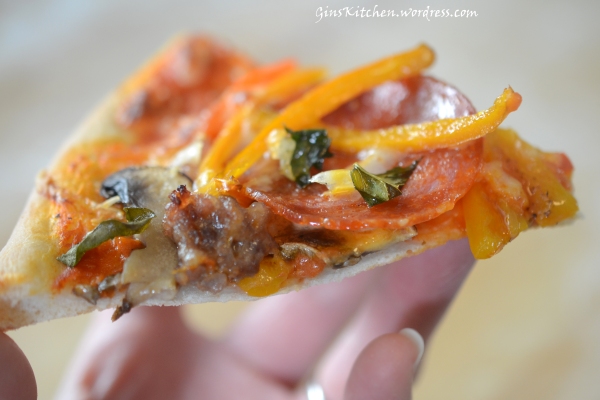
Pizza

It was Super Bowl night.   Super Bowl Sunday still holds the record for most pizza delivered in a single day.  Studies showed that 1.25 billion chicken wings would be consumed and 29 million slices were projected to sell on Super Bowl Sunday.  I’m not surprised as almost 95% of Americans planned to watch the Super Bowl.  Today, I joined the party (not to watch the game but make my own pizza)!  The pizza dough and pizza sauce were made from scratch.  The sauce recipe was adapted from KitchenTreaty and was made with fresh tomatoes.  I can taste its freshness.

Ingredients (Pizza sauce) (about 3 cups sauce):

1 Tbsp
4 cloves
1 tsp
2 pounds
1 tsp
1/2 tsp
Oil
Garlic (minced)
Dried oregano
Tomatoes
Brown sugar
Kosher salt
Black pepper to taste

Directions:

  1. Dice tomatoes and set aside (picture 1).
  2. In a medium sauce pan, heat oil over medium high heat.  Add minced garlic and cook until aromatic.  Add tomatoes, dried oregano, sugar, salt and black pepper.  Keep stirring (picture 2).
  3. Leave over medium heat, stir occasionally, until boiling.  Reduce heat to low and simmer UNCOVERED for 45 minutes or until sauce is thickened (picture 3).
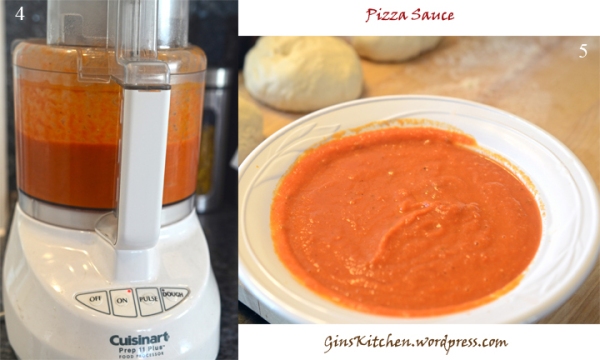
  4. Allow the sauce to cool and blend the sauce in a food processer (picture 4).
  5. Pour sauce into a bowl and let it cool (picture 5).

Pizza Sauce

Pizza sauce

Ingredients (Pizza dough) (make about 5 small pizzas):

2 tsps
1 cup
3 cups
1 1/4 Tbsp (4 tsps.)
2 tsps
1 1/4 Tbsp (4 tsps.)
Active dry yeast
Warm water
Bread flour
Sugar
Salt
Olive oil

Directions:

  1. Place all ingredients (except dry yeast) inside the pan in the breadmaker.  Fill the yeast dispenser with dry yeast (usually it is on the top of the breadmaker).  Select the “Pizza dough” mode (refer to manual of your breadmaker to select the dough program).  After the kneading process, allow the dough to rise in the breadmaker for about 1 1/2 – 2 hours.
  2. Deflate the dough, bunch it back and divide it into 5 pieces – You can use the dough at this point, but for a finer and nicer texture, after deflating and punching the dough, roll it into a ball and put it back into an airtight container and refrigerate overnight.  About 2 hours before you are going to make your pizza, remove the dough from the fridge, deflate again, and split into 5 equal portions.  Roll each portion into a ball and cover with plastic wrap.  Let them sit at room temperature for 2 hours.

Assembling Pizzas:

Ingredients (pizza toppings):

Pepperoni, thinly sliced
Italian sausages, cook ahead
Mushrooms, thinly sliced
Red onion, thinly sliced
Yellow bell pepper, thinly sliced
Red bell pepper, thinly sliced
Mozzarella cheese, shredded
Mild cheddar cheese, shredded
Fresh basil leaves, chopped
Cornmeal (to slide the pizza onto the pizza stone)

** I made my pizzas with the above ingredients, of course you can add anything you want to your pizza, such as ham, BBQ chicken, even Kimchi.

Directions:

  1. In a small sauce pan over medium-high heat, warm 1 tablespoon of the oil.  Add red onion and cook until it is slightly tender.  Transfer onion to a paper towel-lined plate.  (Picture 1)
  2. In the same pan over medium-high heat, warm 1 tablespoon oil.   Add the bell peppers, stirring frequently, until just softened.  Transfer the peppers to the same paper towel-lined plate.  (Picture 2)
  3. Now warm 1 tablespoon oil.  Add the mushrooms, salt and pepper and cook (stirring occasionally) until softened.  Transfer the mushrooms to the plate with the peppers and onion.

Pizza

  1. Preheat oven to 500 ºF and heat up the baking stone (or baking pan) in the oven.
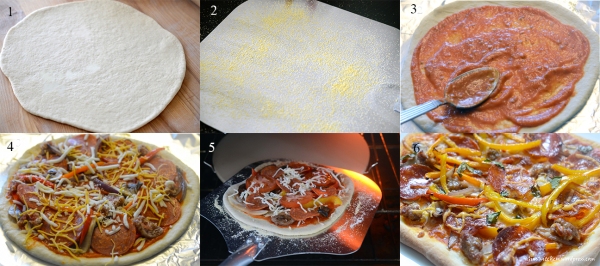
  2. Using a rolling pin to roll out your dough ball, flatten disc into an 8-inch circle.  If you don’t know how to shape your pizza dough by tossing it in the air, simply start at the center and work outwards, use your fingertips to press the dough to 1/2-inch thick.  Stretch the dough until it will not stretch further.  (picture 1)
  3. Lightly sprinkle your pizza peel with corn meal.  Transfer one prepared flattened dough to the pizza peel.  If the dough has lost its shape in the transfer, lightly shape it to the desired dimensions.  (picture 2)
  4. Top dough with a layer of sauce.  (picture 3)
  5. Then sprinkle with cheese, and place your desired toppings on the pizza, sprinkle more cheese on top at the end.  (picture 4)
  6. Slide the pizza off of the peel and on to the baking stone in the oven.  Bake pizza one at a time until the crust is browned and the cheese is golden, about 10 minutes. (picture 5)
  7. You can use the pizza peel or a stainless steel spatula to remove the pizza from the pizza stone.  Serve immediately (picture 6)
  • pizza