I got this recipe from my cousin who made a tri-tip roast for our family New Year’s Eve dinner. Ever since, the tri-tip roast has been a requested dish for our annual New Year’s gathering. I have discovered that the same recipe can be used for making pork tenderloin and the flavor is still amazing. The only adjustment is to reduce the cooking time.
Ingredients:
2 pounds
Pork Tenderloin (about 2-3 pieces)
1/2 Cup
Fresh squeezed lemon juice
1/2 Cup
Cooking oil (grape seed oil)
1/4 Cup
Brown sugar
1/4 Cup
Light soy sauce
1-2 Tbsp
Black pepper
1/4 Cup
Garlic salt
1/4 Cup
Chopped garlic
1/4 Cup
Chopped dried onions
Ingredients for gravy:
1 Can
Chicken broth
2 tsp
Cornstarch
2 Tbsp
Water
1 Tbsp
White wine
To taste
Salt
Directions:
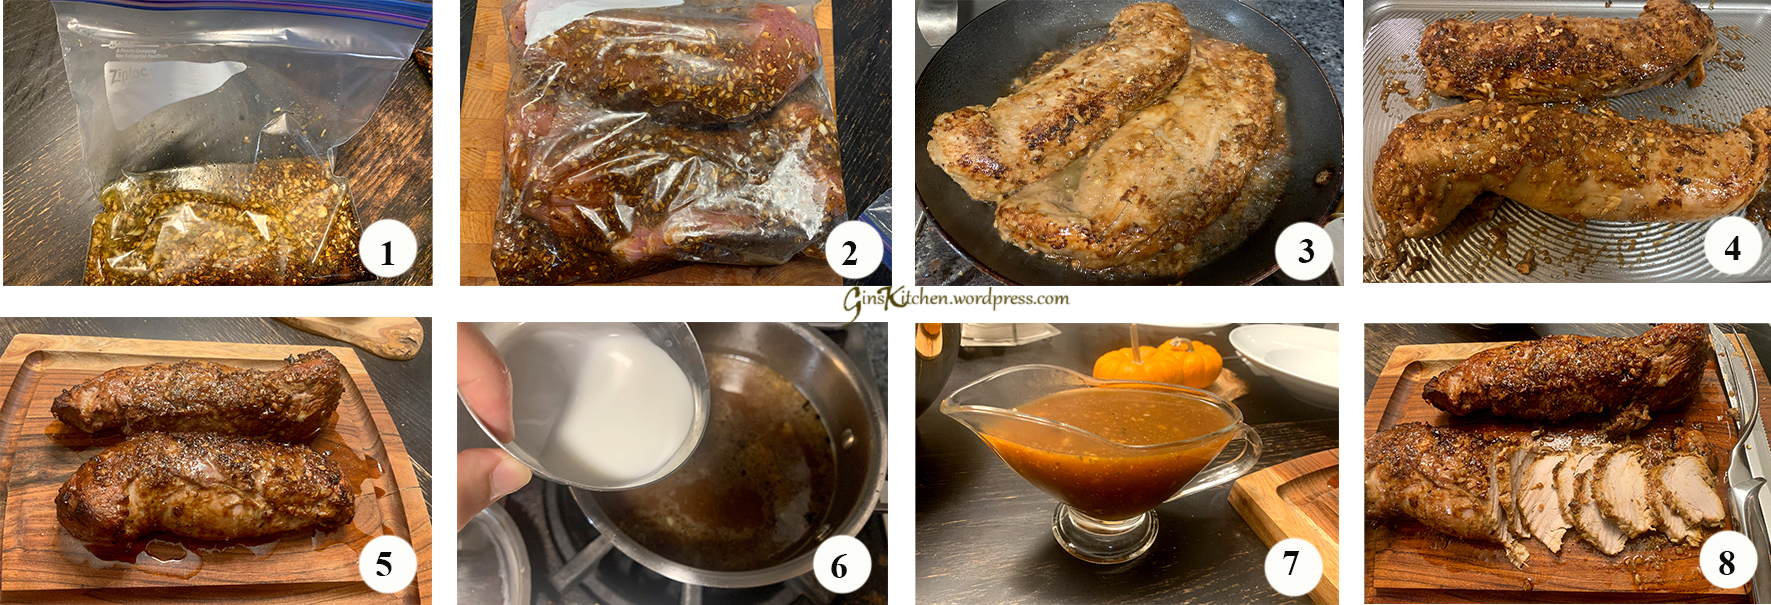
Mix all ingredients in a mixing bowl, transfer the mixture to a 1-gallon ziploc bag. (Picture 1)
Place the pork tenderloin in the bag and toss the bag to make sure the meat is evenly coated with the marinade, refrigerate overnight. (Picture 2)
Preheat oven to 350°F.
In a large skillet, drizzle a little cooking oil and brown the pork tenderloin on both sides. (Picture 3)
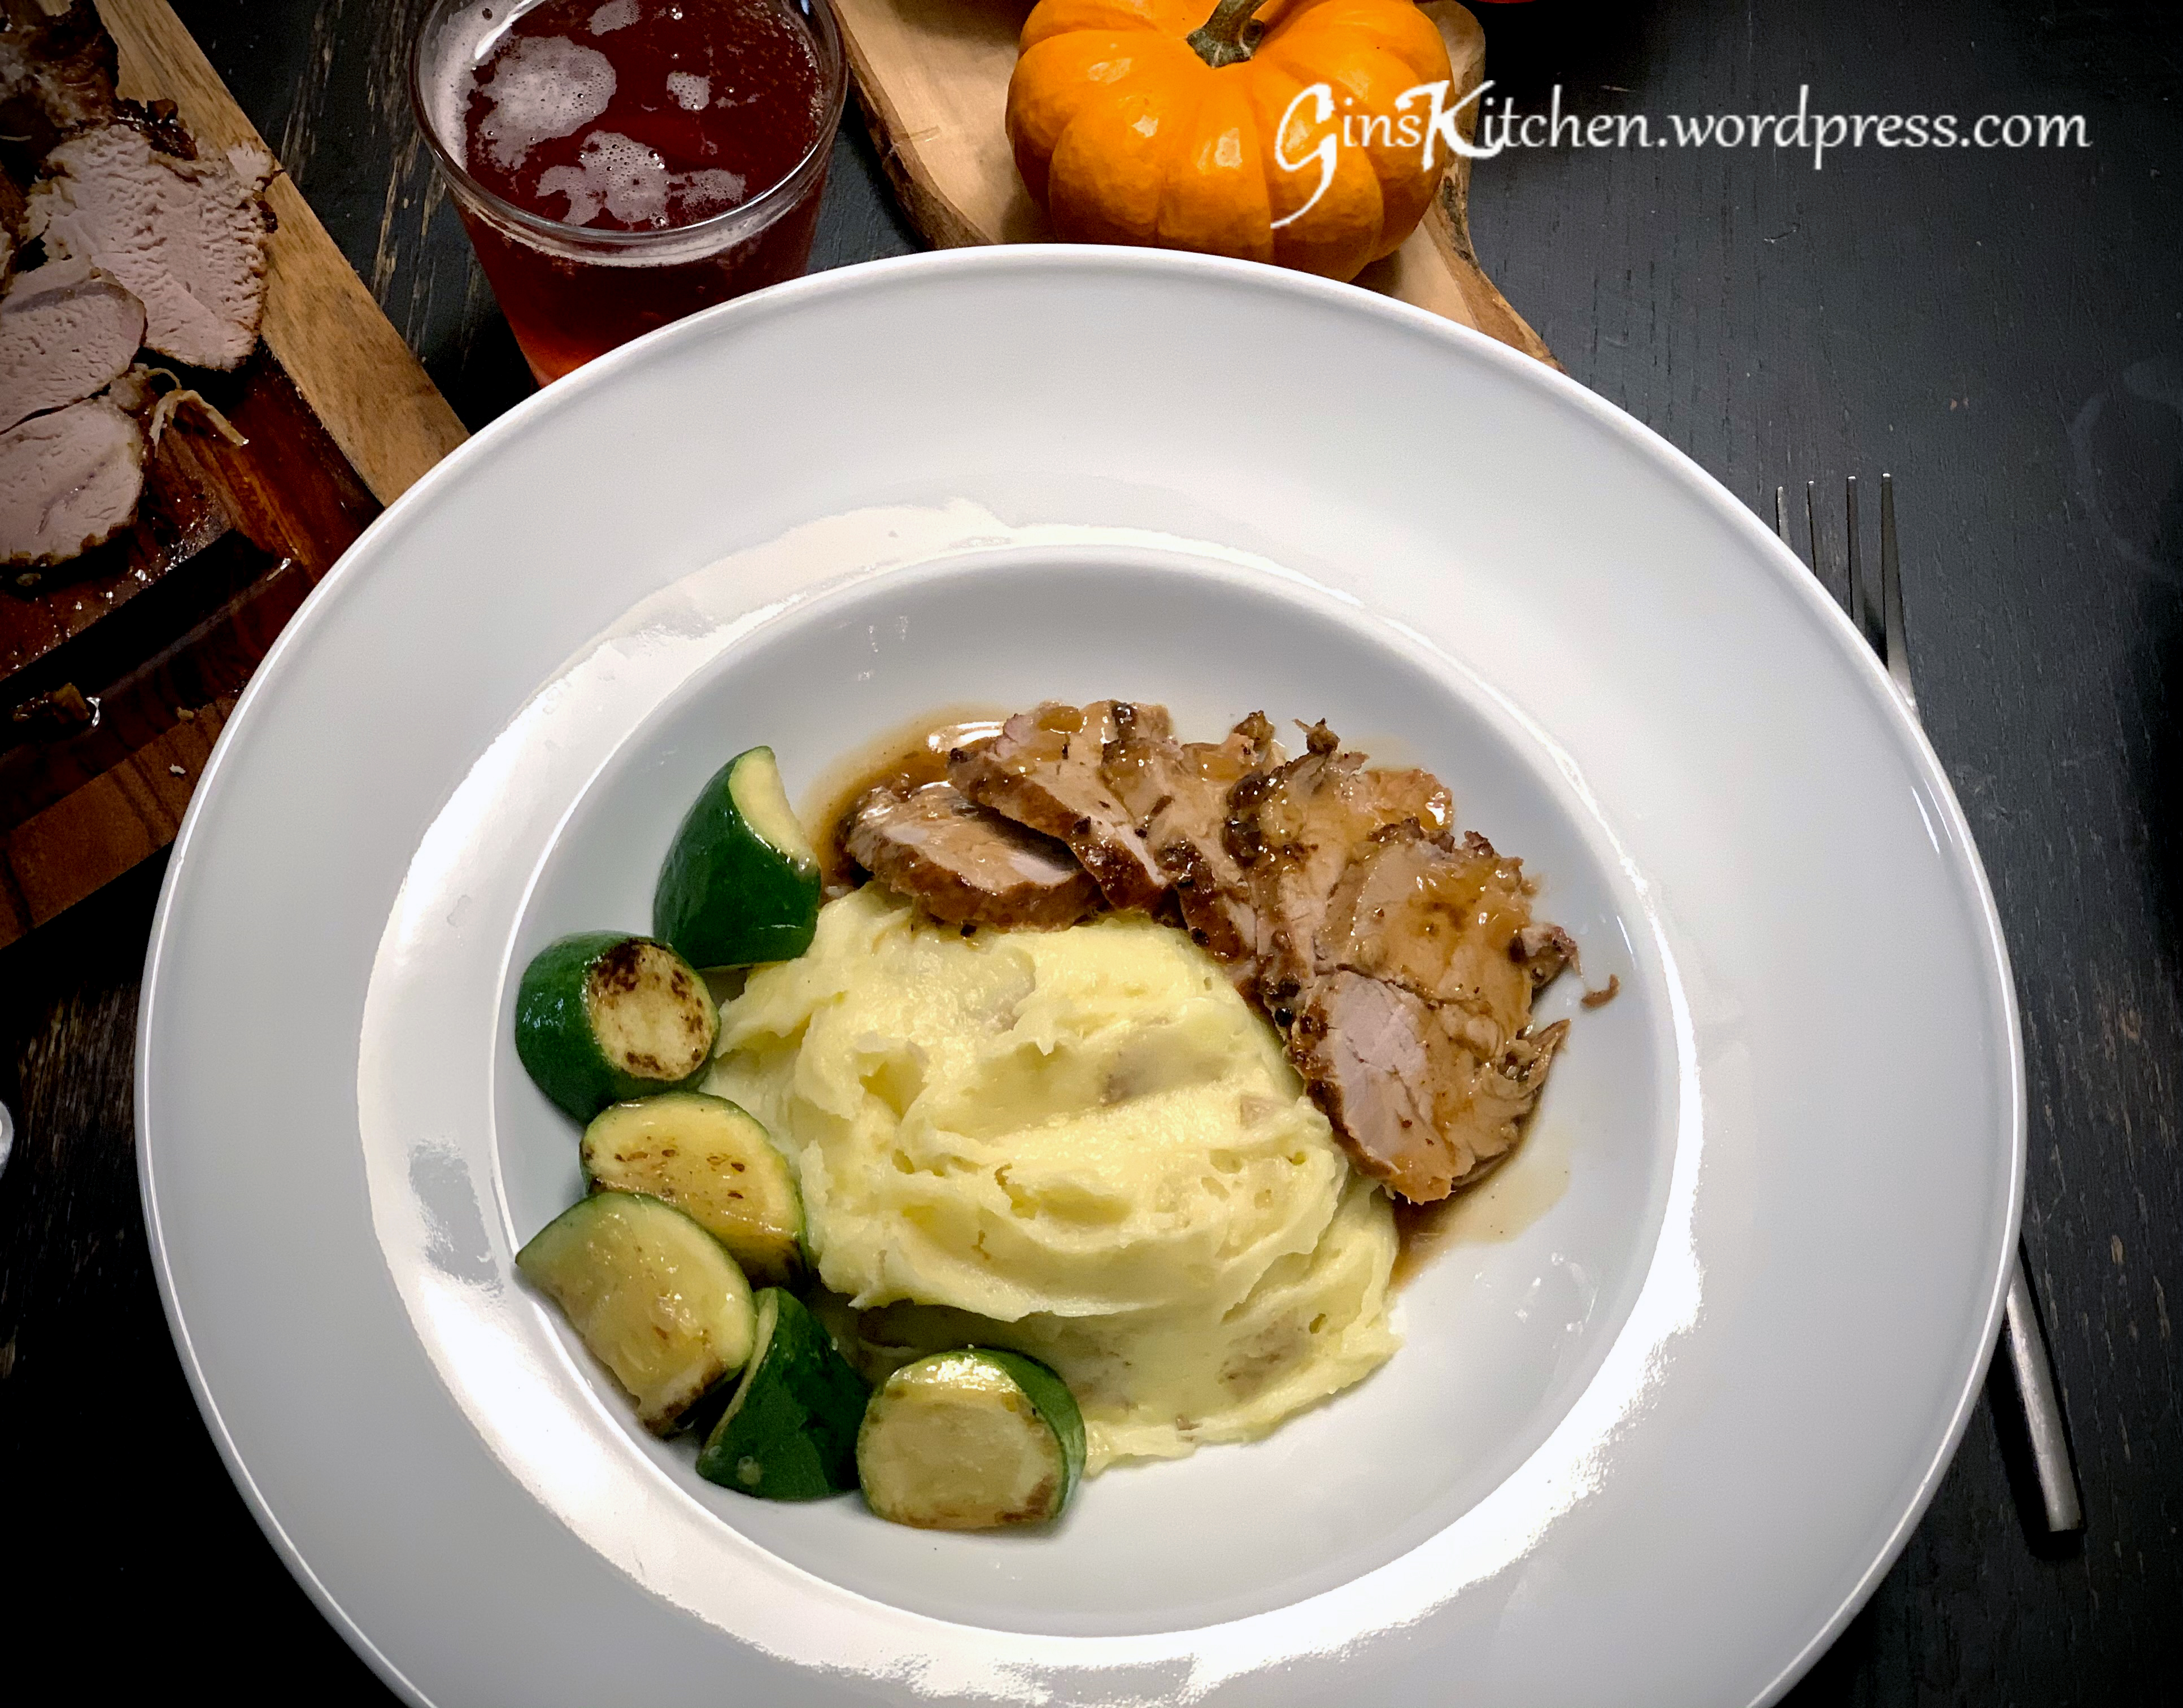
Transfer the meat to a baking sheet and bake in the oven until the thermometer reads 160°F. (The federal agency says it is lowering the recommended safe cooking temperature for whole cuts of pork from 160°F to 145°F. This is your preference). Let it sit for 3-5 minutes before cutting. (Pictures 4-5)
While the meat is resting, heat up a cup of chicken broth. Scrape the brown pieces from the baking sheet and add into the chicken broth, then add in white wine. Combine cornstarch and water in a small bowl, then stir until smooth. Stir cornstarch mixture into hot broth to thicken the gravy. Add salt to taste. (Pictures 6 & 7)
Slice pork tenderloin and pour gravy on top to serve.
This recipe is from Christine Ho’s cookbook (Christine’s recipe here). It is so delicious that I didn’t alter any ingredients, so this recipe must be saved here for my children. For all pork lovers, this is a must try dish.
Ingredients:
700g
Pork spare ribs
1 tsp
Minced fresh ginger
1 tsp
Finely chopped garlic
2 tsp
Cooking wine
to taste
Salt
to taste
Pepper
Ingredients of sauce:
1 cup
Freshly squeezed orange juice, sifted
1 cup
Chicken broth
2 Tbsp
Light soy sauce
2 Tbsp
Brown sugar
1/2 tsp
Orange zest
Directions:
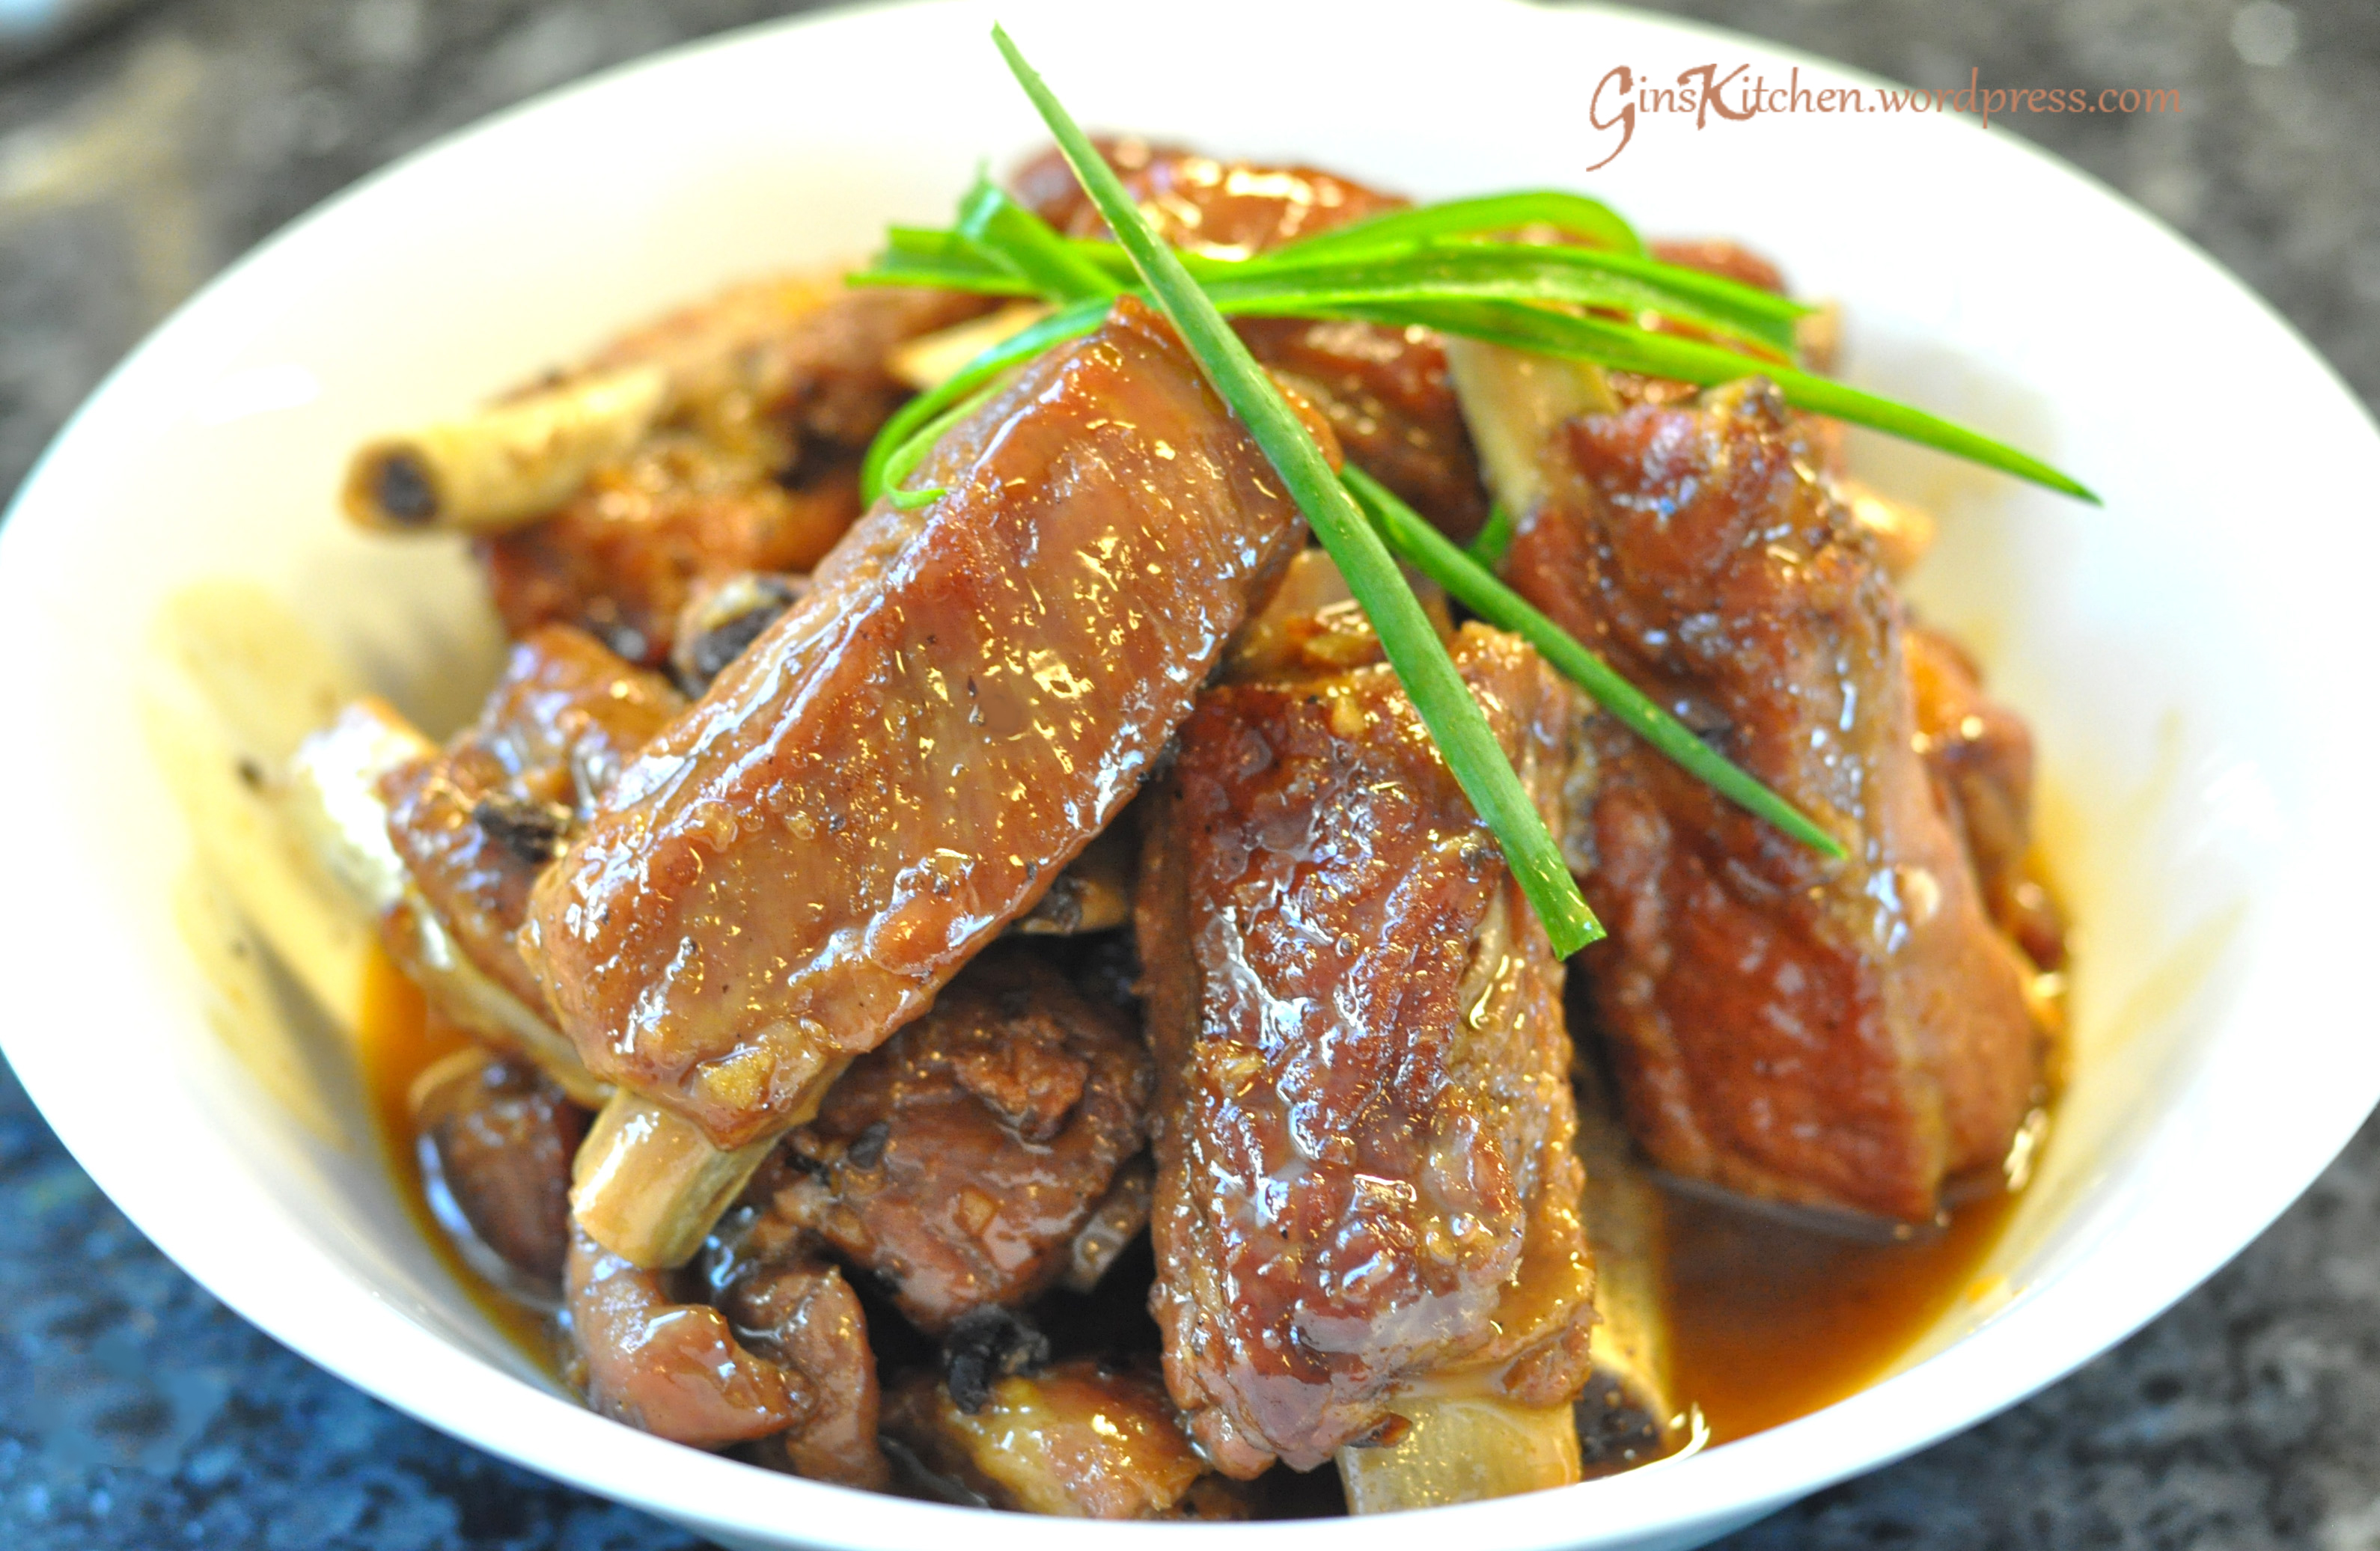
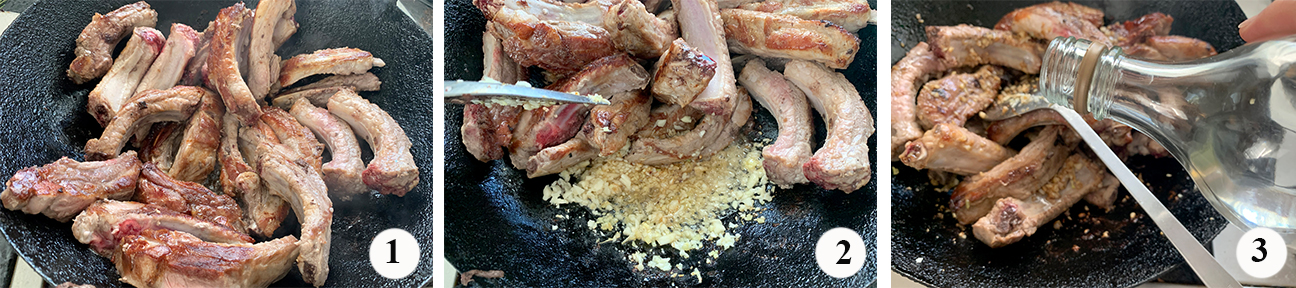
Rinse pork ribs and wipe dry with kitchen papers. Season with salt and pepper.
Add all ingredients for the sauce in a pot and bring it to a boil over medium fire.
Brown pork ribs on a frying pan/wok until both sides are golden. Push pork ribs to one side of the pan, then add in ginger and garlic, cook until fragrant. Pour in cooking wine and stir to combine all ingredients. (Pictures 1-3)
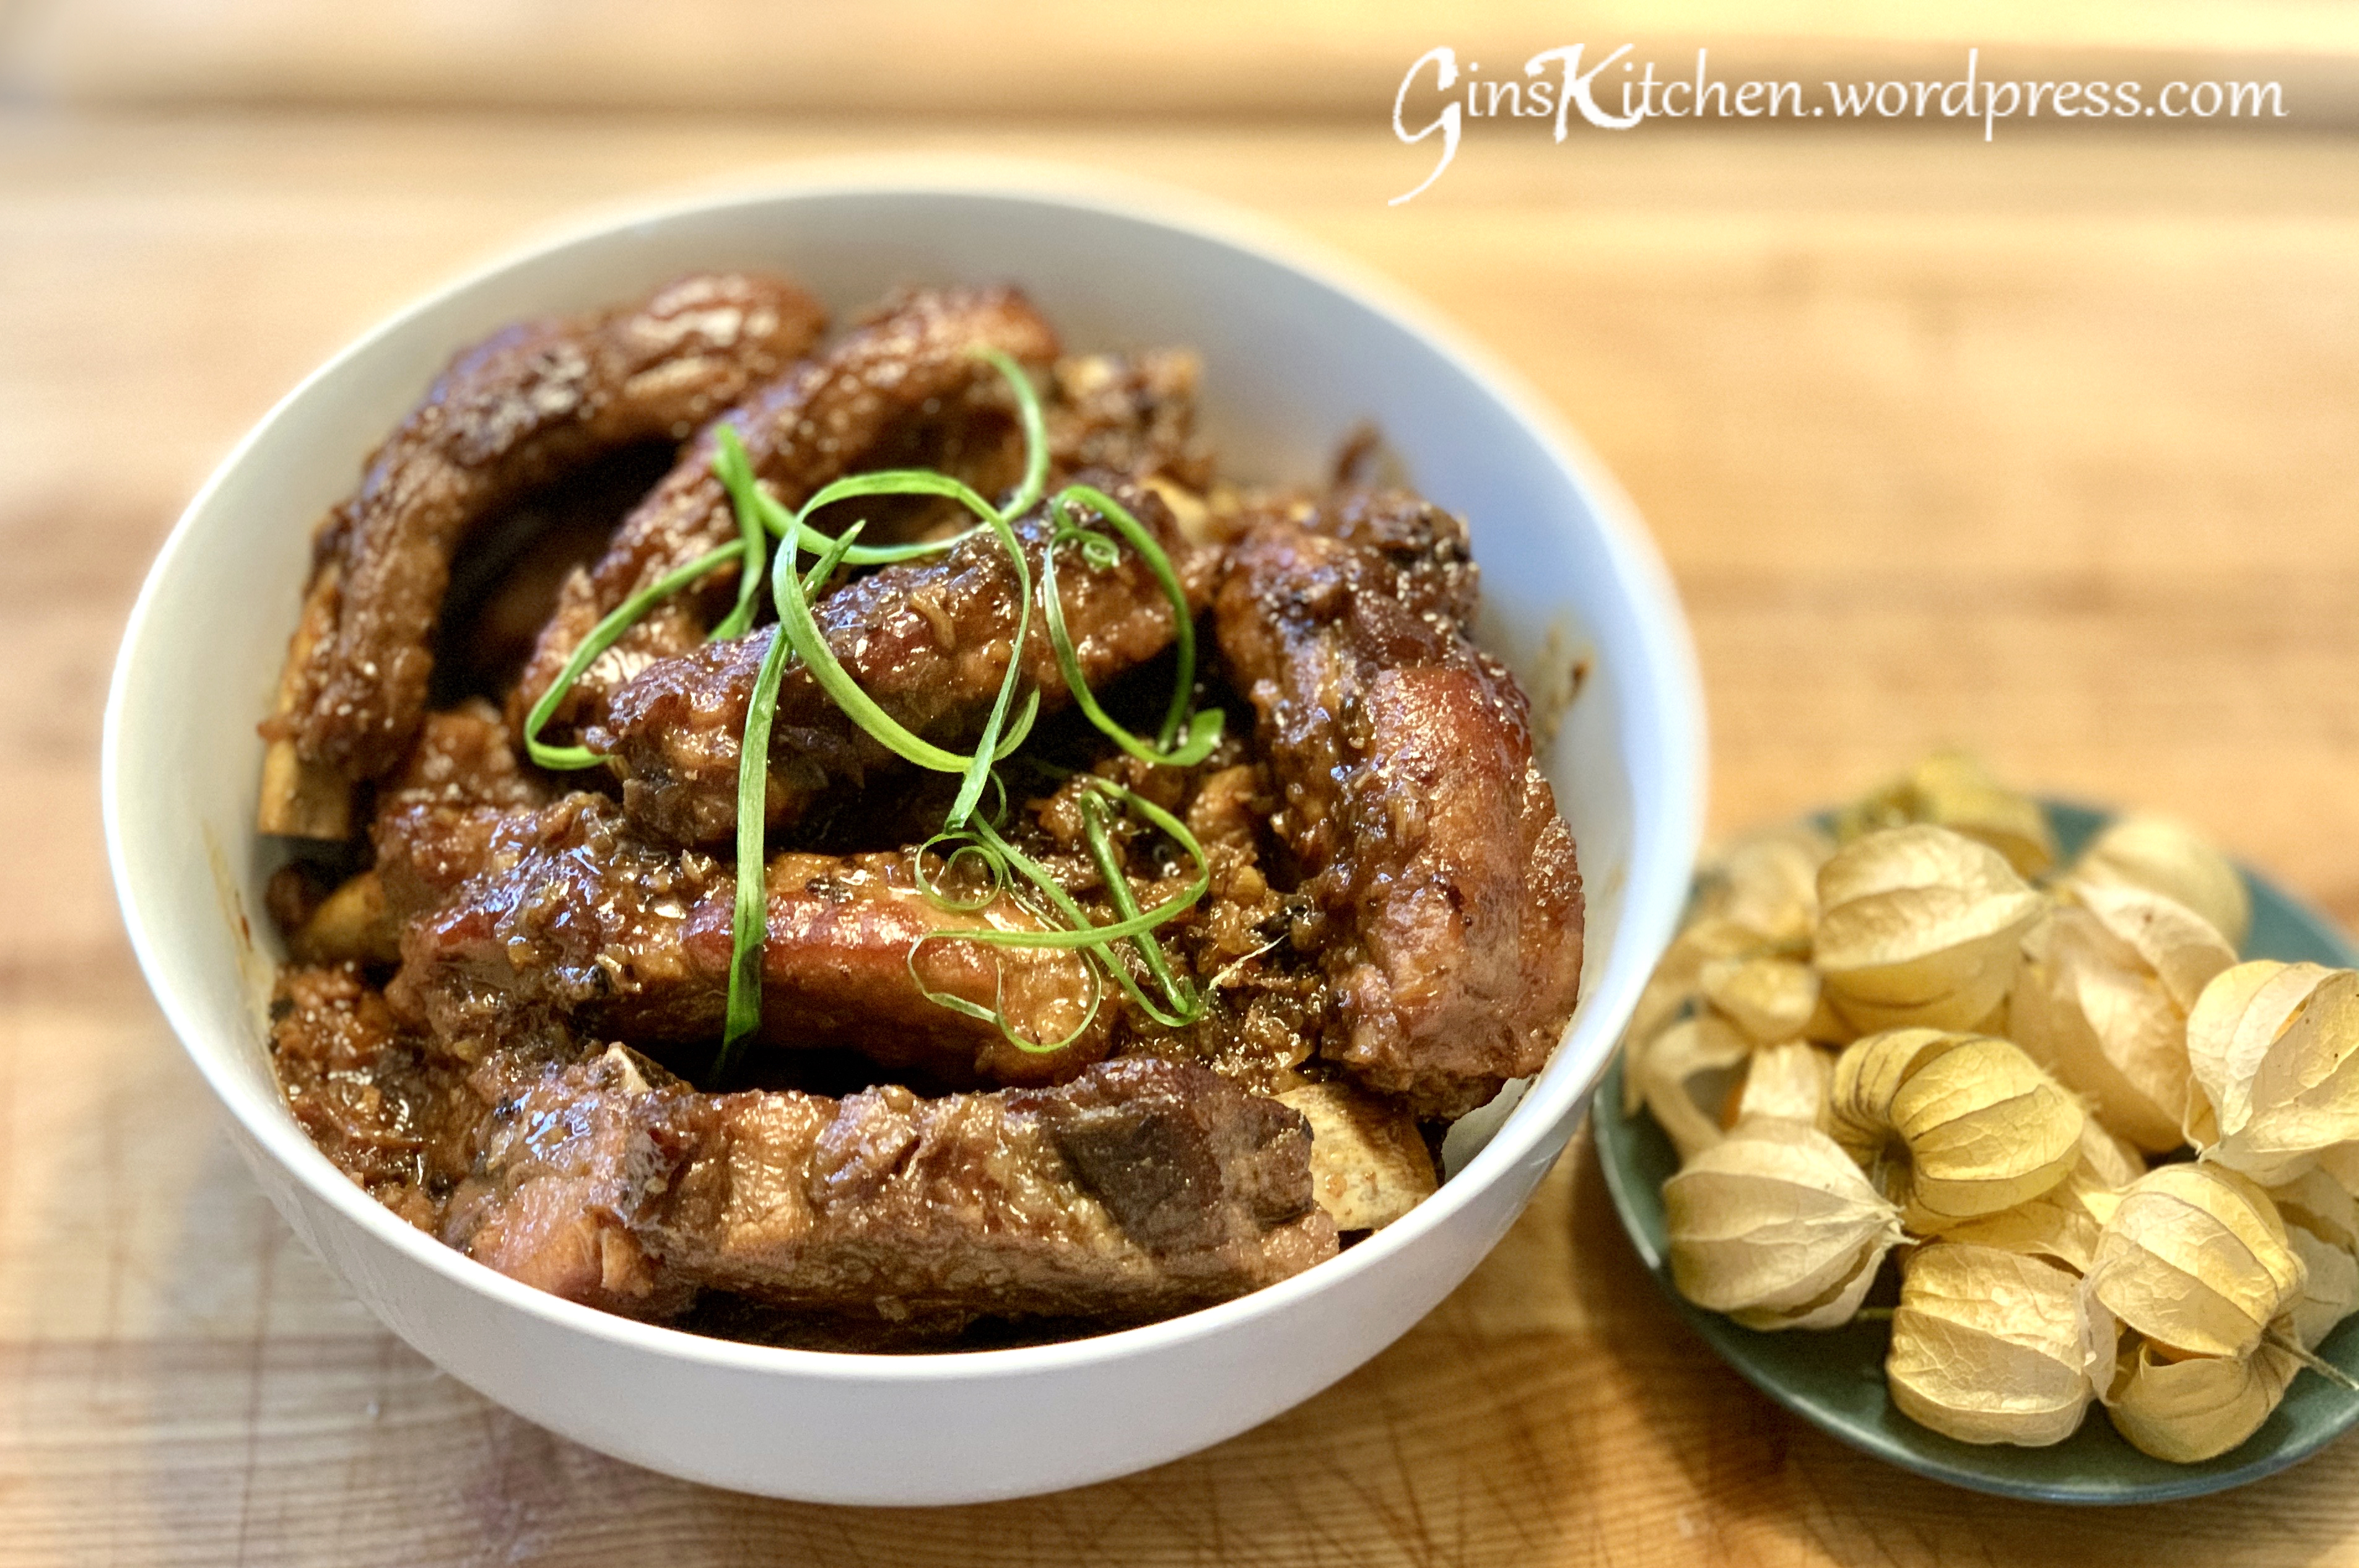
Transfer the pork ribs to the pot with the sauce, reduce heat, cover and simmer for 2 hours or until sauce becomes thickened. Serve hot with steamed rice.
The good thing about living in Southern California, besides the year round sunshine, is the food. Here in Los Angeles, which is one of the most multicultural cities in the world, people from different countries allow us to taste different types of authentic cuisine.
There are many good Mexican restaurants and food trucks in East Los Angeles where you can find some of best tacos in the country. If you go for the Taco Tuesday deals, each taco is as low as $1. After your meal, you can walk along some streets in East LA, and there are some food trucks selling fresh churros, they are just delicious!
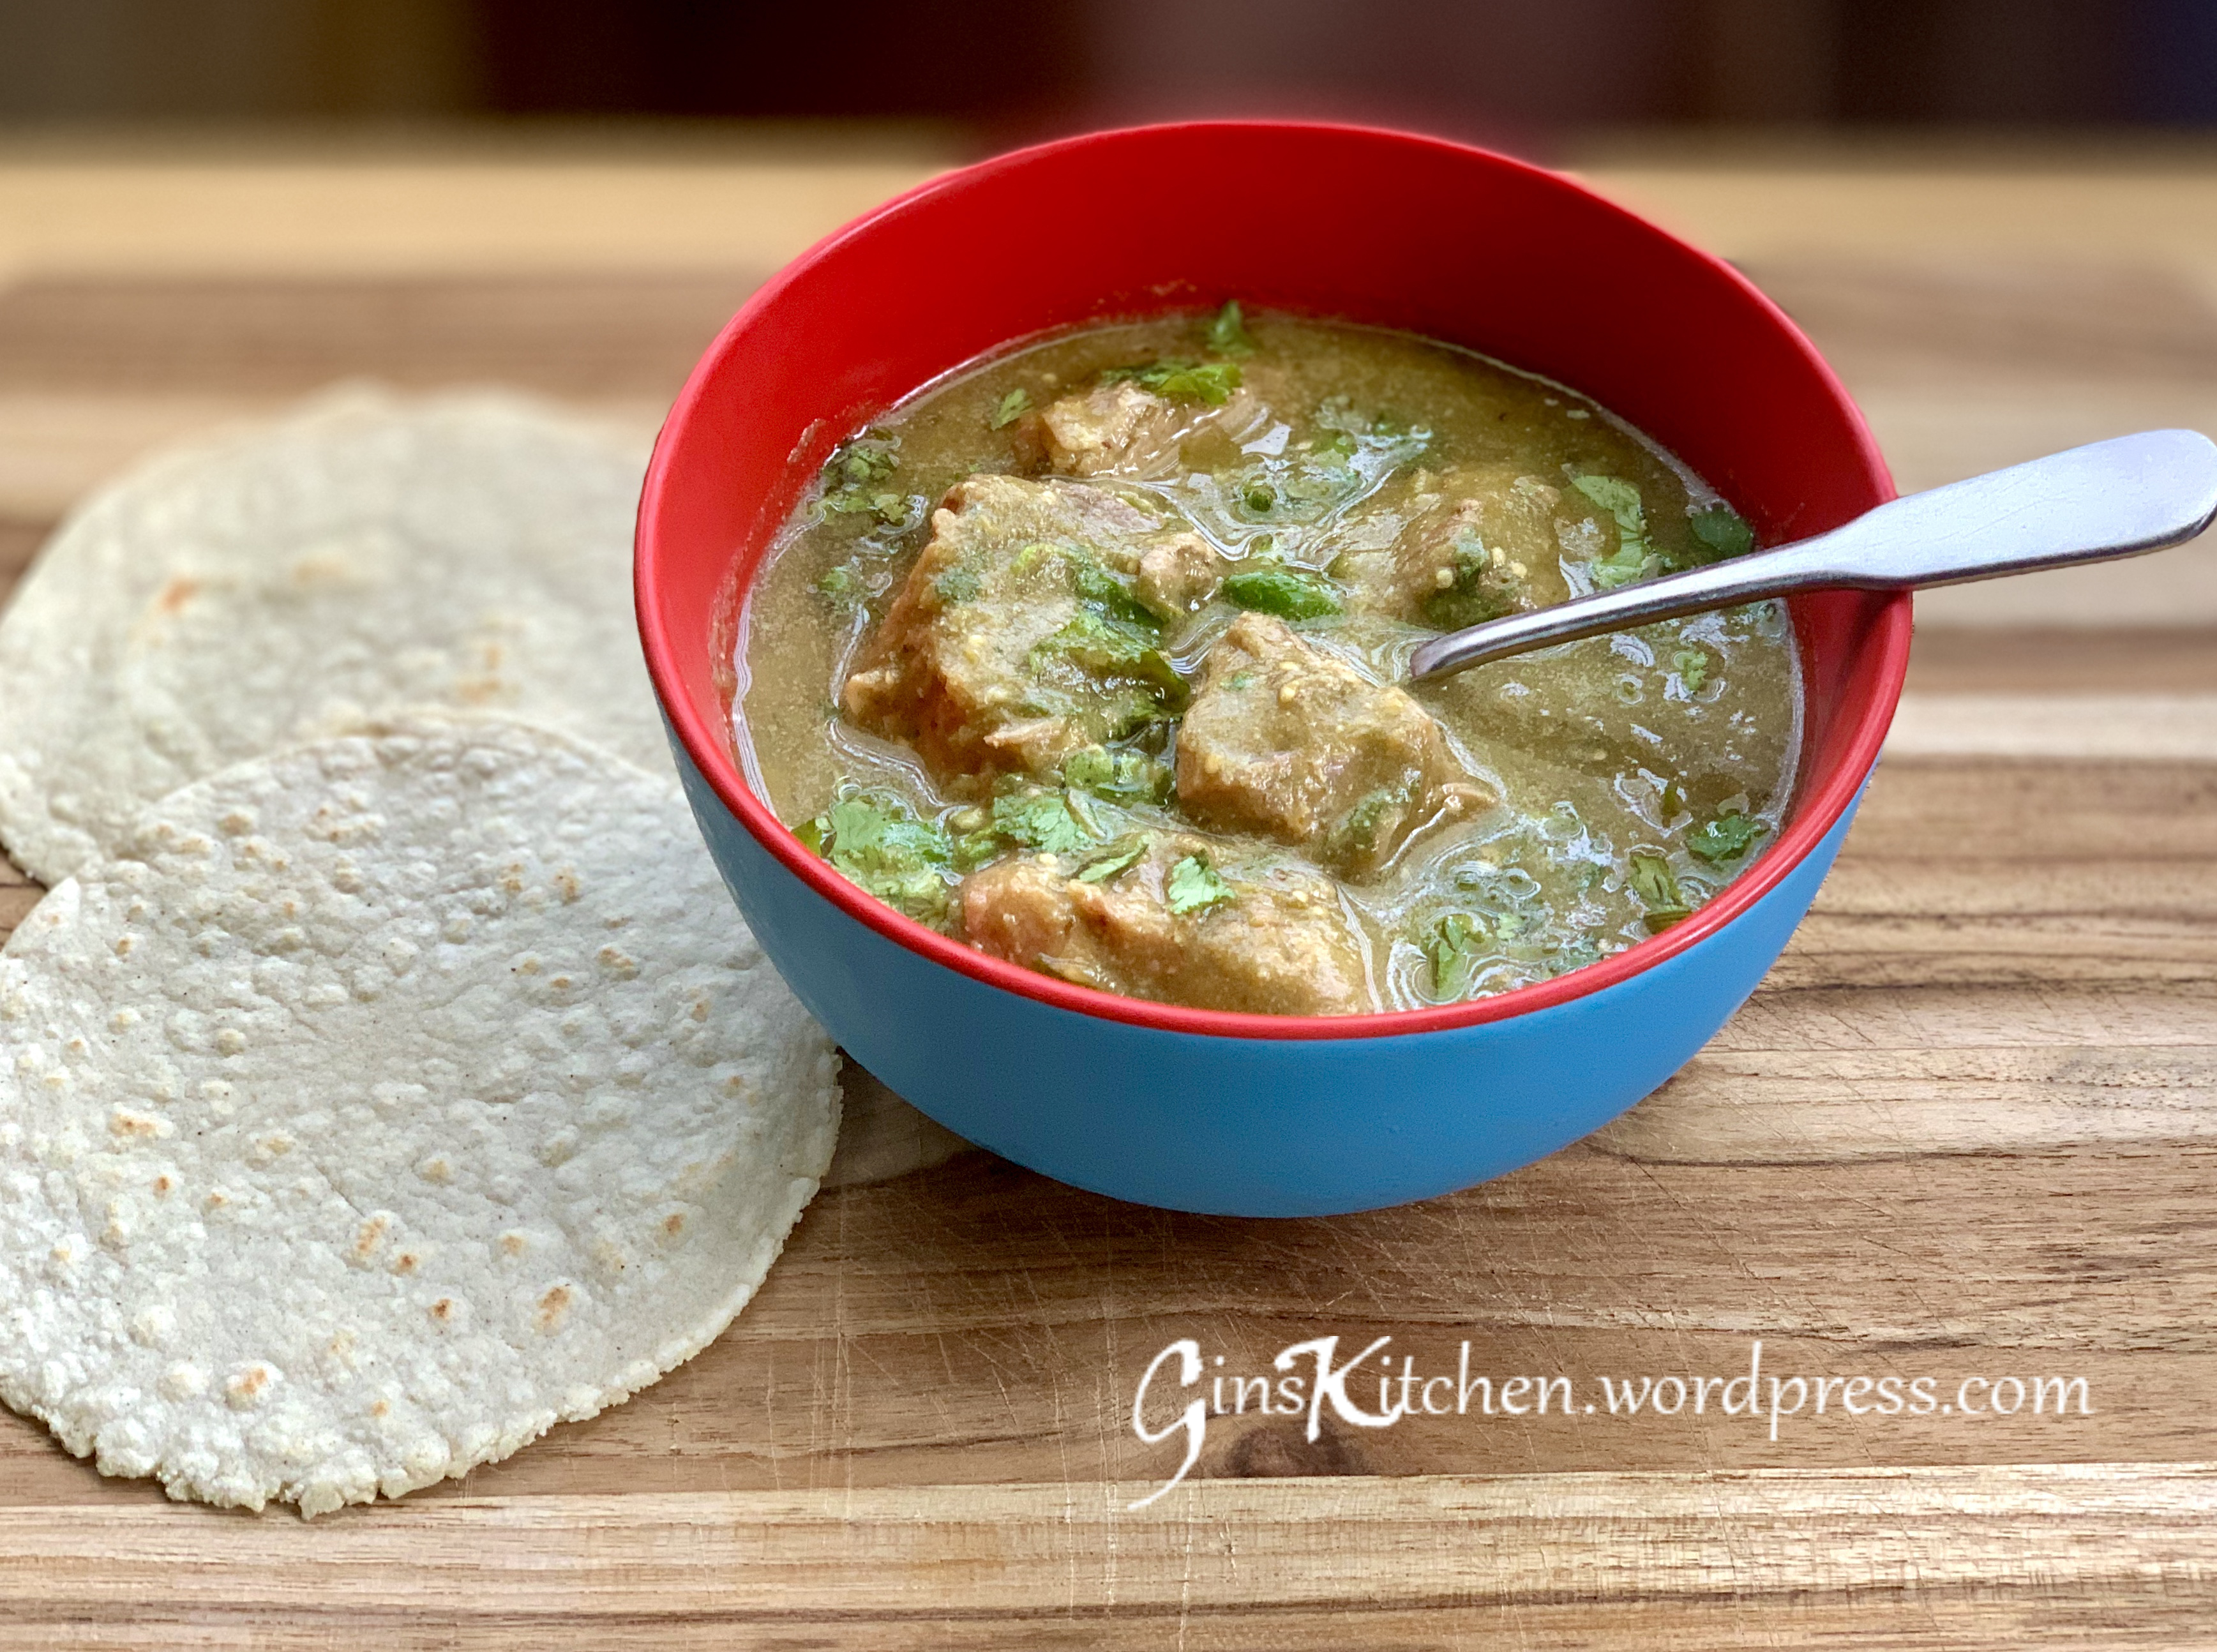
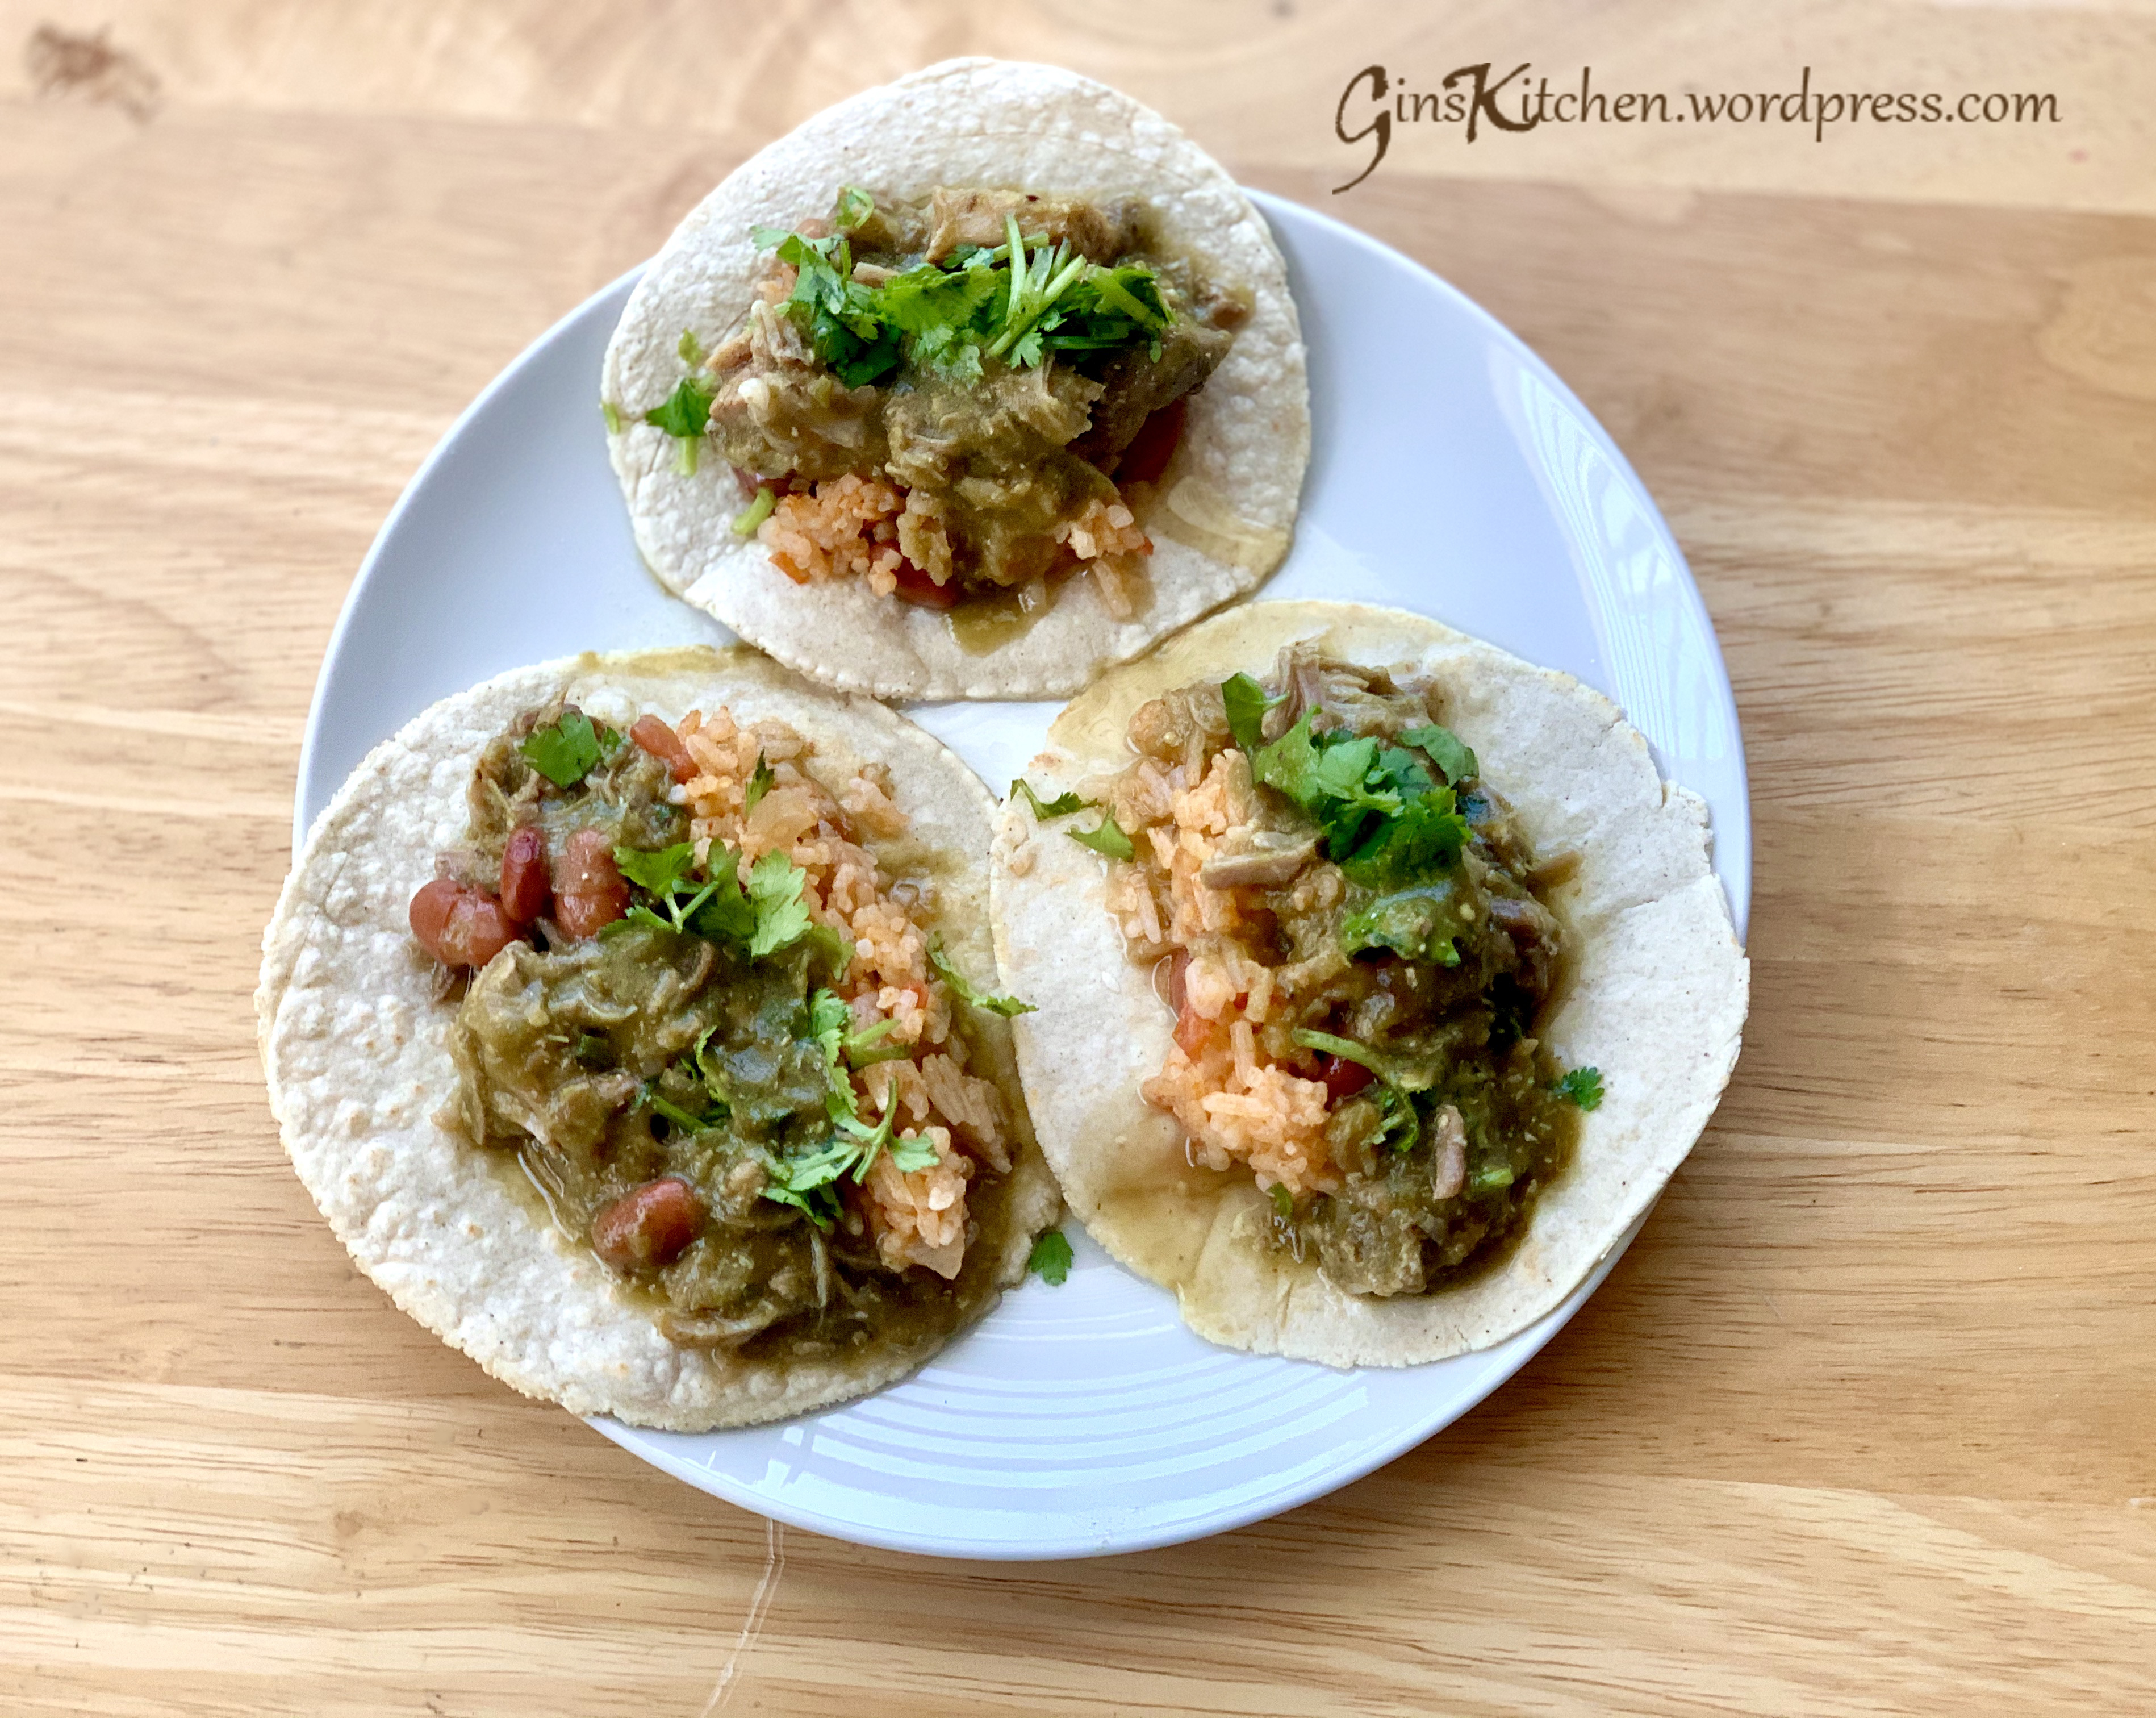
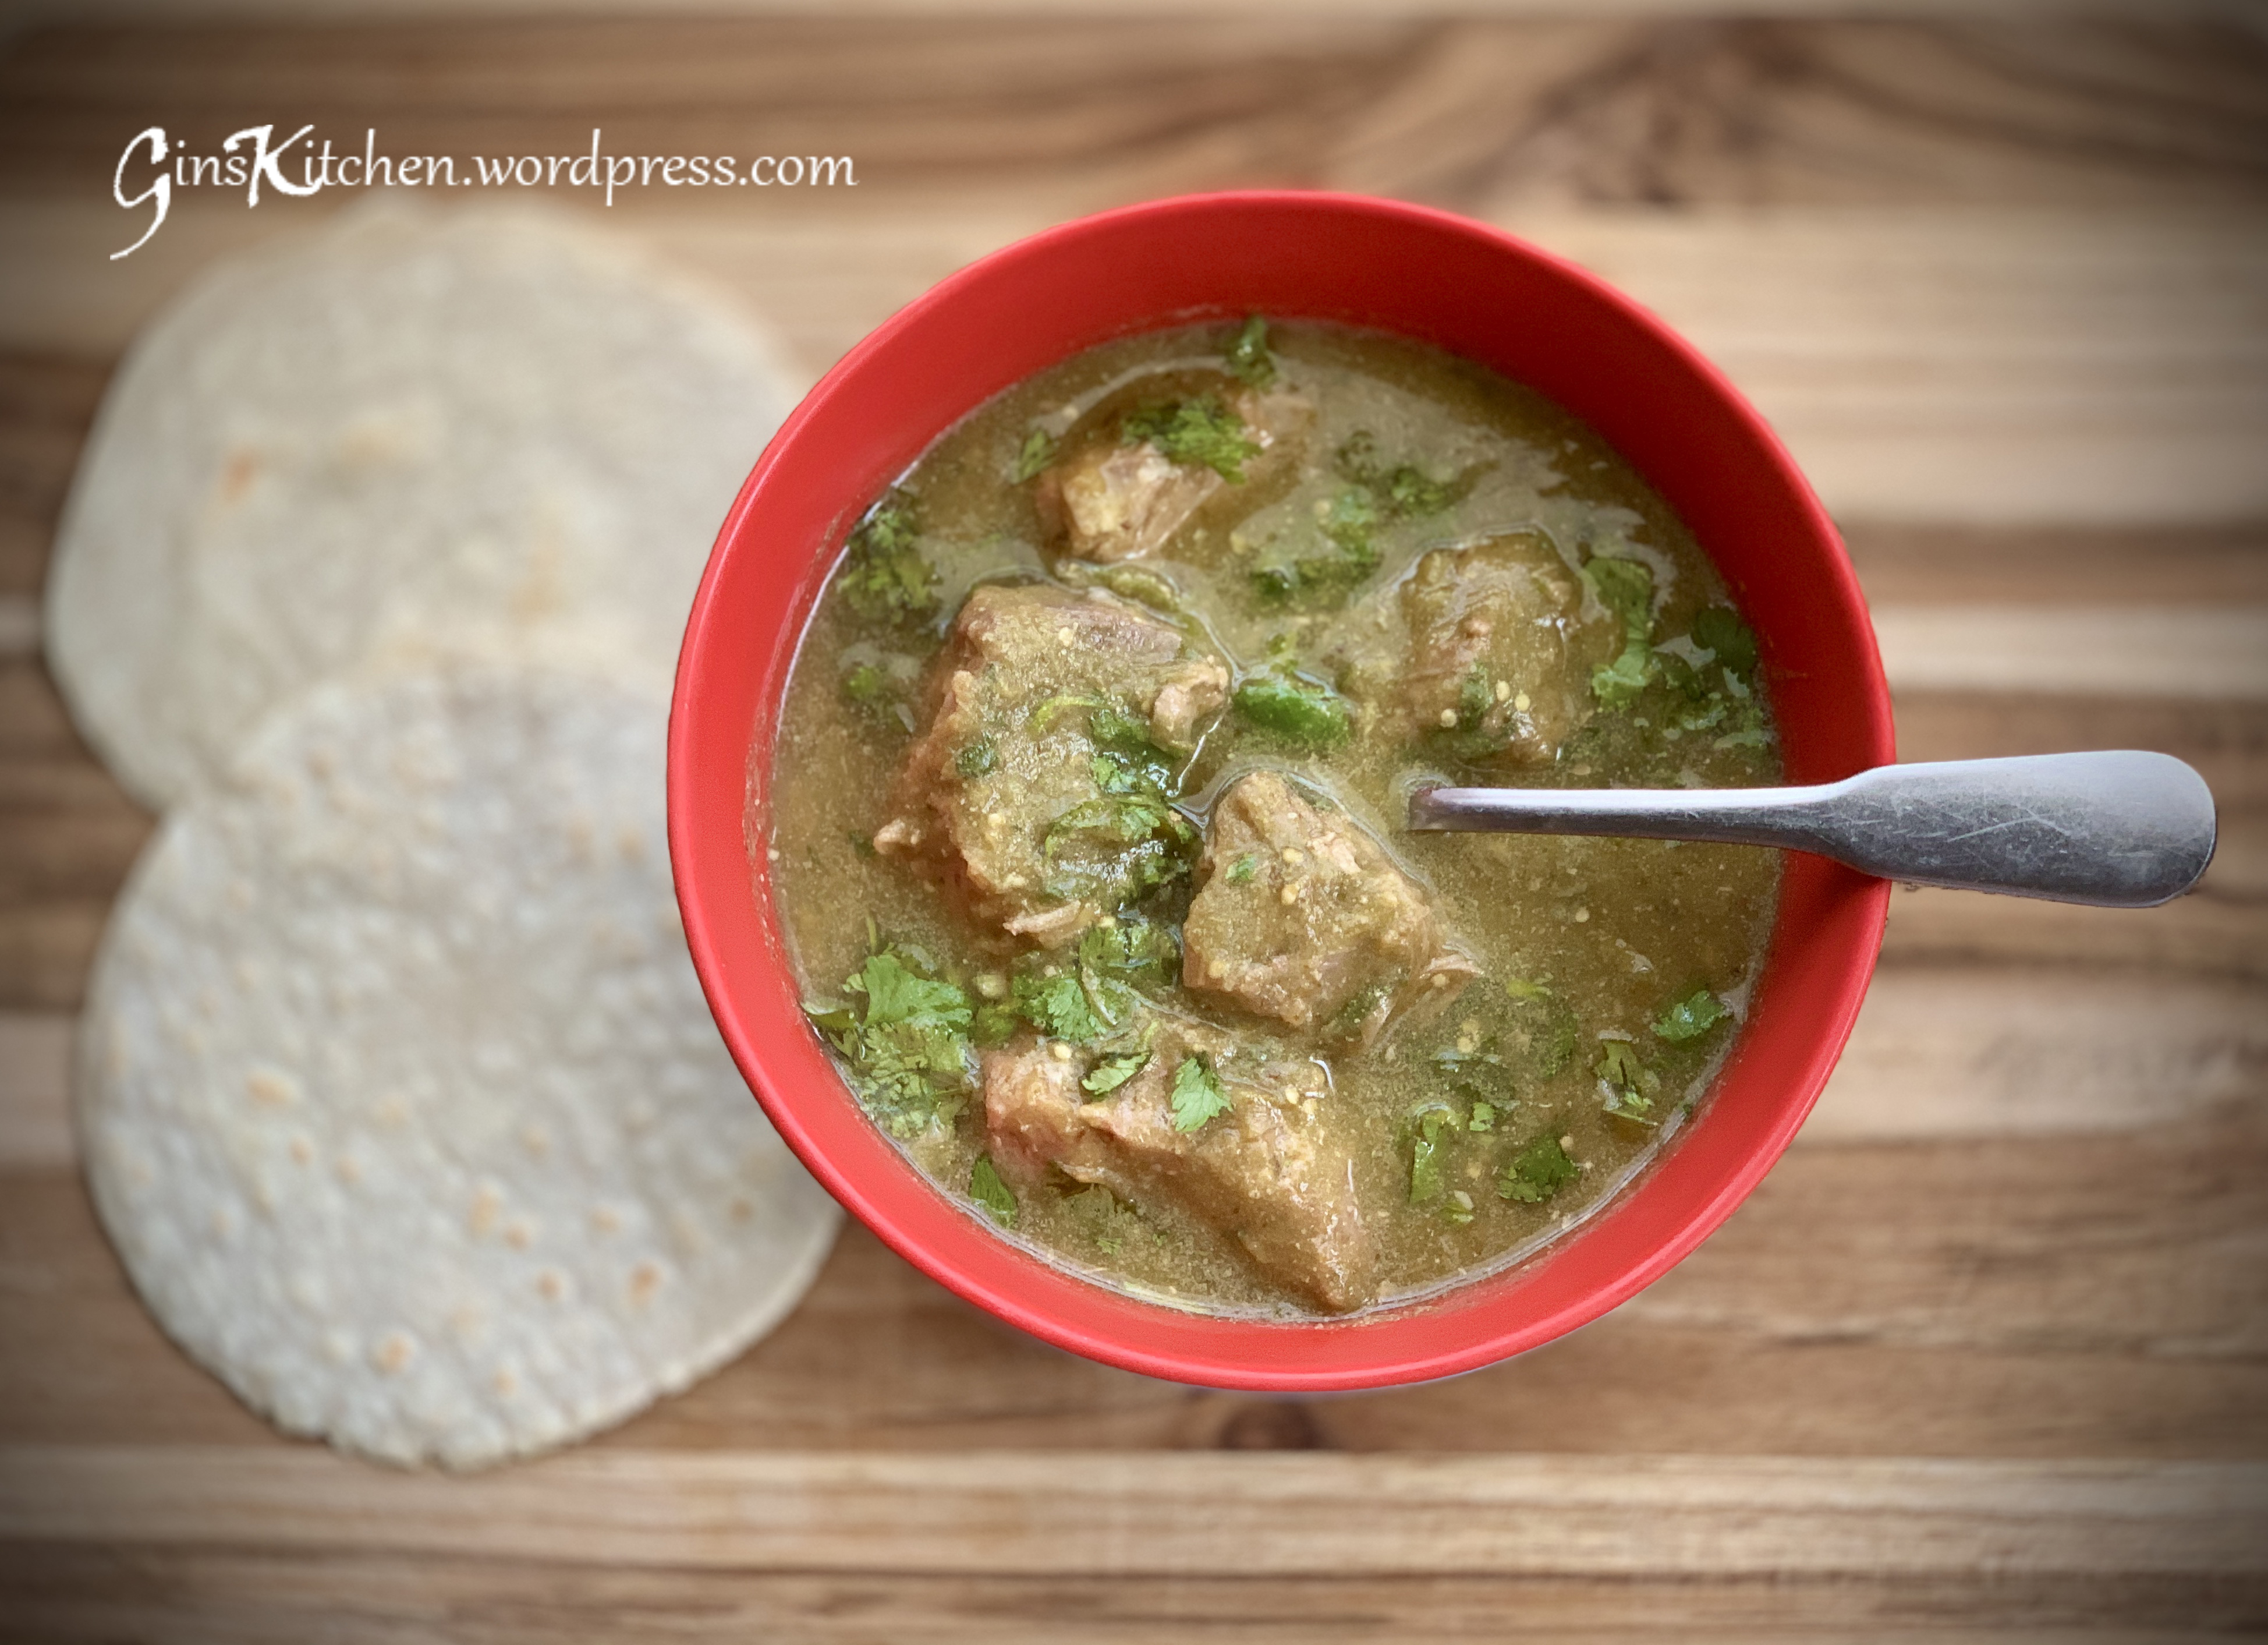
Just because my family loves Mexican food, I came across with this Pork Chile Verde recipe on seriouseats.com using a pressure cooker. Simply add some homemade Mexican rice (recipe here), some beans and/or tortillas as your sides, and you will have a pretty satisfying meal.
Ingredients:
4 pounds
Pork shoulder (Cut into chunks)
350g
Tomatillos (quartered, papery husks removed)
300g
Poblano peppers (about 2 peppers, chopped, seeds and stems discarded)
170g
Anaheim peppers (about 2 peppers, chopped, seeds and stems discarded)
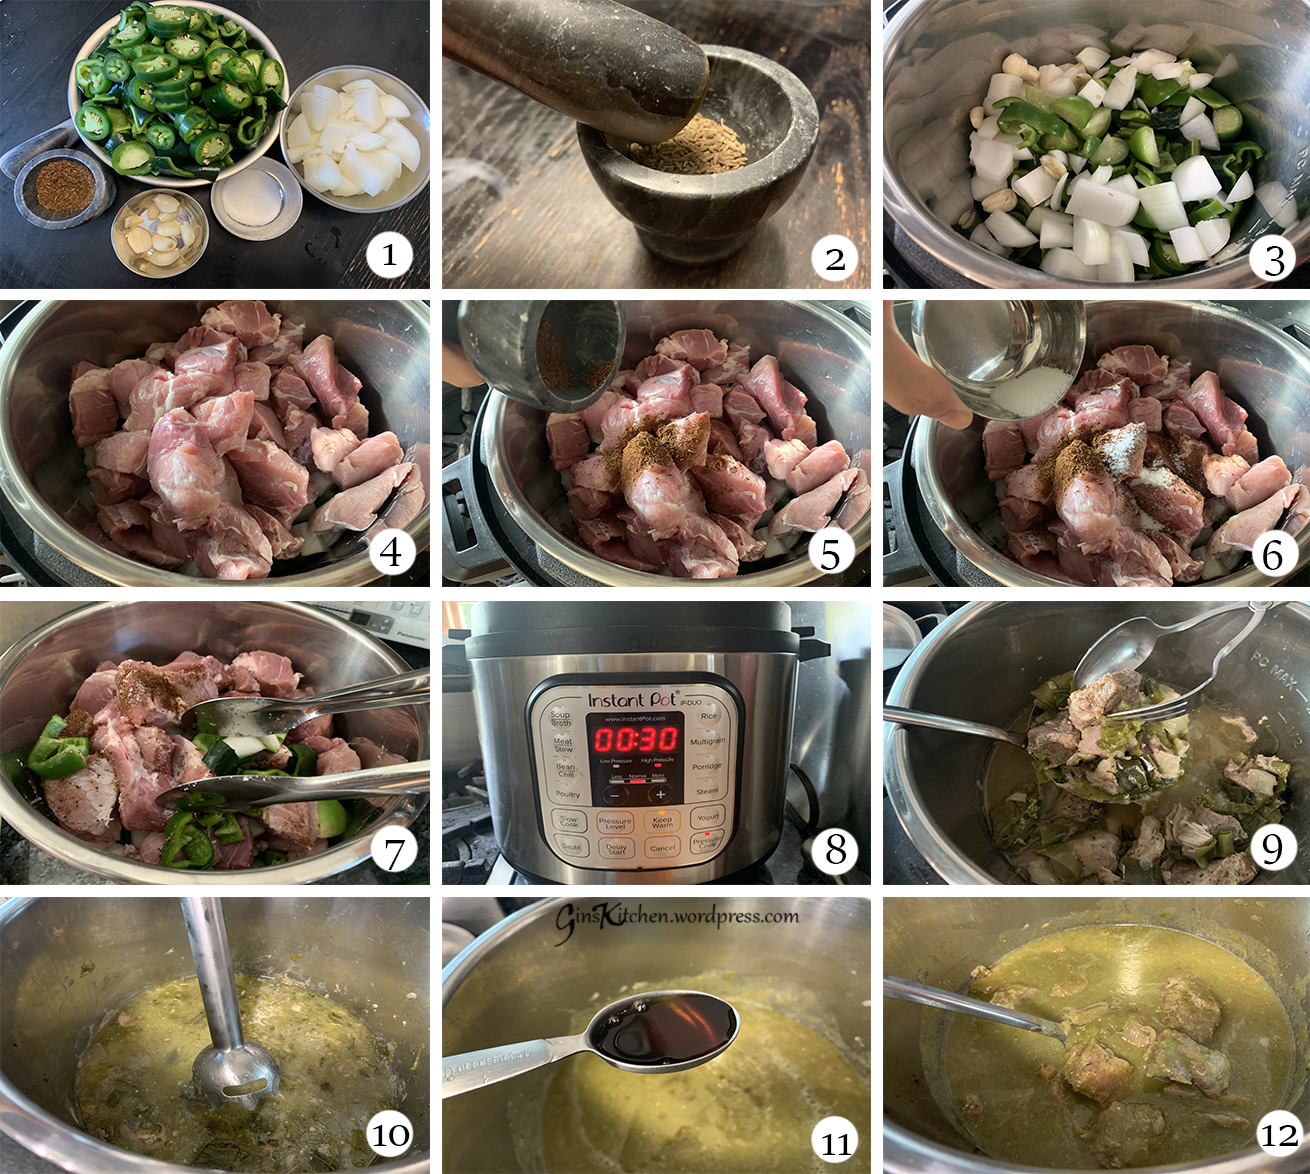
Roughly chop all peppers, remember to keep the Jalapeno chili seeds. Chop onion and peel garlic. (Picture 1)
Toast 6g of whole cumin seeds and then grind them with a mortar and pestle. (Picture 2)
Put all of the vegetables into a pressure cooker, then put meat on top. (Pictures 3 and 4)
Add ground cumin and salt to the pressure cooker, then use tongs to stir everything together. (Pictures 5-7)
Cover the lid and cook at high pressure for 30 minutes. Turn the sealing vault to the “sealing” position. (Picture 8)
After 30 minutes, do a quick release of the pressure.
Remove pork with tongs to a bowl and set aside. (Picture 9)
Use an immersion blender to blend the vegetables to a smooth puree. (Picture 10)
Add in a tablespoon of Asian fish sauce. (Picture 11)
Return pork to the pot. (Picture 12)
When serving, add a good amount of chopped cilantro.
I had read some reviews about the vegetables being burned at the bottom of the pot. The pressure cooker I’m using is an electric pressure cooker, so this problem will never happen. If you have a traditional stovetop pressure cooker, you may want to test it out by adding a little water to the pot.
I don’t remember which magazine had this recipe, but it was a recipe from the writer’s grandma so it immediately caught my eye! We all know grandmas’ cooking is always full of delicious recipes created with ‘secret’ ingredients.
It is very important to choose a good piece of meat. For making Char Siu, the best piece is pork butt. Choose a piece that has more marbling than others as lean pieces will be very dry and won’t be as flavorful as well. If you still want to keep it healthy and lean, I’d recommend using pork neck since the texture is more tender yet lean (the pictures below in the collage show pork neck).
Ingredients:
2 pounds
Pork Butt
4 Tbsp
Granulated sugar
2 Tbsp
Light soy sauce
2 Tbsp
Dark soy sauce
2 Tbsp
Hoisin sauce
2 Tbsp
Rice cooking wine
2 Tbsp
Ground bean paste
2 tsp
Sesame oil
1/4 tsp
Ground white pepper
2 Tbsp
Honey
Directions:
Quarter pork butt lengthwise. If you use pork neck, you don’t need to cut it. In a small bowl, combine sugar, soy sauce, hoisin sauce, rice wine, ground bean paste, sesame oil, pepper, and stir to combine (save the honey for later). Pour mixture over pork, making sure it is well coated. Cover the container with plastic wrap and refrigerate overnight, turn pork at least once. (picture 1)
When ready to roast, let pork come to room temperature and let it sit for at least 30 minutes. Preheat broiler, place a rack in a roasting pan or use a broiling pan. Add enough hot water so that it reaches a depth of ¼ inch in the pan. Brush the broiling pan with oil so meat won’t stick to the pan. (Picture 2 and 3)
Place pork on rack, discard marinade. Carefully place pan under broiler (pork should be about 4 inches from broiler element), and broil until meat is just beginning to char slightly, about 15 minutes. Brush with honey and broil for 2 more minutes (Pictures 4 and 5)
Turn pork and repeat Item 3 above.
Let the meat rest for 5 minutes and cut into slices.
Served with rice and your favorite side dishes, or you can make noodles in soup.
Ever since I bought an electric pressure cooker (Instant Pot), I’ve tried different recipes that required long cooking times on the stove top. I must say I love pressure cooking as it has saved me so much time! This Instant Pot is very safe to use, if the cooker is still pressurized, the lid will be locked to prevent accidental opening. I have tried cooking a whole chicken, tri-tip, soup and Oxtail.
Ingredients:
3 pounds
Pork soft bones
10 cloves
Garlic
1
Anise
2 slices
Ginger
3 stalks
Green onions
2/3 cup
Light soy sauce
1/2 cup
Mirin
1/2 cup
Water
4 Tbsp
Dark soy sauce
4 Tbsp
Brown sugar
1 Tbsp
Mei Kuei Lu Chiew (or rice cooking wine)
Directions:
I bought these pork soft bones in an Asian supermarket, as you can see from picture 1, they are like short ribs and has a little fat marbling in the meat. The little white circles are the soft bones, once the ribs are cooked for a long time, you can eat the bones together with the meat.
Add 2 tablespoons of cooking oil to a frying pan and fry the pork ribs until slightly golden brown. (picture 2)
Add garlic, ginger and green onions to the ribs and stir well. (picture 3)
Add a tablespoon of Mei Kuei Lu Chiew (if you don’t have this type of wine, just add rice cooking wine). (picture 4)
Transfer the ribs to a pressure cooker. In a separate bowl, combine light soy sauce, mirin, water, dark soy sauce and brown sugar. Pour the mixture into the pressure cooker. (pictures 5-10)
I am using an electric pressure cooker (Instant Pot). Close the pressure cooker lid tight and make sure the steam release knob is turned to “Sealing” position. Select “Meat/Stew” function, set pressure to “normal” and the cooking time to 35 minutes. As the pressure increases inside the cooker, the Float Valve pops up and seals the cooker. (picture 11)
When the ribs are done cooking, slide the steam release knob to the “Venting” position to let out steam until the Float Valve drops down. The meat is so soft and tender, you can serve it with noodles in soup or rice. (Picture 12)
Note: If you don’t have a pressure cooker and want to make this on the stove top, instead of 1/2 cup of water, add 4 cups of water to the pot. Cook ribs in medium low heat for about 2 hours.
After posting recipes for the Soft Boiled Eggs and Tonkotsu Ramen Broth, I must post this recipe since Chashu pork is by far the most popular ramen topping. These Chashu slices are braised pork belly, they are so tender and flavorful and they just melt in your mouth. Cooking time could be long, but the whole process is very easy.
There were two main reasons I wanted to make this myself: (i) at most of the ramen restaurants, each bowl only comes with 2 slices of meat. If you are a meat eater like me, you will need to order extra meat for an additional cost; (ii) I had two fatty slices one time (90% of fat and 10% of lean meat) and was very disappointed. Although I was able to exchange for two leaner pieces, I felt embarrassed and was not sure if the restaurant would do something to my meat (you know what I mean!). Anyways, when making the Chashu myself, I can pick a nice piece that has less fat and I can serve my ramen with 4-5 slices of meat.
Ingredients:
3 pieces
Pork belly (about 2 pounds each)
1 cup
Light soy sauce
1.5 cup
Mirin
1.5 cup
Water
1 cup
Cooking wine
2 tsp
Lemon juice
6 Tbsp
Brown sugar
2 two-inch knob
Ginger
2
Whole shallot (cut in half)
2
Whole garlic heads (about 12 cloves)
6 stalks
Green onions
Directions:
Preheat the oven to 250 F.
Lay the pork belly on a chopping board, roll it into a cylindrical tube with skin facing out, and then use butchers’ string to tie the joint tightly. (pictures 1 and 2)
In a large pot, place the pork belly and add water to cover the pork. Once boiled, drain and remove the scum by rinsing the pork under cold running water. (picture 3)
Prepare all ingredients, cut shallots, ginger, green onions and peel garlic. (picture 4)
In a large pot, heat all ingredients over high heat until boiling, then add pork belly (it won’t be submerged). (pictures 5 and 6)
Once boiled, transfer the pot to the oven and cook for 5 hours. Turn pork occasionally.
Let it cool. Once completely cook, chill the pork in the refrigerator. This makes it easier to slice.
When ready to serve, reheat pork belly slices (chashu) in hot ramen soup.
Keep the chashu sauce, you can use the sauce to marinate the soft boiled eggs.
I have tried using ground turkey to make meatballs but they tend to lack flavor. The texture is more dense and you need to kick it up a notch by adding a lot of seasonings. I even tried to mix turkey meat with beef – flavor was a lot better but still couldn’t satisfy my taste buds, that is until today when I made these meatballs with 3 types of meat (turkey, pork and beef). The combination of meats create an amazing flavor and the meatballs are very juicy. My kids finished their whole plate tonight.
Ingredients:
1 pound
Ground turkey (93% lean)
1 pound
Ground pork
1 pound
Ground beef (93% / 97% lean)
1
Egg (beaten)
1 cup
Ketchup
1/2 cup
Oatmeal
4 Tbsp
Dried chopped onion
2 1/2 Tbsp
Garlic powder
4 Tbsp
Light soy sauce
1 Tbsp
Brown sugar
2 tsp
Dried oregano
2 tsp
Black pepper
Directions:
Preheat oven to 350°F.
Mix the pork, beef and turkey together thoroughly in a large mixing bowl. Stir in all seasoning, then add in beaten egg and mix well. (pictures 1 and 2)
Stirr in oatmeal, you may want to crumble oatmeal with your hands and mix well. (picture 3)
Shape meat into balls about 1 1/2 inches in diameter. Place them on a baking sheet and drizzle lightly with olive oil. Bake for 20 minutes or until they are just barely cooked through and no longer pink inside. Do not overbake. (pictures 4 and 5)
Return meatballs directly in your pasta sauce and simmer for 5-10 minutes. My home made tomato basil sauce can be found here.
You can serve meatballs with spaghetti/pasta, make a meatball sandwich or just eat them with the tomato base sauce.
It was Super Bowl night. Super Bowl Sunday still holds the record for most pizza delivered in a single day. Studies showed that 1.25 billion chicken wings would be consumed and 29 million slices were projected to sell on Super Bowl Sunday. I’m not surprised as almost 95% of Americans planned to watch the Super Bowl. Today, I joined the party (not to watch the game but make my own pizza)! The pizza dough and pizza sauce were made from scratch. The sauce recipe was adapted from KitchenTreaty and was made with fresh tomatoes. I can taste its freshness.
Ingredients (Pizza sauce) (about 3 cups sauce):
1 Tbsp
4 cloves
1 tsp
2 pounds
1 tsp
1/2 tsp
Oil
Garlic (minced)
Dried oregano
Tomatoes
Brown sugar
Kosher salt
Black pepper to taste
Directions:
Dice tomatoes and set aside (picture 1).
In a medium sauce pan, heat oil over medium high heat. Add minced garlic and cook until aromatic. Add tomatoes, dried oregano, sugar, salt and black pepper. Keep stirring (picture 2).
Leave over medium heat, stir occasionally, until boiling. Reduce heat to low and simmer UNCOVERED for 45 minutes or until sauce is thickened (picture 3).
Allow the sauce to cool and blend the sauce in a food processer (picture 4).
Pour sauce into a bowl and let it cool (picture 5).
Ingredients (Pizza dough) (make about 5 small pizzas):
Active dry yeast
Warm water
Bread flour
Sugar
Salt
Olive oil
Directions:
Place all ingredients (except dry yeast) inside the pan in the breadmaker. Fill the yeast dispenser with dry yeast (usually it is on the top of the breadmaker). Select the “Pizza dough” mode (refer to manual of your breadmaker to select the dough program). After the kneading process, allow the dough to rise in the breadmaker for about 1 1/2 – 2 hours.
Deflate the dough, bunch it back and divide it into 5 pieces – You can use the dough at this point, but for a finer and nicer texture, after deflating and punching the dough, roll it into a ball and put it back into an airtight container and refrigerate overnight. About 2 hours before you are going to make your pizza, remove the dough from the fridge, deflate again, and split into 5 equal portions. Roll each portion into a ball and cover with plastic wrap. Let them sit at room temperature for 2 hours.
Assembling Pizzas:
Ingredients (pizza toppings):
Pepperoni, thinly sliced
Italian sausages, cook ahead
Mushrooms, thinly sliced
Red onion, thinly sliced
Yellow bell pepper, thinly sliced
Red bell pepper, thinly sliced
Mozzarella cheese, shredded
Mild cheddar cheese, shredded
Fresh basil leaves, chopped
Cornmeal (to slide the pizza onto the pizza stone)
** I made my pizzas with the above ingredients, of course you can add anything you want to your pizza, such as ham, BBQ chicken, even Kimchi.
Directions:
In a small sauce pan over medium-high heat, warm 1 tablespoon of the oil. Add red onion and cook until it is slightly tender. Transfer onion to a paper towel-lined plate. (Picture 1)
In the same pan over medium-high heat, warm 1 tablespoon oil. Add the bell peppers, stirring frequently, until just softened. Transfer the peppers to the same paper towel-lined plate. (Picture 2)
Now warm 1 tablespoon oil. Add the mushrooms, salt and pepper and cook (stirring occasionally) until softened. Transfer the mushrooms to the plate with the peppers and onion.
Preheat oven to 500 ºF and heat up the baking stone (or baking pan) in the oven.
Using a rolling pin to roll out your dough ball, flatten disc into an 8-inch circle. If you don’t know how to shape your pizza dough by tossing it in the air, simply start at the center and work outwards, use your fingertips to press the dough to 1/2-inch thick. Stretch the dough until it will not stretch further. (picture 1)
Lightly sprinkle your pizza peel with corn meal. Transfer one prepared flattened dough to the pizza peel. If the dough has lost its shape in the transfer, lightly shape it to the desired dimensions. (picture 2)
Top dough with a layer of sauce. (picture 3)
Then sprinkle with cheese, and place your desired toppings on the pizza, sprinkle more cheese on top at the end. (picture 4)
Slide the pizza off of the peel and on to the baking stone in the oven. Bake pizza one at a time until the crust is browned and the cheese is golden, about 10 minutes. (picture 5)
You can use the pizza peel or a stainless steel spatula to remove the pizza from the pizza stone. Serve immediately (picture 6)
I adapted this recipe from my friend, Angela, who makes the best empanadas. These delicious hand pies can be made with so many different types of fillings. There are classic savory fillings and sweet dessert fillings. You can swap the pork for chicken or beef, or simply use the ingredients you have available in your refrigerator.
Ground pork
Light soy sauce
Oyster sauce
Brown sugar
Corn starch
Red potatoes (diced)
White onion (diced)
Minced garlic
Carrot stick (minced or shredded)
Medium size tomatoes (diced)
Green peas
Dried oregano (crushed)
Salt
Fish sauce
Dough:
250g
8 oz
200g
1
All-purpose flour
Cream cheese (softened)
Unsalted butter (softened) (a little less than 2 sticks)
Egg, lightly beaten (for egg wash only)
Directions – for filling:
Prepare all ingredients — dice potatoes, carrots, onion and tomatoes. (picture 1) Marinate ground pork with light soy sauce, oyster sauce, brown sugar and corn starch, set aside.
Heat 2 Tbsps of oil in a large skillet over high heat, add 2 gloves of garlic and cook until aromatic. Now add diced potatoes, pan fry until slightly brown. Add water and cover to simmer until water evaporated. Set aside. (picture 2)
Heat 1 Tbsp of oil in a large skillet over medium heat, add onion and garlic, cook until tender (picture 3). Add ground pork and stir well. Breaking up the meat with a turner or wooden spoon, cook meat until brown. (picture 4)
Add carrot and tomatoes and keep stirring. Cook for about 5 minutes (add a few tablespoons of water if necessary) (picture 5). Return potatoes to the pan and add green peas, stir until all ingredients are combined (picture 6). Add oregano, ½ tsp of salt and 1 tsp of fish sauce (add more if necessary).
Allow the mixture to cool thoroughly before filling in the dough.
Directions – for Dough:
Cream butter and cream cheese together until smoothly blended (picture 1).
Beat in the flour until just combined (picture 2).
Shape dough into 2 smooth balls, wrap in cling wrap and refrigerate for an hour or overnight (picture 3).
Assemble the Empanadas:
Preheat oven to 375 degrees Fahrenheit.
Remove dough from refrigerator and work on a lightly floured work surface.
Roll chilled dough thin, cut with a 3 or 4 inch round cookie cutter. (picture 1)
Place a proportional amount of filling in the center of the dough circle (about 1 tablespoon full). (picture 2)
Fold 1 side over so that the edges meet, press to seal. To braid the edges of empanadas, start at one corner of the empanada with your thumb and index finger, fold the seal edge down over itself (press down and seal), and repeat this step until you reach the other end. (picture 3)
Place on parchment-lined baking sheets, brush tops with egg wash. (picture 4)
One of the famous festivals in China is Dragon Boat festival (端午節). This festival commemorates the patriotic poet Qu Yuan (屈原) who died on the fifth day of the fifth month in the Chinese lunar calendar. Like other Chinese festivals, there is also a legend behind it. You can read the long story online and learn why Dragon boat racing and eating Zongzi have become the central customs of the festival.
This year, the festival falls on June 12 and I can see a lot of Chinese people at the market getting ingredients to make Zongzi. Zongzi (also called Zong) has different shapes and various fillings and the main ingredients are sticky rice, green beans, fresh meat and salted duck egg yolk. People also added red beans, dried shrimp, peanuts, chestnuts, Chinese sausages, shiitake mushrooms etc. I have made these Zongzi for many years (only once a year though) and I’m sharing my mom’s secret recipe today. Every year she makes a lot and gives them to friends, relatives and neighbours. Her Zongzi were fabulous and never disappointed anyone!
Ingredients (makes 20 Zongzi):
5 lbs
Sticky rice (Glutinous rice) (糯米)
2 bags (14 oz each)
Peeled split mung bean (去皮開邊綠豆)
10
Salted Duck Egg Yolks (halved) (咸蛋黃)
2 lbs
Pork belly
11 oz
Peanuts
7 oz
Miniature dried shrimp
1 bag (14 oz)
Bamboo leaves
3 1/2 Tbsp
Salt
6 Tbsp
Vegetable oil
20
Long strings
Marinate for Meat:
1 tsp
Salt
2-3
Red fermented beancurd (南乳)
1 Tbsp
Light soy sauce
1 Tbsp
Water
4 Tbsp
Five spice powder (五香粉)
Directions:
Cut pork belly into approx. 1.5” cubes and marinate with 1 teaspoon of salt for 20 minutes. In a small bowl, mash the red fermented beancurd and add light soy sauce and water, mix well.
Heat the wok with 1 tablespoon of oil and stir in the beancurd mixture, add pork belly and stir fry until the meat gets a nice coat of the sauce – about 5 minutes (the meat is not completely cooked). When the meat is cool, cover and refrigerate overnight.
After the meat is marinated overnight, take it out from the fridge, roughly rinse off the beancurd mixture and pad dry. Sprinkle about 4 tablespoons of five spice powder and mix well. The pork pieces should have a nice coat of powder, add more if necessary. Set aside.
Soak rice in water for 4 hours, drain.
Add 3 ½ tablespoons of salt and 6 tablespoons of oil to the rice, mix well (taste the rice, add more salt if necessary). Set aside.
Soak Green mung beans in water for 2 hours, drain and set aside.
Wash dried shrimp, pad dry and set aside.
Boil a pot of hot water and put the bamboo leaves in, soak for 20 minutes. Wash each one with a brush.
Wrap ingredients with bamboo leaves (see instructions below). Boil Zongzi for 4 hours.
These are all the ingredients you will need:
If leaves are very dirty, you may want to use a clean brush to brush each leaf. After washing and boiling the bamboo leaves, choose two large ones, make a small cross with the leaves. Bend and twist the leaves in the center to make a funnel shape (see pictures below).
Fill the funnel shape with a few tablespoons of sticky rice, top with a sprinkling of mung beans. Add meat, egg yolk, peanuts, dried shrimp, etc. Now the ingredients are heavy enough to hold the funnel shape, add one leaf to each side and top with more sticky rice, mung beans, peanuts and dried shrimp (the meat and the egg yolk should be in the middle part of the Zongzi). The mound should be generous but not overflowing. Carefully fold the sides in over the mixture (folding both sides first), then fold the bottom over. (see pictures below)
Now you fold the top leaf flap downwards to make a package. Take a long string and wrap the Zongzi firmly.
Place Zongzi in a large pot and fill the pot with water (water should cover all Zongzi), cover and bring it to a boil. Reduce heat and cook for four hours. You will need to check the water level, add water as necessary.
Note:
The pork belly should have some fat, do not trim the fat. The meat will be too dry if it’s all lean.
I left one ingredient out “magenta leaves” (紅絲線 aka 紅藍) which is Chinese herb. I just couldn’t find it in the States, probably sold in Asia only.