Homemade Biscuits


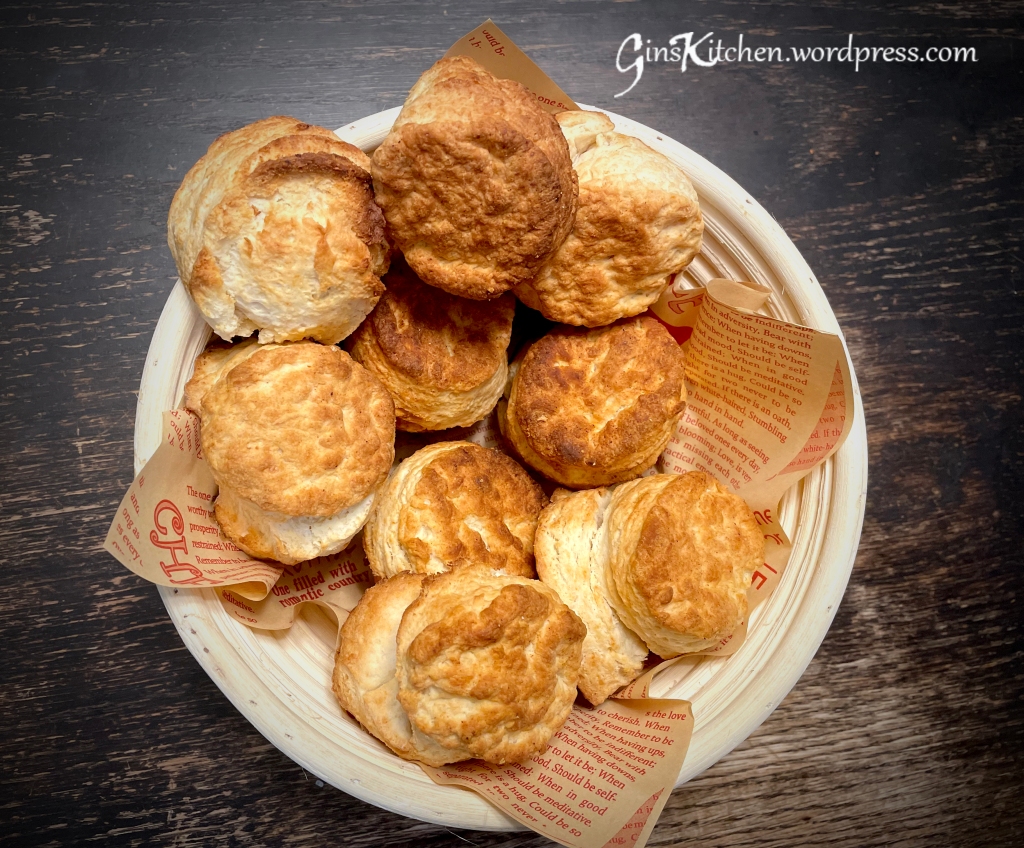
These buttery, flaky biscuits are the perfect side dish for holidays—they go well with turkey, prime rib, or any seafood main course. You will love these biscuits as there are lots of layers, the tops are nicely golden brown, and the bottoms are crispy. Not only they are good for holidays meals, but also for breakfast along with scrambled eggs, bacon, and sausage. Most importantly, they are so simple to make and great for beginners as well. So, stop eating those biscuits out of a can and try making them from scratch.

Ingredients:

370g (2 1/2 cup)All purpose flour
2 TbspBaking powder
1 TbspGranulated sugar
1 CupButtermilk (very cold)
1 stickButter (chilled and grated)
1 tspKosher Salt

Method:

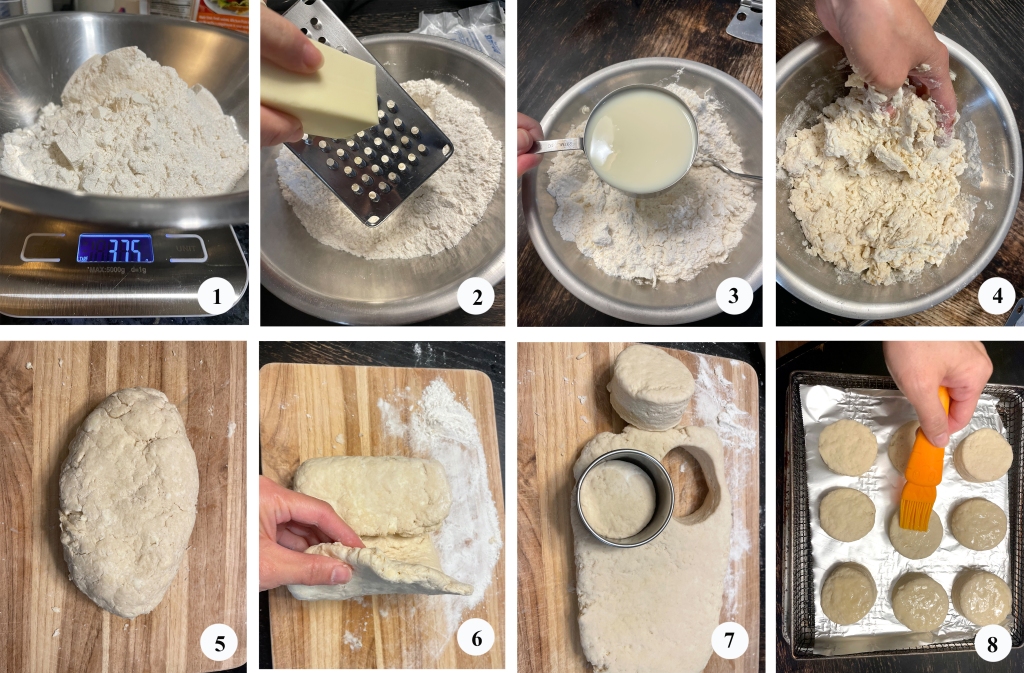
  1. In a large mixing bowl, combine flour, baking powder, salt and sugar. (Picture 1)
  2. Use a grater to grate butter over the flour mixture and quickly toss with your hands. (Picture 2)
  3. Pour in buttermilk and stir until just combined. (Pictures 3 & 4)
  4. Transfer the dough to a clean work surface / chopping board. (Picture 5)
  5. Shape the dough into a rectangle, about 1″ thick, fold the dough into thirds. (Picture 6)
  6. Use a rolling pin, slightly roll it back into a 1″ thick rectangle (do not roll hard to flatten it), repeating the folding process (step 5 above) 2 more times.
  7. Now that the dough is back to a 1″ thick rectangle after folding 3 times, use a small round cookie cutter (about 2″ in diameter) to press down and cut out the biscuits. (Picture 7)
  8. Line air fryer basket with parchment paper, place biscuits 1/2″ apart, brush tops with melted butter. (Picture 7)
  9. Cook at 400F until tops are lightly golden (about 10-12 minutes).
  10. Serve warm.

** If you bake these in the oven, preheat the oven to 425F while mixings the dough. Bake for about 20 minutes until tops are lightly golden.

Polka Dot Mocha Swiss Roll Cake


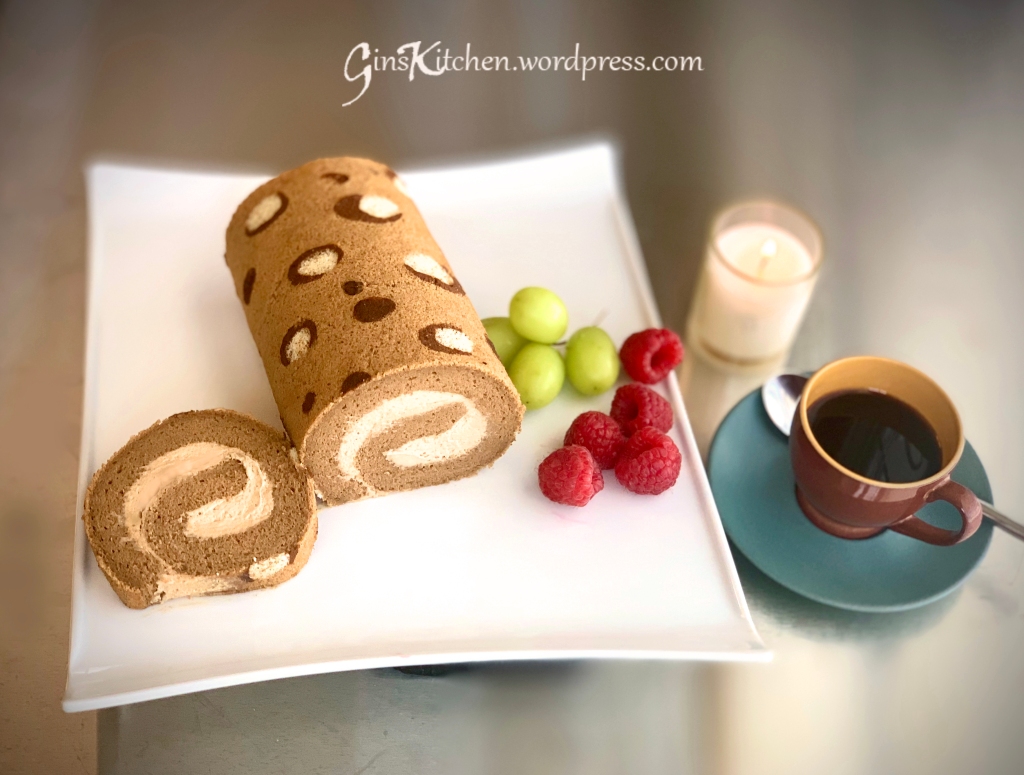
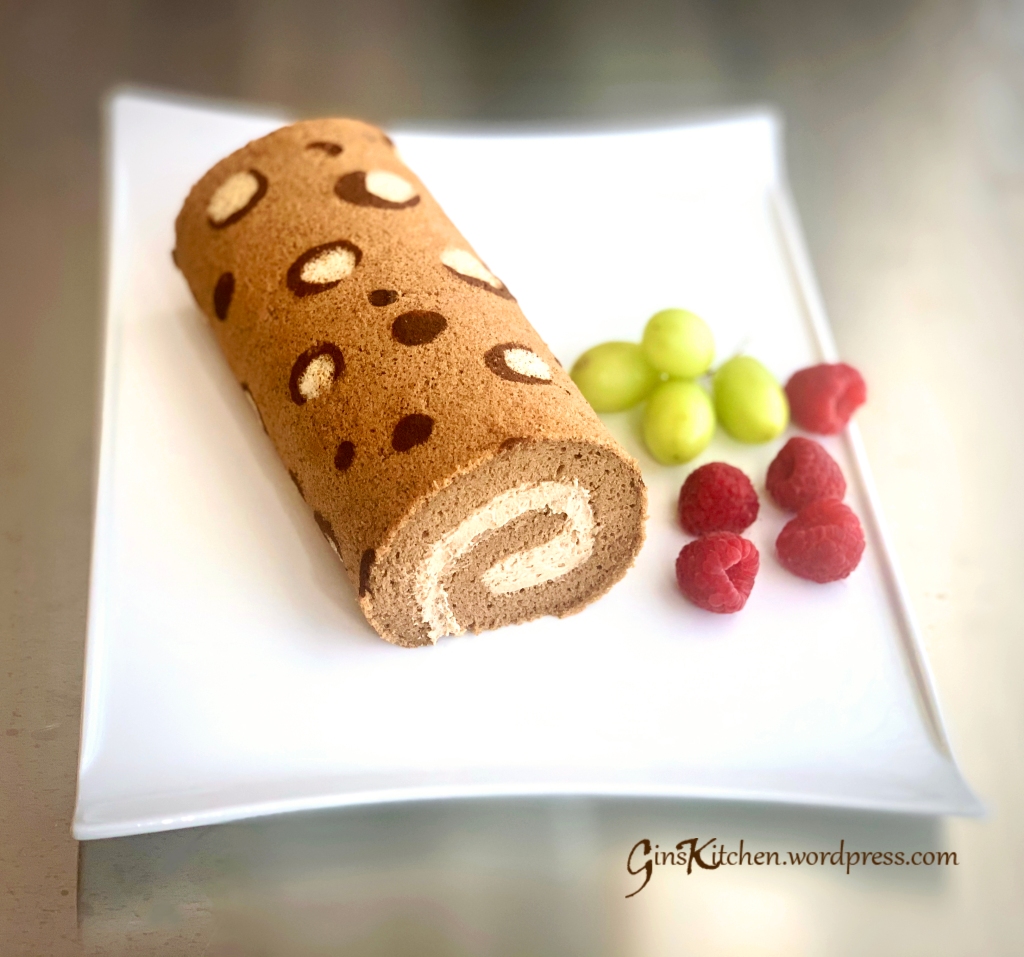
Patterned roll cakes have been on my to-bake list for the longest time. Today, I’m posting this mocha roll cake with a brown polka dot design. This was made following the same basic Swiss roll cake recipe, but instead I added instant coffee for the mocha flavor. As for the patterns, I opted for cocoa powder for the natural coloring. You may need to use food coloring for some of them, as it depends on what flavor your cakes are and what color you want your patterns to be. I have tested different methods of adding patterns but failed several times to get a good result. I personally prefer freezing the patterns over pre-baking the patterns.

Ingredients for the circle pattern paste:

10gUnsalted butter (softened)
10gPowdered sugar
10gCake flour
10gEgg white
1 TbspCocoa powder

Ingredients for the roll cake:

Ingredients A
80gEgg Yolk
1gSalt
35gSugar
Ingredients B
45gOil
40gMilk
Ingredients C
72gCake flour
2 Tbsp (4g)Instant Coffee
2 TbspHot water
Ingredients D
120gEgg white
55gSugar

Cream filling:
1 CupHeavy whipping cream
1 TbspPowdered sugar
1 TbspInstant black coffee
1 TbspVanilla instant pudding

Directions for making the pattern:

  1. You can draw your own pattern template or download one online. Line a 9×13-inch baking sheet with parchment paper and place the pattern sheet beneath it.
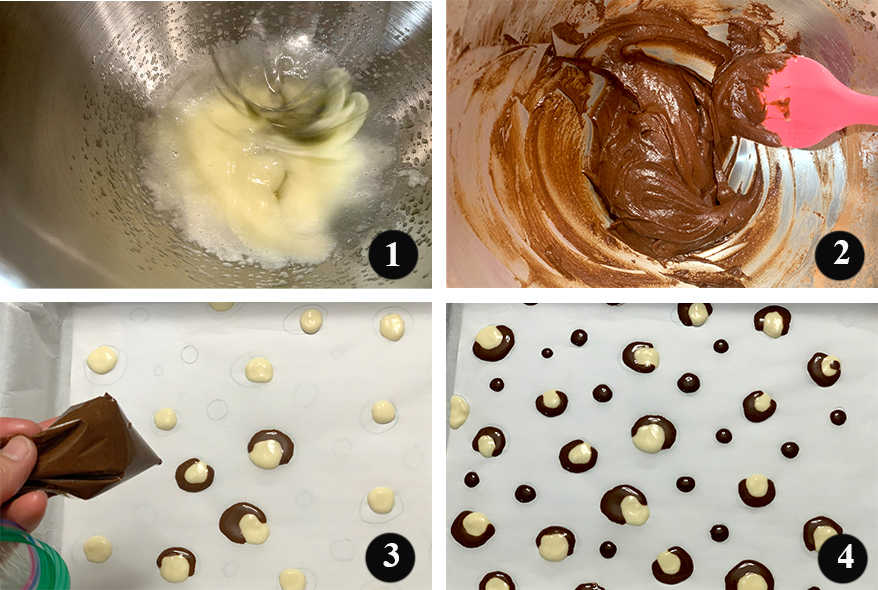
  2. In a bowl, mix egg white, sugar, butter and flour until you get a smooth paste (DO NOT add cocoa powder yet). In a separate bowl, take out half of the mixture (one half for the white circles and one half for the brown circles) and slowly add in cocoa powder (add little by little until you get the color you want). (Pictures 1 & 2)
  3. Fill the Ziploc bag with the mixture and seal the top. Use scissors to snip off one corner of the bag – creating a tiny hole makes it easier to trace the patterns. (Picture 3)
  4. Once all patterns are done, place the whole baking sheet in the freezer. (Picture 4)

Directions for making the roll cake:

  1. Preheat oven to 340°F.
  2. Separate the egg yolks and egg whites into two bowls.
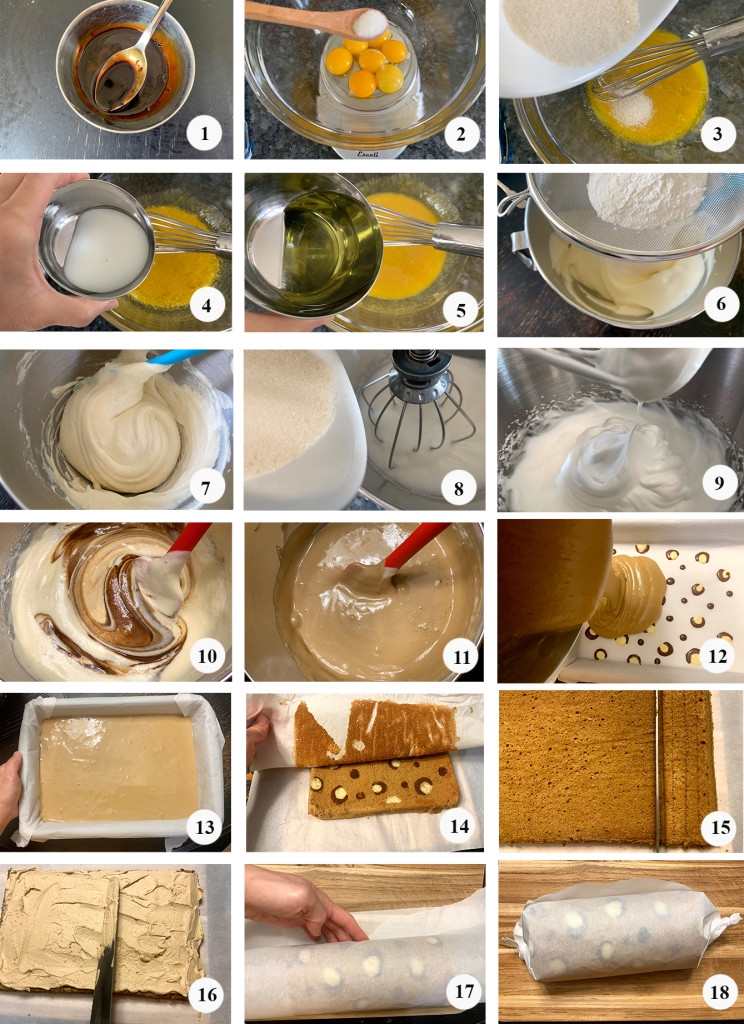
  3. Dissolve instant black coffee in hot water, set aside and let it cool. (Picture 1)
  4. In a large bowl, add salt to egg yolks and mix well.  Add in 35g of sugar, beat until well combined.  (Pictures 2 & 3)
  5. Add oil and milk to the egg yolk mixture and beat until the mixture is pale.  (Pictures 4 & 5)
  6. Sift the flour into the egg mixture and gently fold to combine.  (Pictures 6 and 7)
  7. In a mixing bowl, beat egg whites until foamy, gradually add sugar and beat until soft peaks form.  (Pictures 8 and 9)
  8. Add in black coffee liquid to the egg whites and fold to combine. (Picture 10)
  9. Pour the egg yolk mixture into the egg whites and gently fold to combine with a spatula.  (Picture 11)
  10. Pour the batter into the prepared pan.  Spread the batter evenly and tap the pan several times.  This will remove any air bubbles inside the batter.  (Pictures 12 & 13)
  11. Bake for about 13 minutes, remove the cake from the pan as soon as it is ready.  Allow it to cool for about 10 mins.  Put a piece of parchment paper on top of the cake (you may want to lightly spray the parchment paper with oil to prevent the outer layer from sticking), and flip the pan over so that the pattern is on top.  Peel away the original parchment paper from the bottom of the cake. Trim the top and bottom edges.  Hold the knife at a 30 degree angle and trim the right and left edges. (Picture 14)
  12. Using a knife to score 2 vertical lines along the cake from the right edge, careful not to cut all the way into the cake. (Picture 15)
  13. Spread an even layer of whipped cream over the cake.  (Picture 16)
  14. Tightly roll the cake from the side you just scored toward the other end. (Picture 17)
  15. Secure the roll by taping or twisting the parchment paper at both ends.  Refrigerate for 1 hour before serving.  (Picture 18)

Directions for making the filling:

  1. Dissolve instant black coffee powder in 1 tsp. of hot water, set aside and let cool.
  2. Whip the heavy whipping cream on medium speed until it is smooth and firm, add powdered sugar and whip for another 1-2 minutes.
  3. To make the cream firmer, add vanilla instant pudding and whip for 1-2 minutes.
  4. Add in coffee and whip for another minute.

Mexican Rice


Mexican rice 2

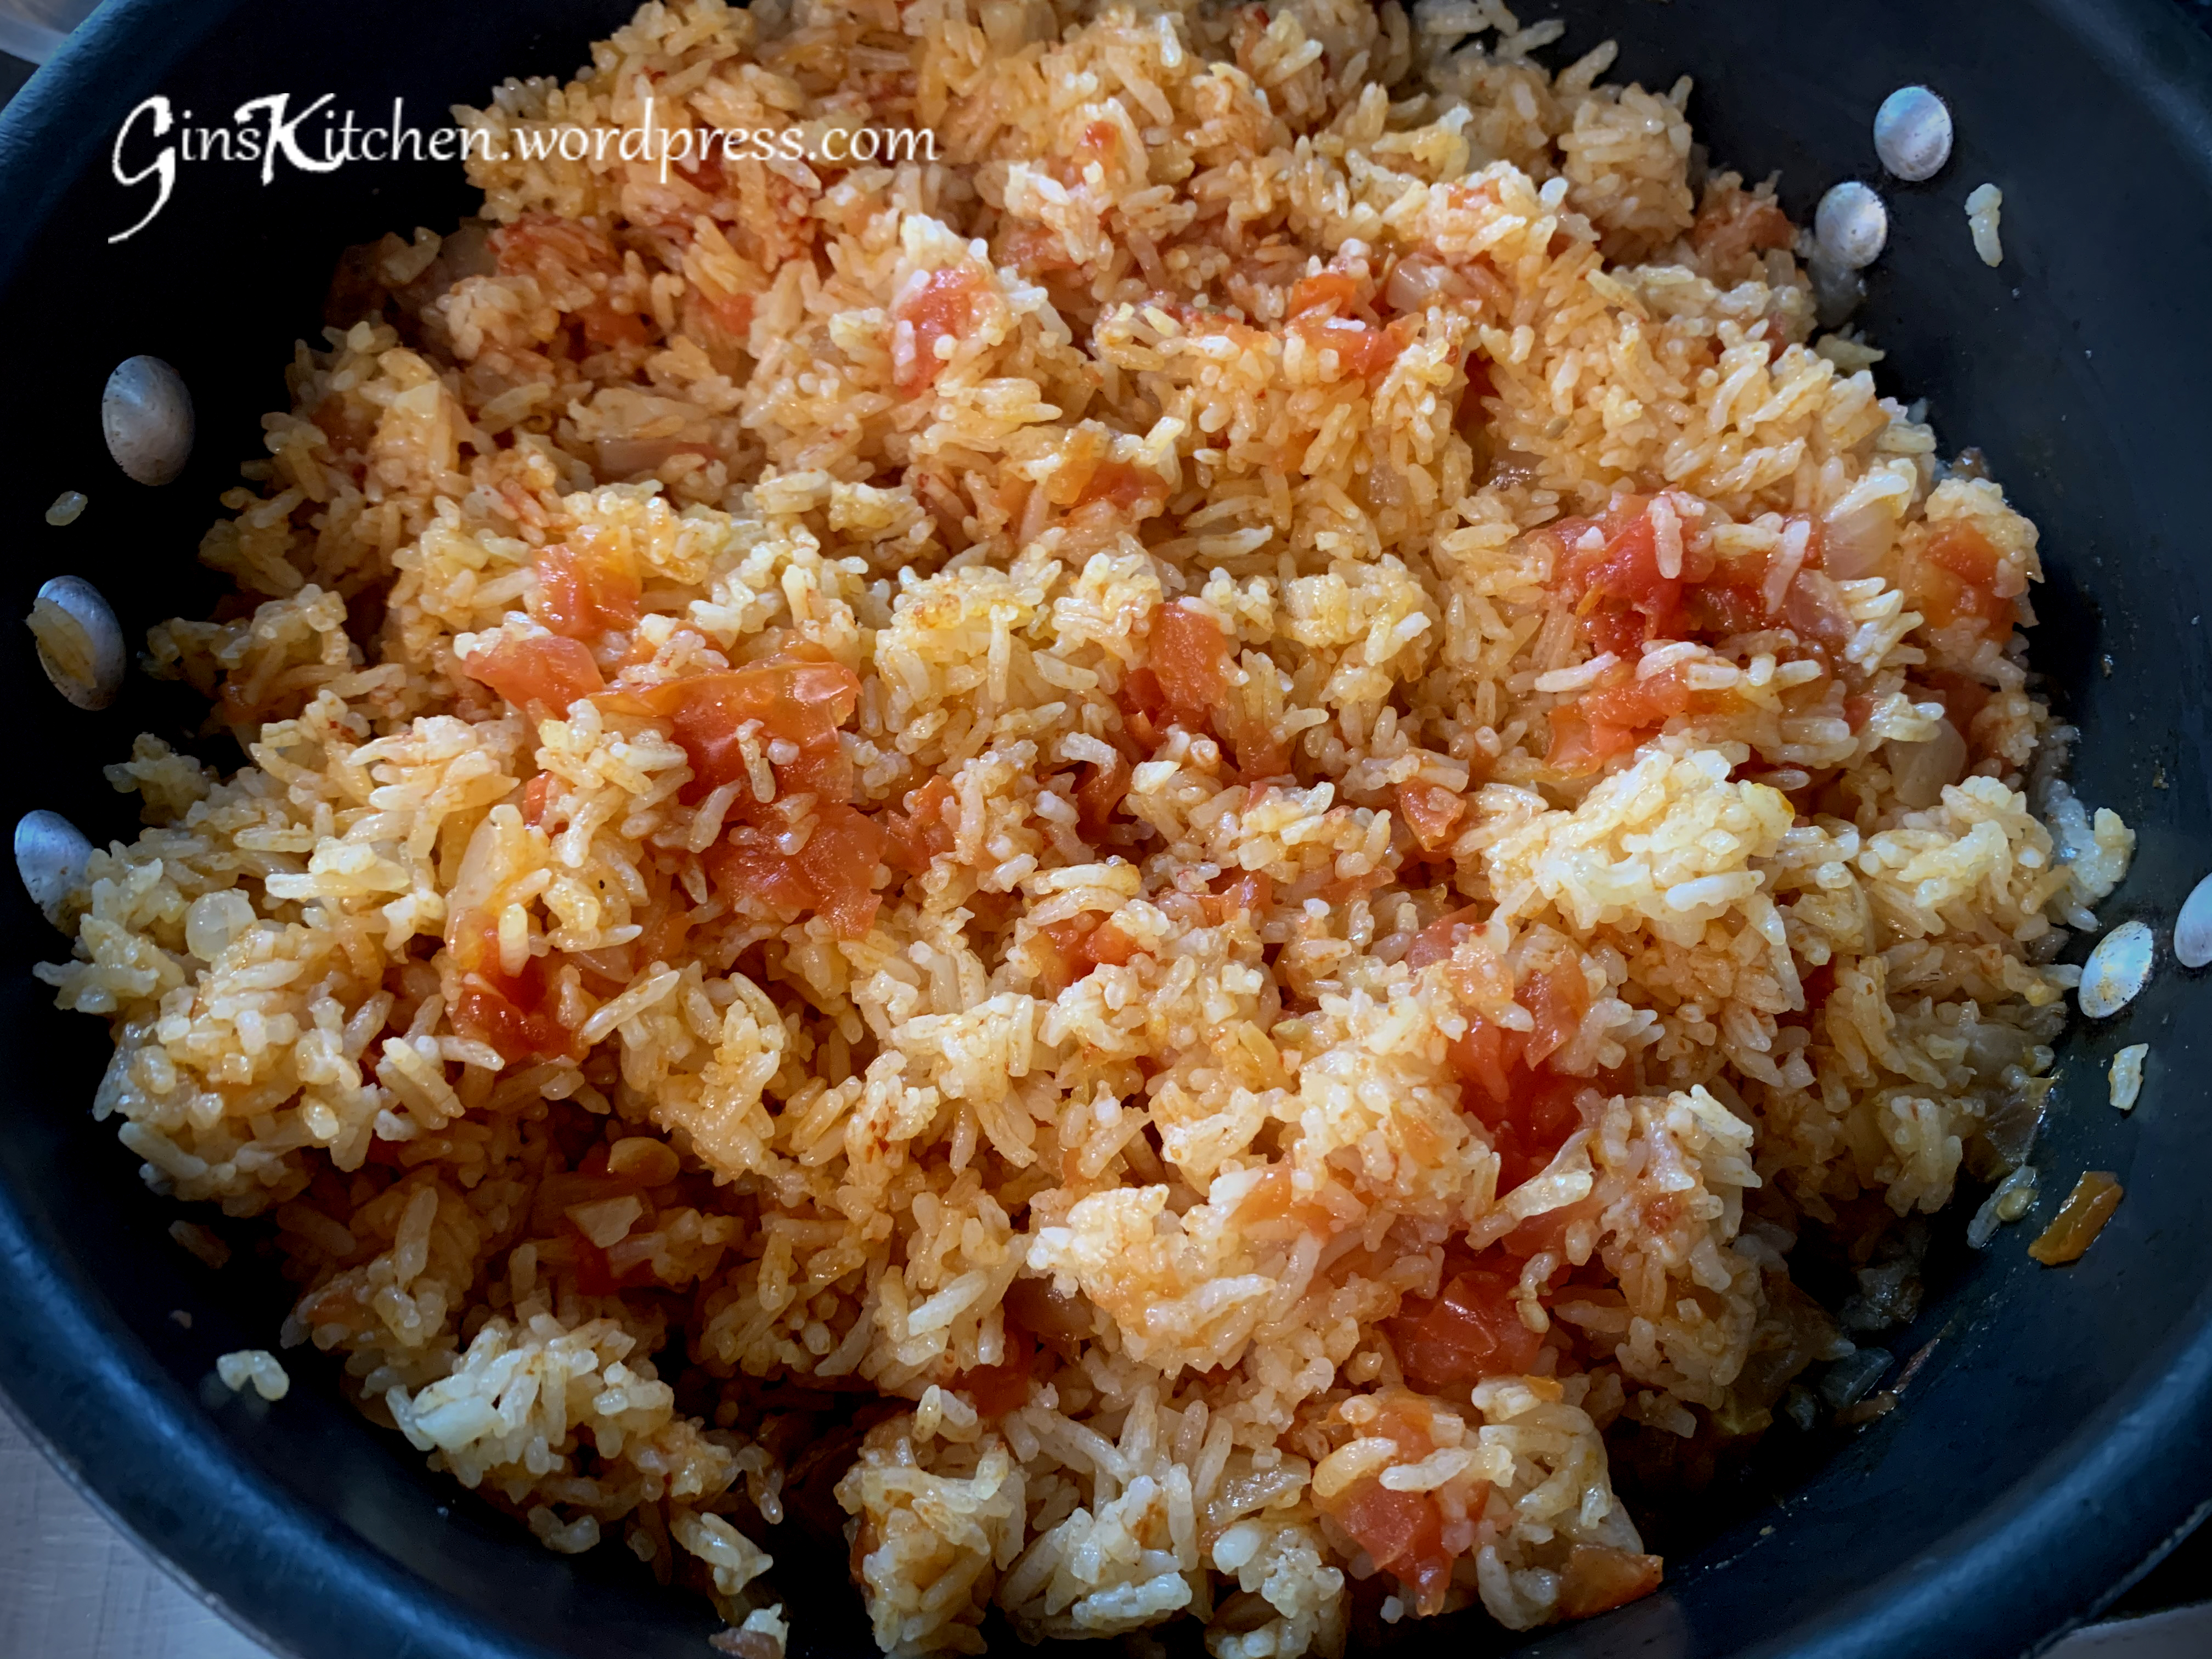
Rice is typically eaten to supplement meals in Asia.  I grew up eating rice almost every day when I lived in Hong Kong.  A meal without rice just feels incomplete – like something was missing.

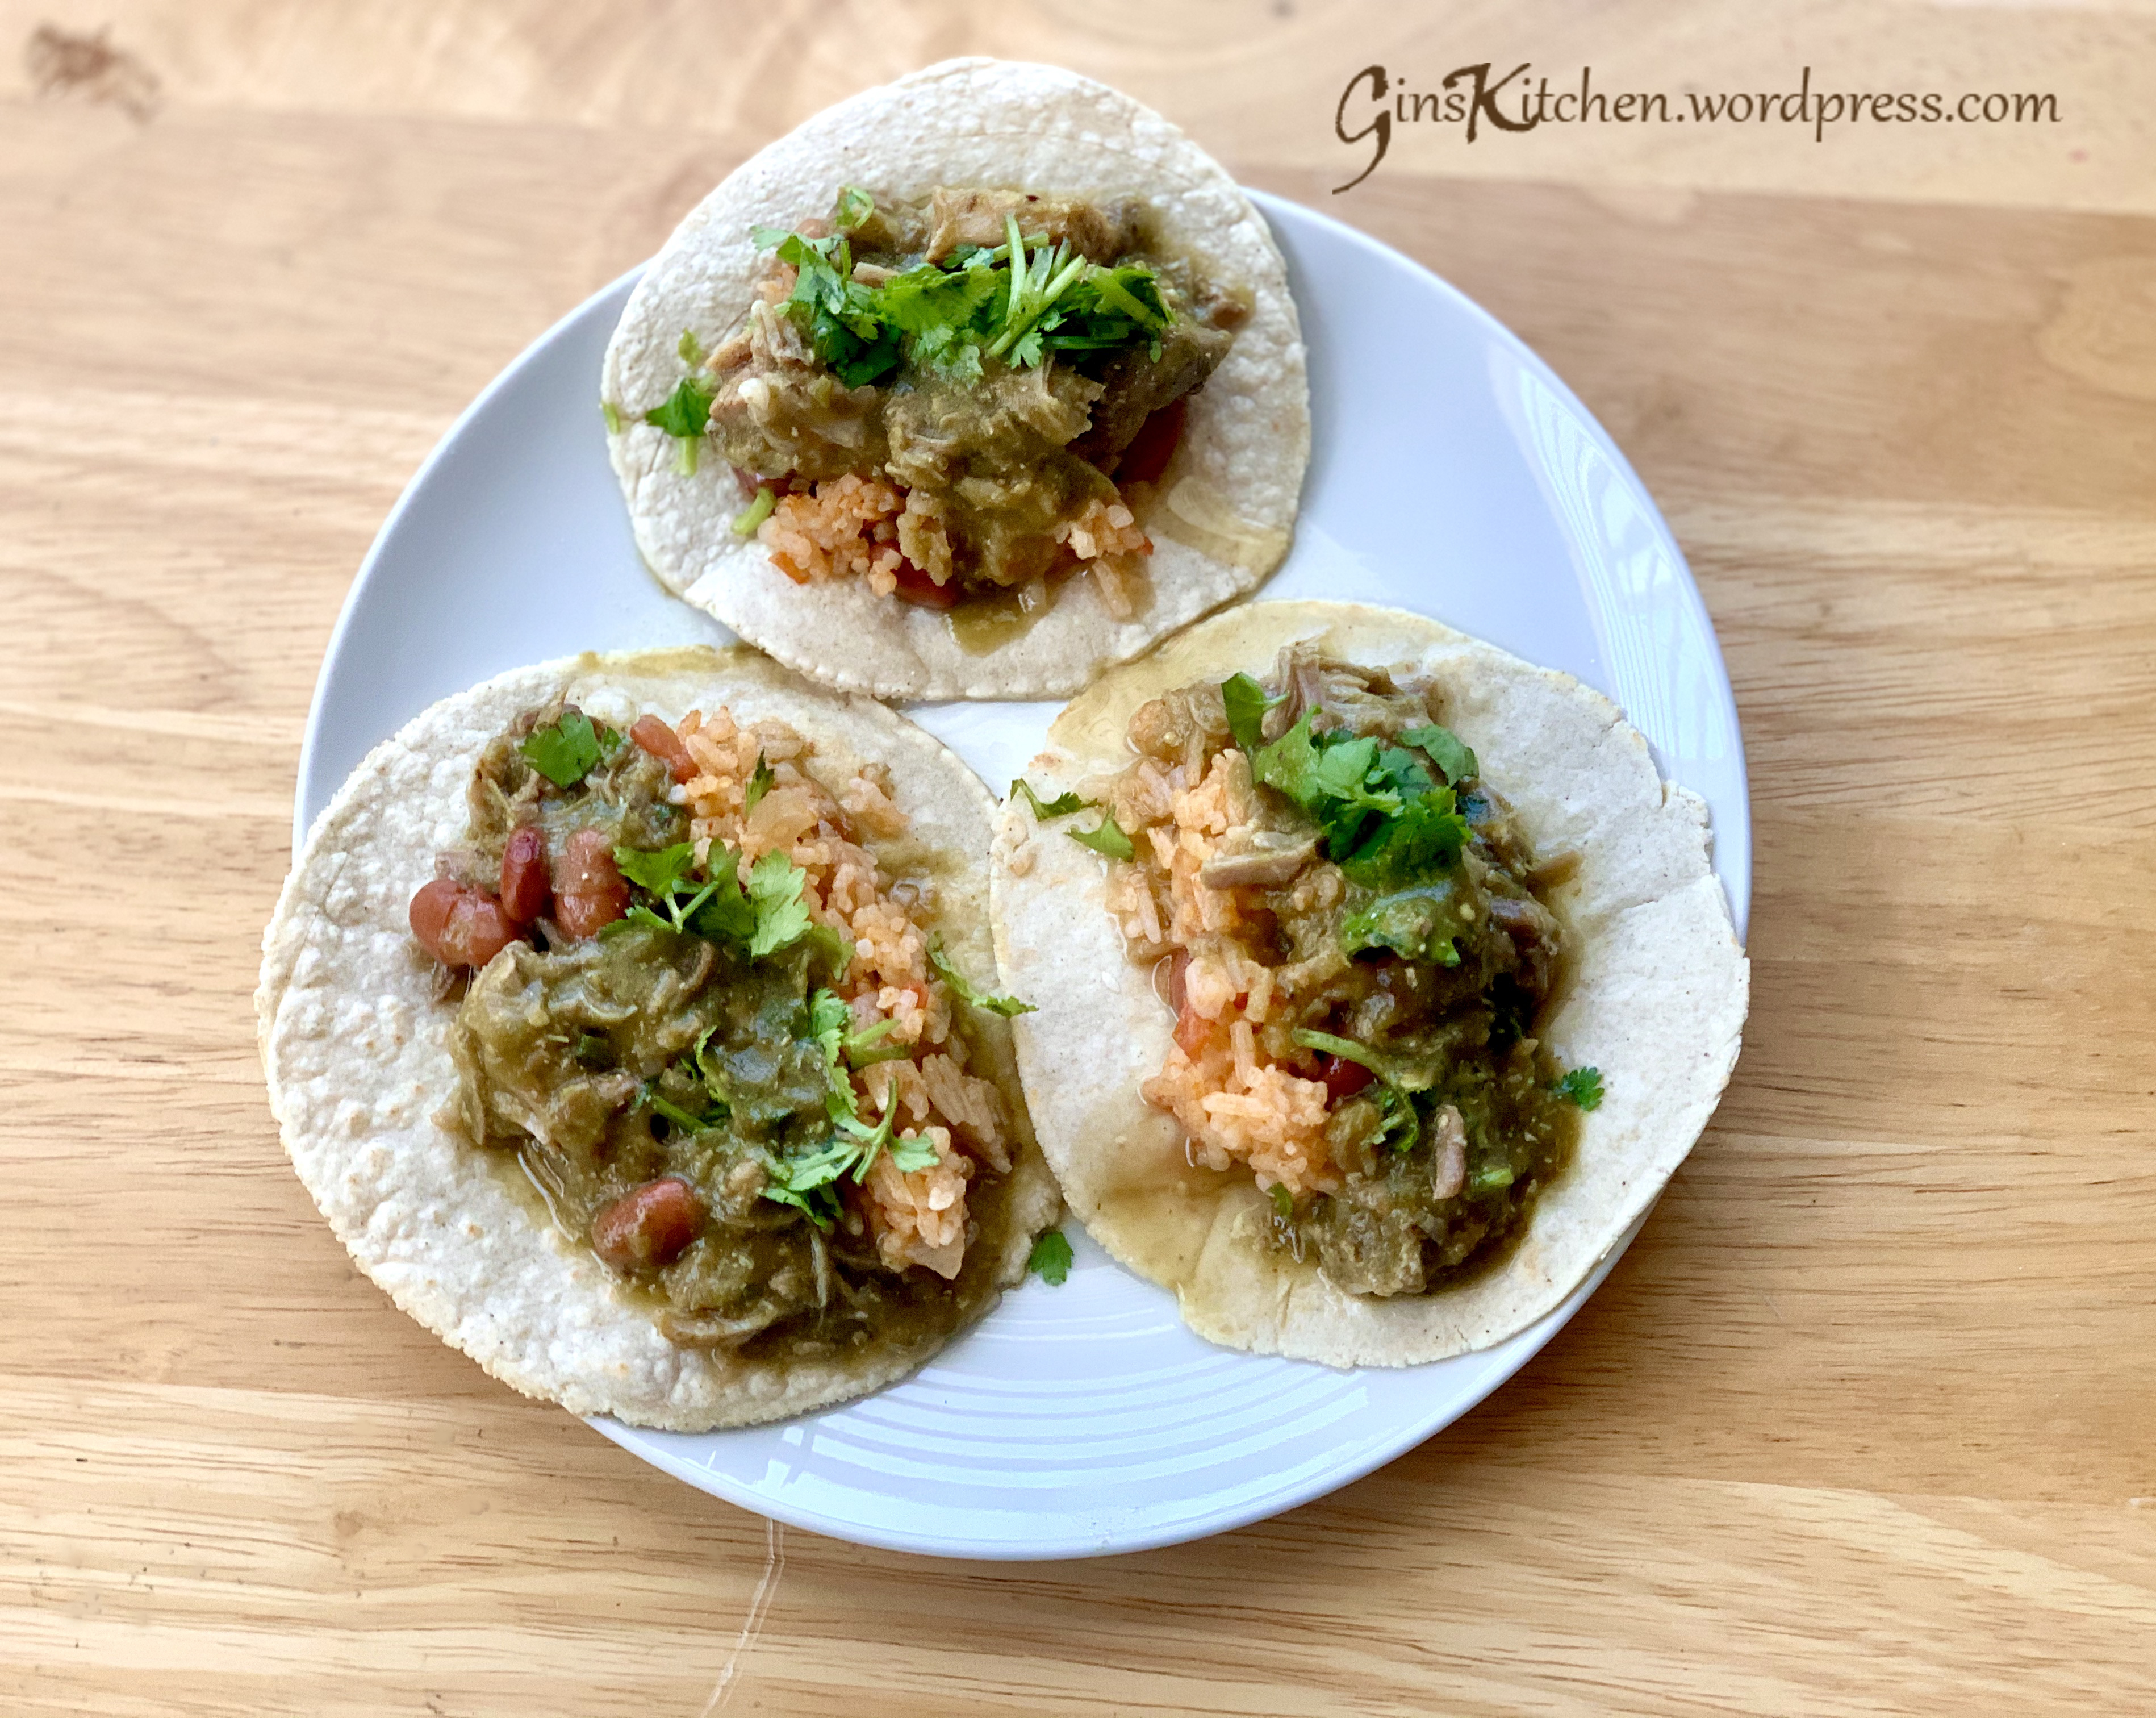
Mexican food is not popular in Hong Kong, I never had Mexican food until I moved to Los Angeles.  I started cooking Mexican rice when one of my Hispanic co-workers gave me a recipe.  Now, whenever I make Pork Chili Verde (recipe here), my children always demand a pot of Mexican rice.  It’s not hard to make at all but it did take me several tries to get the correct water amount.  There are a lot of great recipes on the internet, but I’m recording this for my daughters because we use Jasmine rice in our household.

Ingredients:

3 cupsLong grain rice / Jasmine rice
3 cupsWater
2 mediumTomatoes
150gWhite onion
2 TbspTomato paste
2 tspMinced garlic
2 cubes (10g each)Knorr Chicken bouillon
½ tspSalt

Directions:

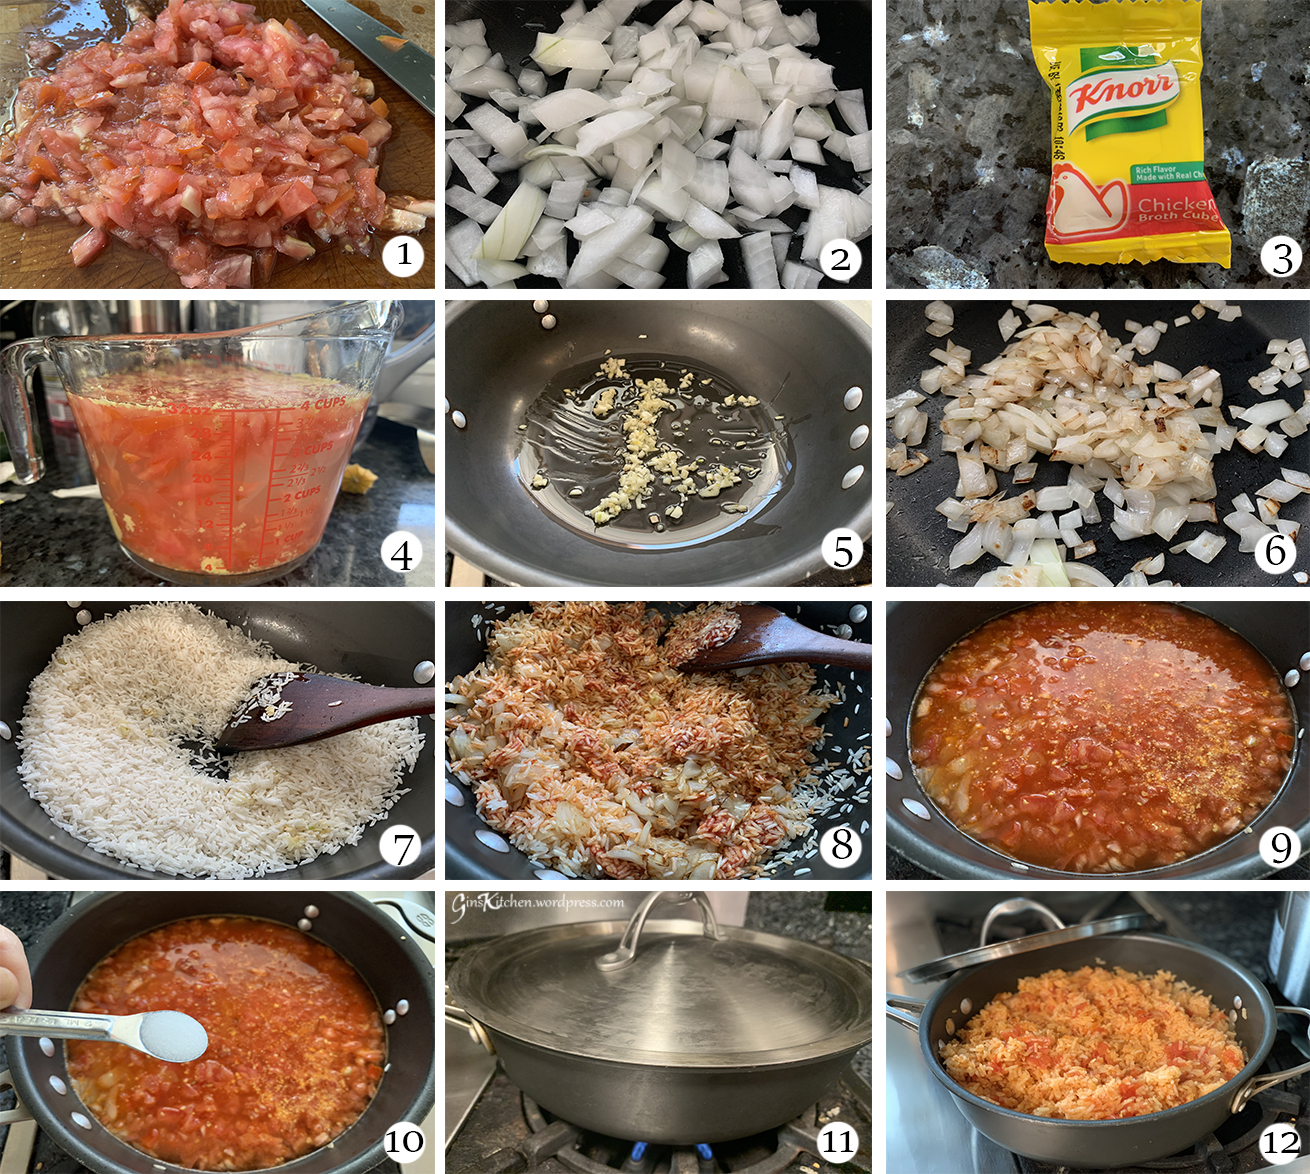
  1. Chop tomatoes and onion, set aside.  (Pictures 1 & 2)
  2. Dissolve 2 cubes of chicken bouillon in 3 cups of water. (Picture 3)
  3. Add chopped tomatoes to the chicken broth.  (Picture 4)
  4. Heat a tablespoon of oil in a large saucepan over medium heat, add minced garlic and onion.  Cook until onion is slightly brown.  (Pictures 5 & 6)
  5. Add rice in to the pan and stir for about 2 minutes.  (Picture 7)
  6. Add 2 tablespoons of tomato paste and stir well.  (Picture 8)
  7. Pour the chicken broth with chopped tomatoes to the pot and add 1/2 teaspoon of salt.  (Pictures 9 & 10)
  8. When water is boiling, cover the rice and turn fire to low, cook for 20 minutes.  (Picture 11)
  9. After 20 minutes, turn off fire and leave the pot covered for about 10 minutes.
  10. Use a fork to loosen the rice.  (Picture 12)
collages
Tacos

Furikake Chex Mix


Chex Mix
Furikake Chex Mix

Here I am, writing my blog again.  I have already been working remotely for 2 weeks  due to the Coronavirus outbreak.  State announced the “Safer-At-Home” order on March 19, so all of us are now home 24/7.  As of today, USA has 331,234 confirmed cases, this number is rising rapidly.  Besides purchasing necessities at the markets, cleaning, cooking or baking is a good way to kill time.

This Hawaiian-style chex mix is incredibly addictive, it is very crunchy with a combination of sweet and savory taste.  It is perfect to have for parties, gatherings and even for just the family!  Get your youngsters to bake together and have some family quality time!

Ingredients:

2 cupsRice Chex
2 cupsCorn Chex
2 cupsWheat Chex*
2 cupsPretzel
1.5 cupsGardetto’s Garlic Rye chips
170gButter
¼ cupHoney
½ cupBrown sugar
1 TbspSoy sauce
1 TbspWorcestershire sauce
1 bottle (about 2oz)Furikake seaweed

* The Chex mix could be any combination of rice/corn/wheat.  Wheat is more flat and hard in texture.

IMG_7638

Method:

  1. Preheat oven to 250 °F.
  2. Mix dry ingredients like Chex mix, pretzels and garlic rye chips together in a very large bowl.  (Picture 1)
  3. Melt butter in a pot, add in sugar, honey, soy sauce and worcestershire sauce until everything is combined.  (Pictures 2 – 6)
  4. Pour hot sauce mixture into the dry mix and mix well.  (Pictures 7-8)
  5. Add in Furikake seaweed .  (Picture 9)
  6. Line a large baking sheet with alumni foil and drizzle a little oil.  This will prevent the chex from sticking to the pan.  (Picture 10)
  7. Evenly spread the chex mix on to the baking sheet.  (Picture 11)
  8. Bake for 1 hour and 15 mins, turn Chex mix every 20 mins (Picture 12)
Hawaiian Chex Mix

You can store the Chex mix in an air tight container.

Chex Mix in the jar

Egg Waffle / Bubble Waffle / Egg Puff / Gai Daan Jai (雞蛋仔)


Egg Waffles - 3

Since I mentioned in my Boot Jai Go post that one of the most popular Hong Kong street vendor’s snacks is egg waffle, I must introduce and record a recipe on my blog.  According to Wikipedia, egg waffles were ranked No.1 in a 100 most popular Hong Kong street snack listing.  There are many English names (bubble waffle, egg puff, eggettes, just to name a few), but its Cantonese name is Gai Daan Jai (meaning little eggs).  One story says the enterprising post-war generation created the egg-shaped mould to make up for an eggless batter as eggs became a luxury in China.  Grocery stores would take the cracked eggs and sell the perfect eggs to customers.  Throwing away the cracked eggs would be a waste of money, so they turned the eggs into batter and sold them as waffles.  After making the egg waffles with the semi-spherical cell pans (pan base is deeper and the cover is shallower), they look like small eggs.  I guess this is how it got its name “little eggs”.

Ingredients:  (makes 5)

210gAll purpose flour
10gBaking powder
15gCustard powder
42gTapioca starch
3Eggs
210gGranulated Sugar
42gLow fat milk
210mlVery cold water
42gVegetable oil
3 drops (slightly less than ¼ tsp)Vanilla extract

Directions:

  1. Measure all ingredients, set aside.  (picture 1)
  2. Pour all ingredients into a blender (except vegetable oil and vanilla extract), blend until well mixed.  (picture 2)
  3. Add in vanilla extract and oil and blend until combined.  (pictures 3 and 4)
  4. Strain the batter through a sieve.  (picture 5)
  5. Warm up each side of the mould and brush a thin layer of oil on each side. (picture 6)
  6. Pour the egg batter onto the mould with a ladle and close the mould.  Hold the handles firm to keep two sides tight.   I turned the fire to medium high.  (picture 7)
  7. After 1-2 minutes, flip the pan and cook for 1-2 minutes.  You can slightly open the pan to check if the the waffle is slight brown.  (picture 8)
  8. Remove the egg waffle from the mould with a fork and place it on a cooling rack.  (picture 9)
Egg Waffles Steps

It should be served hot or warm (cold is not as good). The waffles are crispy on the outside, soft and chewy on the inside.Egg Waffles - 2

This egg waffle mould/pan makes waffles over the stove.  For first time use, clean the pan thoroughly. The first 2 waffles should be discarded.  There are some fancy electricity-powered makers that make perfect egg waffles and you don’t need to pay too much attention to the cooking process or need any skill.   However, one owner of the waffle shop said “If the skill isn’t there, it doesn’t matter how good your ingredients are.”  IMG_9924

Note:  Some recipes say the batter should be refrigerated for at least an hour in order to make a perfect egg waffle.  To skip this step, I substituted room temperature water with icy-cold water.  The result is the same.

Yummy!Egg Waffles - 4

Traditional Mooncakes 廣式月餅


Mooncakes.jpg

I made these traditional mooncakes two years ago with a 63g mooncake mold.  I’m posting this again with the ingredients for a 75g mold.  Please plan ahead of time as (i) the paste needs to be made and refrigerated (or you can buy the paste from a store), and (ii) the skin normally needs to rest for 2 days after baking to get the best texture,  called “回油” in Chinese.  If you have a sweet tooth, you may want to increase the sugar amount as my recipe is a healthier version – less sugar and less oil.

moon-cakes

Ingredients for Lotus Paste (yield: 17 pieces – 23g each paste ball):

400gLotus seeds
240gSugar
200mlGrape seed oil/Olive oil
2 TbspsHoney
2 TbspsCondense milk
1/4 tspSalt

Directions for making the lotus paste are in my previous mooncake recipe here.

Ingredients for making the dough:  (yield: 17 mooncakes – 52g each dough ball) 

200gAll purpose flour
140gGolden Syrup (recipe courtesy of Christine Ho – here)
1 tspAlkaline water
50g/mlGrape seed oil
  
Fillings: 
900gLotus Paste
9Salted Egg Yolks
1 TbspRose-flavored cooking wine (玫瑰露酒)
1Egg (for egg wash)

Directions: (The dough/filling ratio is 3:7)

  1. Mix salted egg yolks with wine. Wipe dry the yolks with kitchen paper after a few minutes.  Cut each into two halves. Set aside.  (Note: if you don’t want to use cooking wine, you can use salt water to rinse the egg yolks to remove the excess egg whites).
  2. Place golden syrup in a bowl.  Add in alkaline water, stir to combine. Add in oil and mix well.
  3. Add flour into the syrup mixture and combine well. Gently knead the dough till smooth (takes 1~2 mins). Shape it into a round ball and wrap with cling wrap. Leave it in the fridge to rest for at least 2 hours or overnight.
  4. Before making mooncakes, bring the dough to room temperature for 30 mins. Divide dough into 17 equal portions, each weighs 23g.  Roll each portion into a ball shape.  Divide lotus paste into 17 equal portions as well, each weighs 52g, the salted egg yolks are roughly 5g each half.  (Pictures 1-3)
  5. Take a lotus paste ball and poke a hole in the middle with your finger. Place egg yolk inside. (Picture 4).
  6. Flatten each dough into a small disc with a rolling pin. The dough is sticky, I suggest putting a piece of cling wrap on top and roll it out.  (Picture 5)
  7. Wrap the dough around the filling and shape it into a ball. (Picture 6)
  8. Lightly dust the stuffed dough with some flour and lightly dust the mold.  Place the stuffed dough into the mooncake mold.  Tip:  When wrapping the filling, the dough is thicker on the closing end, the thicker side of the dough should go into the mold first as you will get the pattern pressed on this side.  (Picture 7)
  9. Press the handle, then remove the mooncake from the mold.  Dust off any excess flour with a brush.  (Pictures 8-9)
  10. Line the baking sheet with parchment paper and place mooncakes on top.
  11. Preheat oven to 350F. Prepare the egg wash by whisking the egg, sift through a fine sieve.
  12. Lightly spray some water on the mooncakes. (Note: this step prevents the mooncakes from cracking during baking.)   (Picture 10)
  13. Position the rack in the upper third of the oven and bake for 10 mins. Remove from oven and leave to cool for 15mins (Note:  this step helps stabilizing the pattern on top).
  14. After 15 minutes, brush the top with very little egg wash (Note: too much egg wash, the pattern will disappear after baking). Return to oven and change the oven temperature to 325F and continue to bake for another 25-30 mins. (Picture 11)
  15. After baking, the skin doesn’t have the shiny look (picture 12).  Leave mooncakes to cool completely and store in air tight containers. Wait for 2 days before serving, the skin will become soft and shiny, called “回油” in Chinese.
mooncake-steps

This is the clear pattern before baking.

moon-cake-print

I ordered this customized mooncake mold in Hong Kong.  The disk can be removed for easy cleaning.  I personally do not like anything bigger than 75g or smaller than 63g.  However, you may like the 100g as it’s easier to work with.

hkg_4703

I also bought these containers and bags in Hong Kong.  They look nice and neat when giving them as a gift.hkg_4789

Pistachio Macarons with Pistachio Buttercream Filling


Pistachio Macaroons

Pistachio Macarons

Pistachio macaroons and almond Macaroons

Once you have a good handle on macarons technique, you can make different flavors.  Now these pistachio macarons are my favorite.  I added green food coloring to the macarons for my pictures, but the natural hue color is always healthier.

Choosing the right macaron fillings is important, my suggestion is to have the not-so-sweet fillings since the macaron shells are quite sweet.  For the pistachio macarons, I made the buttercream filling with pistachios which goes very well with the cookies.

Pistachio flour could be hard to find depending on where you live, when I spot the unshelled pistachios at Whole Foods (it’s pricey $29.99 per pound), I bought some and ground them myself with a food processor.  The extra pistachio flour can be used to make pistachio paste.  Below are the recipes for the pistachio macarons, pistachio buttercream filling and pistachio paste.  Hope you will get a chance to make these.

Ingredients for Pistachio Macarons:

100gEgg whites (about 3 eggs)
35gCaster sugar
200gIcing sugar (Powdered sugar)
75gAlmond meal
45gPistachio flour
1 tspCream of tartar
1 dropGreen gel food coloring (optional)

Directions:

  1. Measure almond meal, pistachio flour and powdered sugar. Sift together to remove any clumps, sift twice if possible.  Discard any big clumps. (pictures 1-3)
  2. Weigh out the egg whites into a large stainless mixing bowl. Begin beating the egg whites on low speed then gradually adjust to medium until the egg whites are foamy.  (picture 4)
  3. Add in sugar as you beat.   Increase the speed from medium to high, if necessary. (picture 5)
  4. Add a teaspoon of cream of tartar and beat the meringue to stiff glossy peaks. (picture 6)
  5. Add the food coloring and mix until well blended.  Remove the whisk. (Pictures 7 and 8).
  6. Add about 1/3 of the almond/pistachio/sugar mixture to the egg white meringue. Fold in until no streaks remain. Continue to add the remaining mixture (1/3 of the mixture at a time), fold until you reach the proper batter.   (picture 9)
  7. It should take roughly 50 folds until the mixture is smooth and a very viscous liquid, not runny. Over-mixing the batter, your macarons will be flat and have no foot, under-mixing the batter, your macarons shells would be lumpy.  When you lift the spatula, the batter should drop down smoothly.  (picture 10)
  8. Pour the batter into your prepared piping bag.  You can place the bag into a measuring cup and cuff the bag’s opening over the top, this makes the bag easy to fill hands-free. (Picture 11)
  9. Line baking sheets with parchment paper or silicone liners.  Place a tiny drop of batter at each corner of the baking sheet to secure the parchment paper.  Pipe rows of batter (dollops a little bigger than a quarter) onto the baking sheets, giving them space to spread. (picture 12)
  10. Tap the pan on the counter several times to break any air bubbles (this prevents cracking). The little peak on the top of the macaron should go down after tapping the pan. However, if you still see the little peak, simply wet your finger and gently smooth the bump down. (pictures 13 and 14)
  11. If you want to sprinkle nuts on top, do it now so that they will stick to the top of the shells.
  12. Allow the cookies to rest on a level surface for 30-60 minutes.  Until they are no longer tacky to a light touch.
  13. Preheat your oven to 300F and bake the macarons for 16-20 minutes.
  14. You will see the macarons have lovely feet when they are done correctly. (picture 15)
collage
  • Use a piping bag to pipe your favorite filling to one side of the macaron and top with another half of macaron to form a sandwich.
sandwich

Directions for making Pistachio Paste (unsweeten version):

  1. You only need pistachio flour and water to make the paste.  I processed the nuts in a food processor  when I made the macarons at first.  (picture 1)
  2. Now return the pistachio flour to the food processor, then slowly add a bit of water (water amount depends on how much flour you have, just add a little bit at a time).  Process it until it is smooth and forms a paste.  That is it!!  We have our paste for the buttercream filling.  It’s super easy!  (pictures 2-3)

Ingredients for Pistachio Buttercream:

2Egg yolks
60gGranulated sugar
30mlWater
60gUnsalted butter (softened)
3 tspsPistachio paste

Directions:

  1. In a mixing bowl, whisk the egg yolks until smooth. (Picture 4)
  2. In a small saucepan, combine water and sugar and heat it over medium heat. Stir the mixture until the sugar is completely dissolved. Then bring it to a boil and cook until the syrup reaches 250°F.  Use a candy thermometer to check the temperature. (Picture 5)
  3. Slowly pour the hot syrup into the egg yolks and run the mixer on low. Increase the speed to medium high, and beat the mixture until well combined. You can use the egg yolk/syrup mixture now but I always like to take one more step to set a bowl of mixture over a pot of simmering water.  Keep whisk until the mixture registers 160°F.  Meringue becomes very smooth at this point.  Remove from heat and let cool. (Picture 6)
  4. In a mixing bowl, beat butter until whipped and white.  Add in pistachio paste and food coloring (if desired), continue to beat the cream until well combined.  (Picture 7)
  5. Add in meringue and beat until well bended.  (Picture 8)
  6. Transfer the pistachio cream into a pastry bag and fill the macarons. Pipe the filling to one side of the macaron and top with another half of macaron to form a sandwich.  (Picture 9)
pistachio paste
macaroons 2

Japanese Soft Boiled Eggs


egga

I have made these eggs many times.  They are known as the perfect boiled eggs for Japanese ramen.  It seems hard to get the desired texture but as long as you get the right cooking time, you will have these beautiful and delicious eggs on your plate.

Ingredients for marinate:

1 cupWater
1/2 cupSake
1/2 cupSoy sauce
1/2 cupMirin
1 or 2 TbspSugar

Note:  If you have the sauce from the chashu, the taste is delicious.   For recipe of making the chashu, please click here.

Directions:

  1. Cook the marinate ahead of time and let it cool.  You can store this in a jar and put it in the refrigerator.
  2. Wash eggs, take a thumb tack and pierce a tiny hole in the round end of each egg (I used an oven thermometer). This prevents the egg from cracking. (pictures 1 and 2)
  3. Bring a 2 quart of water to a boil and carefully lower eggs into the boiling water with a stainless steel wire mesh ladle (picture 3) and set the timer to 6 minutes (picture 4).
  4. While the eggs are being boiled, fill a bowl with cold water and add ice cubes.
  5. Once 6 minutes is up, take out the eggs and run under cold water.  Place eggs into iced water for at least 5 minutes.  (picture 5)
  6. Crack the eggs and peel of the shell.  Put eggs into bowl with marinade and refrigerate at least four hours, it is better if you use spoons to weight down the eggs to keep entire eggs submerged under, otherwise turn eggs once or twice.
Sof Boiled Eggs steps

Green Onion Pancakes (Scallion Pancakes) 葱油餅


Green Onion Pancake

Whenever we visit a Chinese dumpling restaurant, we always order green onion pancakes.  When served hot, these flaky and savory pancakes are crispy outside, and chewy and soft inside.  Many people like them, even though they are not fond of green onions.  Most restaurants make good scallion pancakes, but occasionally we had some doughy and thick ones which my kids didn’t even touch.  If you never tried Green Onion Pancakes, just remember they are not pancakes at all as they are not made out of a batter.  They are more like crispy, multi-layered flat bread filled with green onions.

Ingredients: (Makes four 6” pancakes)

260g (2 Cups)
120 ml (½ Cup)*
50 ml (¼ Cup)*
2-3 stalks
All purpose flour
Boiling water
Room temperature water
Green onion (minced)
More flour for dusting

*  I used milligram (ML), it’s more accurate as 1/4 cup is about 60 ml, then the water amount is a little too much.

Ingredients for oil mixture:

2 Tbsp
1 tsp
3 Tbsp
All purpose flour
Salt
Cooking oil

Directions:

  1. Place 2 cups of flour in a mixing bowl, add ½ cup of boiling water, mix well.  Then add ¼ cup of room temperature water and mix well (when adding cold water, do not pour in all water at once, you will need to feel the dough when kneading.  It should not be too hard or too sticky) . (Picture 1)
  2. Knead the dough until the surface becomes smooth and is no longer sticky.  If the dough is too dry, add 1 Tbsp of water to the dough; if the dough is too wet, add a Tbsp of flour to the dough.  Cover the dough with plastic wrap and let it rest for 20-30 minutes.  (Picture 2)
  3. In the meantime, prepare green onions and oil mixture – Cut green onions into small pieces.  Set aside.  (Picture 3)
  4. Put 2 Tbsp. of flour, 1 tsp. of salt and 3 Tbsp. of cooking oil into a small bowl and mix well.  (Picture 4)
  5. Divide dough into 4 portions.  (Picture 5)
  6. Working with one dough ball at a time.  Place the dough ball on a lightly floured work surface and roll the dough to a thin disc with a rolling pin.  (Picture 6)
  7. Apply a thin layer of oil mixture to the disc.  (Picture 7)
  8. Sprinkle green onion to the disc but leave one edge open for sealing.  (Picture 8)
  9. Start to roll the dough into a cylinder.  (Picture 9)
  10. Flatten the log a little and coil it up like a sneak.  (Picture 10)
  11. Turn the dough so that the swirl side is facing up.  (Picture 11)
  12. Flatten the dough out with a rolling pin.  (Picture 12)
  13. Repeat steps 6-12 for the rest of the dough. 

green onion pancakes

  1. Now the dough is flattened, add a tablespoon of cooking oil into a skillet over medium heat.  (Picture A)
  2. Transfer the pancake dough onto the pan and cook until both sides are lightly brown (keep flipping the pancake).  (Picture B)
  3. Scrunch up the pancake a little bit by using serving tongs or two wooden spoons/turners.  (Picture C).  Serve immediately.

Green Onion Pancake

See how flaky the pancake is.  It’s crispy outside and soft inside.

Green onion pancake

Pizza


Pizza

It was Super Bowl night.   Super Bowl Sunday still holds the record for most pizza delivered in a single day.  Studies showed that 1.25 billion chicken wings would be consumed and 29 million slices were projected to sell on Super Bowl Sunday.  I’m not surprised as almost 95% of Americans planned to watch the Super Bowl.  Today, I joined the party (not to watch the game but make my own pizza)!  The pizza dough and pizza sauce were made from scratch.  The sauce recipe was adapted from KitchenTreaty and was made with fresh tomatoes.  I can taste its freshness.

Ingredients (Pizza sauce) (about 3 cups sauce):

1 Tbsp
4 cloves
1 tsp
2 pounds
1 tsp
1/2 tsp
Oil
Garlic (minced)
Dried oregano
Tomatoes
Brown sugar
Kosher salt
Black pepper to taste

Directions:

  1. Dice tomatoes and set aside (picture 1).
  2. In a medium sauce pan, heat oil over medium high heat.  Add minced garlic and cook until aromatic.  Add tomatoes, dried oregano, sugar, salt and black pepper.  Keep stirring (picture 2).
  3. Leave over medium heat, stir occasionally, until boiling.  Reduce heat to low and simmer UNCOVERED for 45 minutes or until sauce is thickened (picture 3).
  4. Allow the sauce to cool and blend the sauce in a food processer (picture 4).
  5. Pour sauce into a bowl and let it cool (picture 5).

Pizza Sauce

Pizza sauce

Ingredients (Pizza dough) (make about 5 small pizzas):

2 tsps
1 cup
3 cups
1 1/4 Tbsp (4 tsps.)
2 tsps
1 1/4 Tbsp (4 tsps.)
Active dry yeast
Warm water
Bread flour
Sugar
Salt
Olive oil

Directions:

  1. Place all ingredients (except dry yeast) inside the pan in the breadmaker.  Fill the yeast dispenser with dry yeast (usually it is on the top of the breadmaker).  Select the “Pizza dough” mode (refer to manual of your breadmaker to select the dough program).  After the kneading process, allow the dough to rise in the breadmaker for about 1 1/2 – 2 hours.
  2. Deflate the dough, bunch it back and divide it into 5 pieces – You can use the dough at this point, but for a finer and nicer texture, after deflating and punching the dough, roll it into a ball and put it back into an airtight container and refrigerate overnight.  About 2 hours before you are going to make your pizza, remove the dough from the fridge, deflate again, and split into 5 equal portions.  Roll each portion into a ball and cover with plastic wrap.  Let them sit at room temperature for 2 hours.

Assembling Pizzas:

Ingredients (pizza toppings):

Pepperoni, thinly sliced
Italian sausages, cook ahead
Mushrooms, thinly sliced
Red onion, thinly sliced
Yellow bell pepper, thinly sliced
Red bell pepper, thinly sliced
Mozzarella cheese, shredded
Mild cheddar cheese, shredded
Fresh basil leaves, chopped
Cornmeal (to slide the pizza onto the pizza stone)

** I made my pizzas with the above ingredients, of course you can add anything you want to your pizza, such as ham, BBQ chicken, even Kimchi.

Directions:

  1. In a small sauce pan over medium-high heat, warm 1 tablespoon of the oil.  Add red onion and cook until it is slightly tender.  Transfer onion to a paper towel-lined plate.  (Picture 1)
  2. In the same pan over medium-high heat, warm 1 tablespoon oil.   Add the bell peppers, stirring frequently, until just softened.  Transfer the peppers to the same paper towel-lined plate.  (Picture 2)
  3. Now warm 1 tablespoon oil.  Add the mushrooms, salt and pepper and cook (stirring occasionally) until softened.  Transfer the mushrooms to the plate with the peppers and onion.

Pizza

  1. Preheat oven to 500 ºF and heat up the baking stone (or baking pan) in the oven.
  2. Using a rolling pin to roll out your dough ball, flatten disc into an 8-inch circle.  If you don’t know how to shape your pizza dough by tossing it in the air, simply start at the center and work outwards, use your fingertips to press the dough to 1/2-inch thick.  Stretch the dough until it will not stretch further.  (picture 1)
  3. Lightly sprinkle your pizza peel with corn meal.  Transfer one prepared flattened dough to the pizza peel.  If the dough has lost its shape in the transfer, lightly shape it to the desired dimensions.  (picture 2)
  4. Top dough with a layer of sauce.  (picture 3)
  5. Then sprinkle with cheese, and place your desired toppings on the pizza, sprinkle more cheese on top at the end.  (picture 4)
  6. Slide the pizza off of the peel and on to the baking stone in the oven.  Bake pizza one at a time until the crust is browned and the cheese is golden, about 10 minutes. (picture 5)
  7. You can use the pizza peel or a stainless steel spatula to remove the pizza from the pizza stone.  Serve immediately (picture 6)
  • pizza

Baked Empanadas


Empanadas

Empanadas

I adapted this recipe from my friend, Angela, who makes the best empanadas.  These delicious hand pies can be made with so many different types of fillings.  There are classic savory fillings and sweet dessert fillings.  You can swap the pork for chicken or beef, or simply use the ingredients you have available in your refrigerator.

Ingredients:  

Filling:
250g
1 Tbsp
1 tsp
1 tsp
1 tsp
230g
½
1 Tbsp
1
2
90g
¼ tsp
¼ tsp
1-2 tsps
Ground pork
Light soy sauce
Oyster sauce
Brown sugar
Corn starch
Red potatoes (diced)
White onion (diced)
Minced garlic
Carrot stick (minced or shredded)
Medium size tomatoes (diced)
Green peas
Dried oregano (crushed)
Salt
Fish sauce
Dough:
250g
8 oz
200g
1
All-purpose flour
Cream cheese (softened)
Unsalted butter (softened) (a little less than 2 sticks)
Egg, lightly beaten (for egg wash only)

Directions – for filling:

  1. Prepare all ingredients — dice potatoes, carrots, onion and tomatoes.  (picture 1)  Marinate ground pork with light soy sauce, oyster sauce, brown sugar and corn starch, set aside.
  2. Heat 2 Tbsps of oil in a large skillet over high heat, add 2 gloves of garlic and cook until aromatic.  Now add diced potatoes, pan fry until slightly brown.  Add water and cover to simmer until water evaporated.  Set aside.  (picture 2)
  3. Heat 1 Tbsp of oil in a large skillet over medium heat, add onion and garlic, cook until tender (picture 3).  Add ground pork and stir well.  Breaking up the meat with a turner or wooden spoon, cook meat until brown.  (picture 4)
  4. Add carrot and tomatoes and keep stirring.  Cook for about 5 minutes (add a few tablespoons of water if necessary) (picture 5).  Return potatoes to the pan and add green peas, stir until all ingredients are combined (picture 6).  Add oregano, ½ tsp of salt and 1 tsp of fish sauce (add more if necessary).
  5. Allow the mixture to cool thoroughly before filling in the dough.

Fillings for empanadas

Directions – for Dough:

  1. Cream butter and cream cheese together until smoothly blended (picture 1).
  2. Beat in the flour until just combined (picture 2).
  3. Shape dough into 2 smooth balls, wrap in cling wrap and refrigerate for an hour or overnight (picture 3).

Dough for Empanadas

Assemble the Empanadas:

  1. Preheat oven to 375 degrees Fahrenheit.
  2. Remove dough from refrigerator and work on a lightly floured work surface.
  3. Roll chilled dough thin, cut with a 3 or 4 inch round cookie cutter.  (picture 1)
  4. Place a proportional amount of filling in the center of the dough circle (about 1 tablespoon full).  (picture 2)
  5. Fold 1 side over so that the edges meet, press to seal.  To braid the edges of empanadas, start at one corner of the empanada with your thumb and index finger, fold the seal edge down over itself (press down and seal), and repeat this step until you reach the other end.  (picture 3)
  6. Place on parchment-lined baking sheets, brush tops with egg wash.  (picture 4)

How to wrap empanadas

  • Bake for 30-40 minutes.

empanadas

Vanilla Waffle Cones/Bowls


Vanilla Waffle Cones/Bowls

After making some ice cream, I thought freshly baked waffle cones would go fabulously with it.  An ice cream cone maker will probaby be easier and save some time, but since I didn’t have one, I just baked the batter in the oven and shaped it with a bowl or a mug.   It can be rolled into the shape of a cone as well.  These waffle bowls/cones are so fresh and crispy, you will find it definitely worth the effort.

Ingredients:

2   large
1/8   teaspoon
120g
1/4   teaspoon
65g
40g
Egg whites
Salt
Granulated sugar
Vanilla extract
All-purpose flour
Unsalted butter, melted and cooled

Directions:

  1. Preheat oven to 350 °F.
  2. Beat egg whites until soft peaks form with an electric mixer, add salt and 1 tablespoon of sugar, and beat until stiff peaks form, scrape bowl. Gently fold in remaining sugar and vanilla extract, then fold in flour and butter until incorporated.
  3. Line a baking sheet with parchment paper and use the back of a spoon to spread 2 tablespoons of the batter into a circle 5 inches across, you are likely to get 2-3 rounds on one standard baking sheet. Try to get the circles as even and smooth as possible.
  4. Put the baking sheet in the oven and bake for 10 minutes, you will see the edges will become slightly brown.  Use a thin metal turner to flip the circles over and continue baking for another 5 minutes, the circles should be a deep golden brown throughout.  Continue with the rest of the batter.
  5. Remove baking sheet from the oven.  While the circles are still warm, place on top of a mug and use the bottom of a drinking glass to slightly press it down to shape a bowl.  Let it sit and remove when cooled enough to be firm.
  6. After these cones/bowls are completely cooled, they can be stored in an airtight container.