Korean Spicy Chicken


I bet a lot of people became a good cook when the coronavirus pandemic hit. The pandemic had us stuck at home and many restaurants were closed. Having the opportunity to stay at home allowed us to discover more recipes that eventually led to more learning and experience. It’s important to have different cuisine daily as it can increase our appetite.

Of all the types of food I cook—Italian, Persian, Mexican, American, and Asian foods— I discovered my family really liked Korean cuisine. Their favorite is the beef shortribs (Galbi) (recipe here) and spicy tofu soup. Anyhow, I came across this spicy chicken recipe from rasamalaysia.com, it’s a good addition to my Korean recipe book.

Ingredients:

2 poundsBoneless and skinless chicken thighs
4 TbspCooking oil
3 TbspGochujang (Korean chili paste)
2 tspGochugaru (Korean red chili powder)
2 TbspSesame oil
4 TbspSoy sauce
3 TbspSugar
1 thumb sizeFresh ginger, peeled and minced
6 clovesGarlic, minced
To tasteSalt

Instructions:

  1. Wash chicken thighs and pat dry, trim off all the fat. (Picture 1)
  2. Mince garlic and ginger, set aside. (Picture 2)
  3. Combine all the ingredients in a large bowl, mix well until combined. Marinate the chicken for 2 hours or overnight. (Pictures 3 & 4)
  4. Put chicken thighs on the grill and grill until slightly charred. You can also pan fry the chicken on a skillet.
  5. Cut chicken thighs into strips, sprinkle some toasted sesame on top for garnish, serve with steamed rice.

Below is a picture of the Gochujang (Korean fermented chili paste):

And below is a picture of Gochugaru (chili powder):

Chicken Drumsticks with Seasoned Rub


spice blend chicken
Seasoned Rub Chicken Drumsticks

I adapted this recipe from That Low Carb Life.  The spice blend is packed full of flavor and is good for chicken thighs and drumsticks.  The meat turned out juicy with crispy skin.  If you cannot eat spicy food, you can leave the peppers out, and the chicken will still be very flavorful.

Ingredients:

8 poundsChicken drumsticks
4 tspSmoked paprika
4 tspGarlic powder
4 tspOnion powder
3 tspSalt
2 tspCracked pepper
1 tspCayenne pepper

Directions:

  1. Preheat oven to 425 degrees.  Line a baking pan with aluminum foil.
  2. Put all ingredients to a bowl and mix well.  (Picture 1)
  3. Sprinkle the spice blend on each chicken drumstick.  (Picture 2)
  4. Arrange chicken drumsticks on the baking sheet and drizzle a little cooking oil (grape seed oil) on top.  (Picture 3)
  5. Put in the middle rack of the oven and bake for 35 minutes.  *My chicken drumsticks are pretty small; add 10 minutes of cooking time if chicken drumsticks are big. (Picture 4)
  6. Do not turn chicken, this will allow the drumsticks to have a crispy skin on the top.
  7. Serve chicken drumsticks immediately.
collage
drumsticks

Dutch Oven Chicken with Lemon, Garlic and Rosemary


IMG_E8458

Last summer, I posted a recipe of this chicken cooked in a pressure cooker and promised to post a recipe using a Dutch Oven.   Every time I made this chicken, either one wing or a drumstick was already eaten by my family before I took out my camera to shoot a picture for my blog.   I have to say this is one of my family’s favorite dishes.

I like to use a Dutch Oven to bake the chicken as it keeps the meat very moist and tender, and it allows me to cook the potatoes and carrots together.  Once everything is cooked, I have both a meat and a vegetable dish to serve.

The chicken is best to be marinaded overnight.  It may take some time to prep, but the work is easy after you put the pot in the oven.  Some people may not like rosemary which can be substituted with other herbs or simply be omitted.

Ingredients:

1 (3-4 pounds)Whole roasting chicken
2 TbspButter (melted)
2 TbspLemon zest
2 TbspRosemary (chopped)
3 TbspMinced Garlic
3 tspSalt

Spices for Chicken Skin:

1 tspChili powder
2 tspPaprika
2 tspGarlic powder
1 tspSalt

Vegetables:

1White onion (chopped)
5Medium size carrots (cut)
1 poundRed potatoes (cut into cubes)
2/3 tspSeason salt (or salt and pepper)

Ingredients for Gravy:

2 cupLow sodium chicken broth
2 TbspCorn starch
2 TbspCooking wine/water
 Salt to taste

Chicken Marinade:

  1. Clean the chicken and pat dry.
  2. Melt butter in a microwave and prepare all herbs.  (picture 1)
  3. Use a chopper to chop garlic, rosemary and lemon zest together.  (picture 2)
  4. Mix butter, salt and herb mixture in a container.  (picture 3)
  5. Rub herb mixture evenly underneath the chicken skin and cavity.  (picture 4)
  6. Cover with cling wrap and put the chicken in the fridge overnight.
  7. Combine all spices for chicken skin in a bowl.  (pictures 5 & 6)
  8. Remove chicken from the fridge and sprinkle the skin evenly with the spice mixture right before cooking it.  (picture 7)
collages 1

Directions:

  1. Preheat oven to 350 °F.
  2. In a large Dutch oven, heat 3 tablespoons of oil with a sprig of rosemary and 2 garlic cloves.  Brown the chicken until all sides are evenly golden brown. (pictures 8 & 9)
  3. Cut potatoes, carrots and onion into cubes, season with season salt. (picture 10)
  4. Add potatoes, carrots and onion to the Dutch oven, place them around the chicken. Chicken breast should be facing up before putting it in the oven. (picture 11)
  5. Cover with lid and transfer the Dutch Oven to the preheated oven. Bake for an hour or until the thermometer registers 165 degrees Fahrenheit when inserted in the thickest part of breast. (picture 12)
  6. Transfer the chicken to a serving dish and let it rest for 20 minutes before carving and transfer vegetables from the Dutch Oven to a big container. (picture 13)
Untitled-1
IMG_E8455

To make gravy:

  1. Reserve the juice from the Dutch Oven and skim the fat from the top.  Place the Dutch Oven on stove top on medium heat.  Add 2 cups of chicken broth.  (picture A)
  2. Dissolve 2 tablespoons of cornstarch in 2 tbsp of water/cooking wine.  Pour the cornstarch slurry into the pot and use a spoon or whisk to mix (don’t pour in all cornstarch slurry, if gravy is still thin, add more in until it’s slightly thickened.)  (picture B)
  3. Transfer gravy to a sauce boat and serve hot. (picture C)
Gravy

Lemon, Garlic and Rosemary Whole Chicken (Instant Pot)


Instant Pot chicken

Whenever I spoke to friends/relatives/co-workers about cooking the last few years, I would hear so much about how they fell in love with their IP and why they couldn’t stop using their IP.  Cooking with an IP is currently very popular, but what is an IP?  IP stands for Instant Pot which is a multifunctional electric pressure cooker.  According to The New York Times, Instant Pots currently sit in the top 10 list of Amazon best sellers in the Kitchen category.  I’ve owned one for more than a year now and I understand why people love it so much.  You can easily convert many recipes for pressure cooking.

I normally cook this chicken in a Dutch Oven with potatoes and carrots added to the pot (Dutch Oven chicken recipe will follow).  Cooking this chicken in a Dutch Oven or in a pressure cooker keeps the chicken moist and tender.  When I don’t have much time preparing dinner, I just bring out my IP.

Ingredients:

1 (4 pounds)Whole roasting chicken
2 TbspButter (melted)
2 TbspLemon zest
2 TbspRosemary (chopped)
3 TbspMinced Garlic
3 tspSalt
a dashCooking wine (optional)

Spices for Chicken Skin:

1 tspChili powder
2 tspPaprika
2 tspGarlic powder
1 tspSalt

Ingredients for gravy:

1 cupLow sodium chicken broth (cooking together with the chicken in Instant Pot)
2 TbspCorn starch
1-2 Tbspwater

Chicken Marinade:

  1. Clean the chicken and pat dry.
  2. Melt butter in a microwave and prepare all herbs.  (picture A)
  3. Use a chopper to chop garlic, rosemary and lemon zest together.  (picture B)
  4. In a container, mix butter, salt and herb mixture.  (picture C)
  5. Rub herb mixture evenly underneath the chicken skin and cavity.  (picture D)
  6. Cover with cling wrap and let it sit in the fridge for 4 hours or overnight (you can skip this step if you don’t have time).
chicken marinade final

Direction:

  1. Combine all spices for chicken skin in a bowl.  (Pictures 1 & 2)
  2. Sprinkle the skin evenly with the spice mixture.  (Picture 3)
  3. In a large frying pan, heat 3 tablespoons of oil with a sprig of rosemary.  Cook the chicken until evenly golden brown, add in cooking wine (optional).  (Picture 4)
  4. Pour 1 cup of low sodium chicken broth (or water) to your Instant Pot (pressure cooker), place the metal trivet into the pot.  Gently place chicken on top of the trivet with tongs.  (Pictures 5 & 6)
  5. Select manual setting, adjust pressure to high and set time for 20 minutes.  Turn knob to the sealing position.  When finished cooking, do a quick pressure release.  (Picture 7)
Pressure cooking steps

To make gravy:

  1. Reserve all the juice from the pot and skim the fat from the top. Transfer gravy from Instant Pot to a small pot.
  2. Place the pot on stove top on medium heat.  Dissolve 2 Tbsps of cornstarch in the minimum amount of water needed to make a thin paste.
  3. Pour the cornstarch slurry into the pot and use a spoon or whisk to mix (don’t pour in all cornstarch slurry, if gravy is still thin, add more in until it’s slightly thickened.)
  4. Transfer gravy to a sauce boat and serve hot.
gravy

Ground Turkey Curry


In the 21st century, most people changed their eating habits and chose to eat healthily.  However, I found that healthy foods do not taste as good as normal foods so when I introduce healthier meals to my family, I have to make sure my children will allow me to make it again.  I found this turkey curry recipe from SimplyRecipes by Elise Bauer.  I gave it a little twist to suit our tastes and it became a popular dish for my family.

Ingredients:

3 poundsGround Turkey (93% lean)
1White onion (chopped)
4Medium Carrots (peeled and cut into big pieces)
6Medium red potatoes (peeled and cut into 1-inch chunks)
5Roma tomatoes (diced)
1 cupFrozen peas
4 cupsLow sodium chicken broth
1 headGarlic (minced)
20gFresh ginger (about 1-inch piece) (peeled and grated)
3 ½ TbspsCurry Powder
1 tspTurmeric
1 tspGround coriander
1 tspGround cumin
1 ½ tsps.Red chili powder
1 TbspLight brown sugar
1 tspSalt to taste (about 1 tsp)

Method:

  1. Heat 4 tbsps. of grape seed oil over high heat in a large pan.  When the oil is hot, add ground turkey, make sure not to crowd the meat.  With 3 pounds of meat, it’s better to split the meat into 2 portions and cook separately.  Cook turkey until it begins to brown and liquid is dried up.  Set aside.  (picture 1)
  2. Brown onion in a pan, then add minced garlic and grated ginger.  Stir for about 1 minute.  (picture 2)
  3. Return ground turkey to the pan with onion, garlic and ginger.  Stir for about 1 minute.  (picture 3)
  4. Add 4 cups of chicken broth.  (picture 4)
  5. Then add in all spices (curry powder, turmeric, cumin, coriander, chili powder, sugar).  (picture 5)
  6. Add diced tomatoes, carrots, peas and potatoes.  Add salt and mix well.  (pictures 6-8)
  7. Transfer everything to a pressure cooker and press the “Meat/stew” function, press the button to choose the cooking time to 15 minutes.   Turn the venting knob to “sealing” position.  When it’s done cooking, do a quick pressure release.  (picture 9)
  8. If you don’t have a pressure cooker, you can easily cook this on the stove top.  Cover the pot and simmer the curry for about 20-30 minutes or until the potatoes are soft.
  9. Serve over rice.
curry collage

Notes:

  • 3 pound of meat is enough for 2 meals for 5 people.  This dish is also very good the next day.
  • Ground turkey will release a lot of liquid when cooking.  Make sure not to crowd the meat, otherwise it will take a long time to brown the meat.

Panang Curry with Chicken


Panang Curry with Chicken

Last week, I attended a cooking class which was arranged by my company.  It was very nice and fun learning/cooking with my colleagues.  The chef, Jamie at The Gourmandise School, taught us how to cook Thai cuisine as well as use proper cutting techniques.  I love Thai food but have never tried making it at home.  I’m surprised how easy it is to make Pad Thai and Panang Curry with chicken.  After the class, I made those two dishes again for my family and everyone loved it.  Below is the recipe for Panang Curry with Chicken from the cooking school.  I will publish the recipe for Pad Thai in my next post.

Ingredients:  (Serves 4)

1 canCoconut milk
1 TbspVegetable oil
¼ cupPanang curry paste
2 TbspsFish sauce
1 poundBoneless skinless chicken breast
½ cupChicken stock
2 TbspsBrown sugar
3Kaffir lime leaves
½ cupThai basil leaves
DSC_8663

Directions:

  1. Cut chicken breast into cubes. (picture 1)
  2. Separate coconut cream and milk from can and place cream in medium saucepan along with vegetable oil and curry paste.  Heat over medium high and cook for 2 minutes.  Stir constantly. (pictures 2-4)
  3. Add remaining coconut milk, chicken stock, sugar, fish sauce and Kaffir lime leaves.  Simmer for 5 minutes.  (pictures 5-9)
  4. Add chicken and simmer until just cooked.  Taste for seasoning.  (picture 10)
  5. Slice basil leaves and add in to chicken curry.  (picture 11)
  6. Serve over white rice.  (picture 12)
Panang Curry with Chicken Steps

Notes:

  • I simmered the chicken for 45 minutes and also added potatoes.
  • I found it hard to purchase all ingredients, especially the Kaffir lime leaves.  Kaffir lime leave is highly aromatic and provides a light citrus flavor.  I would not want to omit this ingredient.  One of my co-workers has a little bush, he was nice enough to give me some leaves.
  • All ingredients can be found in Thai supermarkets.  I purchased mine in a Chinese/Vietnamese supermarket.

Sous Vide Soy Sauce Chicken


soy-sauce-chicken

Sous vide cooking is new to me, a lot of my friends have already owned a Sous Vide Precision Cooker for a couple of years.  I heard many good things about it but never thought about buying one until after the Thanksgiving holiday when there was a big sale.  I purchased mine (Anova brand) and used it the very first time yesterday.  Basically sous vide cooking is putting food in a bag and cooking it in a water bath.  This technique is about bringing food up to a precisely controlled temperature to deliver super-juicy, flavor-packed results throughout the entire piece of meat.  I personally don’t like the idea of cooking food in a plastic bag, but if I use those vacuum sealer bags that are BPA free, I think that is acceptable.  Below is my first recipe – A Chinese soy sauce chicken –  the meat was cooked just right, very tender and juicy.  Please note this soy sauce chicken doesn’t need the searing step after the water bath.

Ingredients:

13-4 pound free range brown chicken 黃毛雞
3 slicesFresh ginger
3Star anise
3Bay leaves
2 stalksGreen onions
6 clovesGarlic
7 TbspBrown sugar
300mlLight soy sauce
300mlWater
2 TbspMei Kuei Lu Chiew (Cooking wine) 玫瑰露酒

Directions for making the sauce:

  1. Measure all ingredients and set aside (picture 1).
  2. Add a tablespoon of cooking oil to the frying pan, stir in ginger, garlic and green onion and cook for a minute. (pictures 2)
  3. Add a tablespoon of Mei Kuei Lu Chiew (cooking wine) and then add in 300 ml water. (pictures 3-4)
  4. Add in sugar, anise and bay leaves. (pictures 5 and 6)
  5. When the liquid is boiling, add a tablespoon of Mei Kuei Lu Chiew (cooking wine) and soy sauce. (pictures 7 and 8)
  6. Turn off fire after the sauce is slightly bubbling, transfer the sauce into a bowl and let it cool. (picture 9)
sauce

Directions for sous vide cooking:

  1. Bring a pot of water to a boil and put the whole chicken in for 30 seconds to 1 minute.  This step will firm the chicken skin and allow the sauce to coat the chicken evenly.  (picture a)
  2. Fill a pot of water, clip the Anova Sous Vide Precision Cooker to the side of the pot, download the app and connect Anova to your phone.  Use the phone to set the temperature that you want the food to finish at. For this chicken, I set it to 155.5 for 6 hours.
  3. While the cooker is heating up the water, put chicken in a bag and pour sauce into the bag.  Toss the chicken to make sure sauce gets on all sides.  (pictures c and d)
  4. When water has reached the desired temperature, seal the bag using the water immersion technique (drop the bag into water slowly and air will come out, use binder clips to secure the bag).  Place the bag in the water bath and let it cook for 6 hours.  (pictures e and f)
  5. When the timer goes off, remove the bag from the water bath.  Take out the chicken and let it cool.  You can save the sauce and use it next time, just re-boil and freeze in the freezer.
anova

Let the chicken rest for 10 minutes before cutting.  Serve with white steamed rice.

hal_5642

Chicken, Mushroom and Spinach Ravioli with Homemade Pasta Sauce


Chicken, Mushroom and Spinach Ravioli

Making ravioli with wonton wrappers?!!  I got this great idea when I watched Giada De Laurentiis’ Everyday Italian show.  I did not follow her recipe 100% but if you are interested in her Spinach and Mushroom ravioli recipe, it is on the food network website.

I changed the recipe quite a bit by adding chicken, using fresh spinach and making homemade pasta sauce.  I like to make pasta sauce without using any canned tomatoes or tomato sauce, it’s much healthier and taste really fresh.  Most of my pasta sauce is tomato based with basil and garlic.

Instead of using Mascarpone (couldn’t find any at the store), I mixed cream cheese, sour cream and heavy whipping cream and added it into the filling.  My 9-year old daughter helped me make the ravioli with wonton wrappers, this is something that little kids can do without ruining your dish!

Ingredients (make 30 ravioli):

2 packs
1 pound
½ tsp
1/8 tsp
Wonton Wrapper
Chicken breast
Salt
Black pepper
10 oz
8 oz
¼ tsp
1/8 tsp
1/3 cup
1
Fresh spinach
Button mushroom
Salt
Black pepper
Grated Parmesan cheese
Egg (whisked with 1 teaspoon water)
14 oz
1/8 cup
1 ¼ Tablespoon
Reduced fat cream cheese
Heavy whipping cream
Sour Cream

Directions:

* If you plan to make my pasta sauce, it’s better to start with the sauce first as it takes 45-60 minutes to bake the tomatoes and garlic.

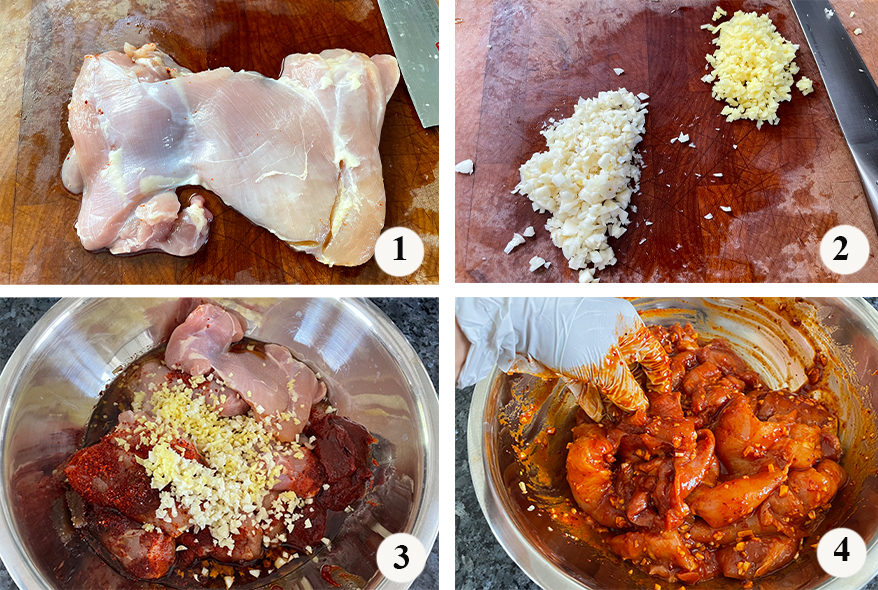
  1. Cut chicken breast into small pieces and marinate with ½ teaspoon of salt and 1/8 teaspoon of pepper. (Pic 1)
  2. Clean and slice mushrooms. (Pic 2)
  3. Blanch spinach after washing it – I steamed it for five minutes, then put it in very cold water.  Drain water and squeeze the spinach with your hands to remove all excess water. (Pic 3)
  4. In a large skillet heat 2 tablespoons of olive oil.  When it’s hot, add the mushrooms and season with ¼ teaspoon of salt and 1/8 teaspoon of pepper.  Cook until all the liquid has evaporated from the mushrooms, add chicken meat and stir fry until chicken meat is cooked (Pic 4).
  5. Add spinach and cook for 2 minutes (don’t worry about mixing all ingredients well as we will use a food processor to pulse the mixture).  Taste the mixture, add salt if necessary (Pic 5).
  6. Place mixture into the bowl of a food processor, pulse until you get a coarse texture.
  7. In a bowl, combine cream cheese, heavy whipping cream and sour cream together.  Mix well.
  8. Place chicken mixture in a bowl and stir in 3-4 tablespoon of Parmesan cheese (if you like it cheesy, add more) and 3-4 tablespoons of the cream cheese mixture.  Taste to check for seasoning and set aside. (Pic 6)
  9. Using a pastry brush, brush the edges of the wonton wrapper with egg wash. (Pic 7)
  10. Place a tablespoon of filling in the center of the wrapper. (Pic 8)
  11. Place another wonton wrapper on top of the filling, press edges firmly and use a round cookie cutter to cut a round shape.  (Pic 9)
  12. In a large pot, bring to a boil 4 quarts of salted and oiled water.  Carefully add small batches of ravioli, about 4 at a time.  Cook for 5 minutes.

How to make ravioli

Roasted garlic, tomato and basil sauce:

I have tried using cherry tomatoes for the sauce and the flavor is a huge difference.  Cherry tomatoes are sweeter and will give the sauce a richer taste.  Usually they are more expensive and you will need several packs to make the sauce.  If you cannot find any on sale, roma tomatoes are just fine.   I added shiitake mushrooms and onion to make the sauce a little thicker this time.

Ingredients:

3 pounds
1 whole head
1/2
3
6
1/4 Cup
A pinch
Ripe tomatoes (Cherry tomatoes will be better)
Garlic
White Onion
Shiitake Mushrooms
Basil leaves
Olive Oil
Salt and pepper

pasta sauce baked tomatoes

Directions:

  1. Prehead oven to 350 F.
  2. Place peeled garlic in a heat-resistant container and add olive oil (enough to fully cover all the garlic cloves).
  3. Bake tomatoes and garlic for an hour, you will see garlic cloves will turn brown (if cherry tomatoes are used, reduce the baking time).
  4. In a large skillet, brown onion and add shiitake mushrooms, cook for 5 minutes.
  5. Puree tomatoes, roasted garlic, basil, onion and shiitake musrhoom in a food processor, add 2 teaspoons of salt, a pinch of pepper and 5 tablespoons of the olive oil that we used to bake the garlic.  You may want to add a tablespoon of brown sugar if tomatoes are not ripe enough.
  6. Spoon a little sauce in the bottom of the serving dish first (this keeps the ravioli from sticking to the plate), then add the ravioli with more sauce on top.  Sprinkle Parmesan cheese on top.

Pastasauce

The pasta sauce can be stored in the freezer up to 3 months.

Chicken Lettuce Wraps


Chicken Lettuce Wraps

When it comes to Chinese cooking, we spend quite a lot of time in preparation (to cut, dice, mince, julienne, chop, etc.).  As a working mom, lettuce wraps is only a weekend dish as I don’t have enough time to cook it after work.  People may find this recipe complicated but it’s worth your time and once you get a handle on it, it is pretty easy.  There are a lot of 30 minute meal recipes, but sometimes we just need to slow down and enjoy cooking and eating.

Marinate for Chicken:

2 pounds
1 tsp
1 Tbsp
2 tsp
1 tsp
Chicken breasts (ground)
Cornstarch
Light soy sauce
Rice cooking wine
Salt

Ingredients:

8
5 Tbsp
1 Tbsp
1 Tbsp
2 stalks
2-3
10
1 package
1 head
Dried shiitake mushrooms (soaked and diced)
Oil
Fresh ginger (minced)
Garlic (minced)
Green onions (cut into small pieces)
Small dried chilies (Optional)
Fresh water chestnuts (minced)
Chinese vermicelli
Iceberg Lettuce

Cooking Sauce:

3 Tbsp
3 Tbsp
3 Tbsp
6 Tbsp
6 Tbsp
3 tsp
3 tsp
6 tsp
Hoisin sauce
Light soy sauce
Rice cooking wine
Oyster sauce
Water
Sesame oil
Light brown sugar
Cornstarch

Directions:

  1. To deep fry the vermicelli, pour 1 cup of oil into a saucepan over medium low heat.  Make sure the oil is hot enough by dropping one noodle into the oil. If the noodle immediately puffs and turns white, the oil is ready.  Fry the noodles in batches, make sure you won’t crowd the pan. Remove the noodles as they puff, and drain them on paper towels.
  2. Cover mushrooms with boiling water, let stand 30 minutes then drain.  Discard woody stems and dice mushrooms, set aside.
  3. Mix all ingredients for cooking sauce in a bowl and set aside.
  4. In a medium bowl, marinate chicken with cooking wine, soy sauce, salt, pepper and cornstarch.  Let it sit for 15 minutes.
  5. Add 3 Tbsp oil to a saucepan/wok over high heat, stir fry chicken until cooked.  Set aside.
  6. Add 2 Tbsp oil to a clean saucepan/wok, add ginger, garlic and chilies.  When garlic is slightly brown, stir in water chestnuts and mushrooms (about 2 minutes).  Return chicken to pan, add 1/3 of the cooking sauce and keep stirring.  The chicken should have a nice coat of sauce, if you see any white part (without a coat of sauce), add more sauce in.
  7. Turn off the fire and sprinkle green onions on top.
  8. Spoon chicken mixture into lettuce leaf and top with cooked vermicelli.
  9. The remaining sauce can be saved and served on the side with the lettuce wraps.  I normally like to bring the sauce to a boil or you can just serve it without cooking.

Note:  To save time, you can buy ground chicken at the market.  I like to rinse the meat before cooking and ground it myself with a food processor.